Cover Measuring Form PDF Details

Are you in the market for a new mattress? If so, you'll want to make sure that you get the perfect fit for your needs. One way to do that is by measuring your bed before you go shopping. In this blog post, we'll show you how to do just that. We'll also provide some tips on what to look for when choosing a mattress. So, whether you're upgrading your old mattress or buying your first one, read on for all the information you need!

QuestionAnswer
Form NameCover Measuring Form
Form Length8 pages
Fillable?No
Fillable fields0
Avg. time to fill out2 min
Other namescoverlogix safety cover measure form, safety measuring form, how to measure rectangular inground pool cover, pool cover measuring form

Form Preview Example

Meyco Safety Covers

Safety Cover

Measuring Form

Measuring Your Pool is EASY!

There are 6 STEPS to filling out this form. Please follow directions carefully.

1.

Your Name:

Address:

City:

Phone:

Fax or Email:

State:


Zip:

Today’s Date:

After completion, submit this form

Digitally Online or by Mail/Fax

Email Form: customsales@doheny.com

Mail Printed Form:

6950 51st Street, Kenosha, WI 53144

FAX Printed Form: 800-786-5650

Customer Representative:

2.CHOOSE YOUR TYPE OF SAFETY COVER: ALL SAFETY COVER WARRANTIES ARE PRO-RATED.

Hinsperger Safety Covers Ships in 10-14 business days.

10 Year Warranty Standard Solid with Drain

10 Year Warranty Standard Solid with Pump

10 Year Warranty Aquamaster Lightweight Solid with Drain

10 Year Warranty Aquamaster Lightweight Solid with Pump

12 Year Warranty Standard Mesh (5 ft x 5 ft spacing)

12 Year Warranty 99% Sun-block Mesh (5 ft x 5 ft spacing)

15 Year Warranty Standard Mesh (3 ft x 3 ft spacing)

15 Year Warranty 99% Sun-block Mesh (3 ft x 3 ft spacing)

25 Year Warranty Commercial Mesh

GLI Safety Covers Blue and green covers ship within 3 business days.

10 Year Warranty Economy Solid with Drain Specify blue or green.

10 Year Warranty Economy Solid with Pump Specify blue or green.

12 Year Warranty Standard Solid with Drain Specify blue or green.

12 Year Warranty Standard Solid with Pump Specify blue or green.

12 Year Warranty Standard Mesh Specify blue or green.

15 Year Warranty Hyper-lite Solid with Drain Specify blue or green.

15 Year Warranty Hyper-lite Solid with Pump Specify blue or green.

15 Year Warranty 99% Sun-block Pro-Mesh Specify blue, green, tan, or gray.

Ships in 10-14 business days.

12 Year Warranty Perma-Guard Solid with Drain

12 Year Warranty Perma-Guard Solid with Pump

12 Year Warranty 95% Sun-block Meycolite Mesh

12 Year Warranty 99% Sun-block Rugged Mesh

6950 51st Street Kenosha WI 53144 | Custom Orders: 1-800-574-7665 option 3 | Fax: 1-800-786-5650 | Doheny.com

3.CHOOSE YOUR POOL CORNER TYPE:

2

1

90º

Imaginary Lines

2


1

Cut Corners

Measurement from

Point 1 to Point 2:

Inches

Square Corners

No measurement is required for Square Corners

Radius Corners

Measurement from

Point 1 to Point 2:

Inches

2

6950 51st Street Kenosha WI 53144 | Custom Orders: 1-800-574-7665 option 3 | Fax: 1-800-786-5650 | Doheny.com

4.CHOOSE YOUR POOL SHAPE AND FILL IN DIMENSIONS BELOW

A

Round

A

deep

end


B

B

B

Oval

C

C1

shallow end

B

A

D

C6

C4

C3

deep end

C2

C1

B

E

Grecian

C5

C6

shallow end

C7

C8

C


C2


C3


deep end


shallow end


A


Rectangle


C1


C4

G

H


deep

A


end


K

C2C3

E

F

Lazy “L” Right

D

IC1-C6:Diagonal measurements must

C5 be taken to imaginary squared off cornersJ

shallow

end

C

C4

A

F

C2


H


deep

G


end


I


C1


B

C

Roman

C3

J

end


shallow


E


K


C4

D

F


E


C2

C3


deep

K

A


end


G

H

C1

B

C4

end

C


shallow


J

C1-C6:Diagonal measurements must

C5

Ibe taken to imaginary squared off corners

D

C6

Lazy “L” Left


C4


D


C5


shallow end


C


C2


C3


E


deepend


F


A


True “L” Left


C1


C6


B


C1


B


C6


deep


True “L” Right


A


F


end


C3


E


C2


C


shallow end


D


C4


C5


FILL IN THE DIMENSIONS HERE.

The above pools are 5 x 5 (strap spacing) unless otherwise specified.

A.


Feet


Inches

B.


Feet


Inches

C.


Feet


Inches

D.


Feet


Inches

E.


Feet


Inches

F.


Feet


Inches

G.


Feet


Inches

H.


Feet


Inches

I.


Feet


Inches

J.


Feet


Inches

K.


Feet


Inches

6950 51st Street Kenosha WI 53144 | Custom Orders: 1-800-574-7665 option 3 | Fax: 1-800-786-5650 | Doheny.com

5a. MEASURING INSTRUCTIONS FOR PLOTTING A FREEFORM, NON-STANDARD SHAPED POOL:

IF YOU HAVE AN EXISTING SAFETY COVER all measurements have to be filled out for your pool, plus a second set of measurements from your A & B points to the existing anchor locations.

A.Begin by sketching the basic inside shape of the pool on the grid page provided. Sketch and label all non-removable details within four (4) feet of the inside pool edge (i.e. coping width, grab rails, waterfalls, spas, ladders, raised walls, uneven decks, planters, dive board stand, slides, etc.).

B.Starting at a distinctive point (i.e. a crack in the deck, a space in the coping, etc.) make marks at roughly three (3) foot intervals around the entire pool numbering the marks as point 1, point 2, and so on, until you return to within three (3) feet of the starting point.

Make marks at one (1) foot intervals for areas with any tight radius, rocks, raised walls, waterfalls, spas, or similar obstructions. Mark points along spa side and pool side of dividing wall, include width of spa wall or distance between spa and pool if separated. Note: Number and label all corners, fill spouts, step section corners, all non-removable objects, etc. Mark front and back of ladders and hand rails to better identify locations.

C.Now establish two points at least three (3) feet from the edge of the longest side of pool (it is best to use distinctive marks for future reference). Label one point as A and the other point as B. The distance between the two points should be roughly 2/3rds of the length of the pool (i.e. if pool is 30ft there would be a 20ft distance between points A and B). Note: The line between point A and point B should NOT cross the pool’s edge.

D.Attach, or have a partner hold, one end of a measuring tape to point A. Measure distance from point A to point 1, A to point 2, and so on. Record measurements on the measuring sheet provided, see visual example for details. Once all measurements have been recorded from point A, move measuring tape to point B and measure distance from point B to point 1, B to point 2, and so on, recording measurements on measuring sheet.

Note: Pull the tape tightly on each measurement.

E.Pick two (2) numbered points on pool edge representing roughly the overall length of the pool at the waterline. List this measurement on measuring sheet. Do the same for the width of the pool and enter measurement on measuring sheet.

EXAMPLE: OVERALL POOL MEASUREMENTS – POINT TO POINT:

Distance from - Point

A

to Point

B

:

25

ft

0

in


Overall Pool Width - Point

17

to Point

48

:

17

ft

0

in


Cross Dimensions Width - Point

11

to Point

52

:

14

ft

0

in


Cross Dimensions Width - Point

27

to Point

43

:

23

ft

0

in


Overall Pool Length - Point

6

to Point

38

:

37

ft

9

in


Cross Dimensions Length - Point

12

to Point

35

:

24

ft

7

in


Cross Dimensions Length - Point

46

to Point

39

:

14

ft

2

in


19 SLIDE LEGS

18

HAND RAILS

EXAMPLE: A & B MEASURMENTS

PT.

A

B

1

5’2”

27’6”

2

8’4”

29’2”

3

11’8”

32’6”

4

15’8”

36’6”

5

CONTINUE

CONTINUE

6


7


8


9


10


11


12


13


14


15


16


17


18


19


20


21


22


23


24


25


Continue taking the A & B measurements for as many numbered points that you have on your pool.

16

15

14

24

25


17


20


23

26

28

29

21


27


ROCKS


9

11


10


8


7


DIVING


14’0”

BOARD


BASE

5

6

Cross Dimensions:


4

3


2


13

12

49

Overall Width: 17’0”

22

Cross Dimensions: 24’7”

Overall Length: 37’9”

48

47


46

SPA WALL

SPILLWAY

Cross Dimensions: 23’0”

34

SPA

30


35

33

31 36


32

37

12 INCH

COPING


38

INSIDE

COPINGOUTSIDE COPING

1

52

50

51


Cross Dimensions: 14’2”

39


44

42

40

PLANTER


43


41


45


Please note: The measurements from


the numbered points should all touch


A and B at the exact same point.

A

25’

SWIM OUT/STEP SECTION


B

5b. DRAW POOL ON GRID BELOW, CAREFULLY FOLLOWING INSTRUCTIONS ON PREVIOUS PAGE.

MAKE OF POOL:

5c.FILL IN MEASUREMENTS IN COLUMNS BELOW (see Measuring Example on page 2)

OVERALL POOL MEASUREMENTS

Point Distance

#to A

1

2

3

4

5

6

7

8

9

10

11

12

13

14

15

16

17

18

19


Distance from - Point

A


to Point

B :


ft


Overall Pool Width - Point


to Point

:


ft


Cross Dimensions Width - Point


to Point

:


ft


Cross Dimensions Width - Point


to Point

:


ft


Overall Pool Length - Point


to Point

:


ft


Cross Dimensions Length - Point


to Point

:


ft


Cross Dimensions Length - Point


to Point

:


ft


Distance

Point

Distance

Distance


Point

Distance

Distance

to B

#

to A


to B

#

to A

to B


21


41


22


42


23


43


24


44


25


45


26


46


27


47


28


48


29


49


30


50


31


51


32


52


33


53


34


54


35


55


36


56


37


57


38


58


39


59


in

in

in

in

in

in

in

Point

Distance

Distance

#

to A

to B

61

62

63

64

65

66

67

68

69

70

71

72

73

74

75

76

77

78

79

20

40

60

80

6.MEASURE YOUR STEP END SECTION. CHOOSE APPROPRIATE STEP POSITION.

Left

Side

Position

L LeftEnd

W Position

Diving Board

Flush Steps

Right

Side

Right

End

Position

Position

A.Step Section Size:

(W) Width:


(L) Length:

Diving Board


Left


Side


Position


Y


X


X


Left


End


Position


Y


Center

Offset Steps


End


Position


Y


Right


End


Position


X


Y


X


Right


Side


Position

L

W

B.Offset Steps – Distance of step from corners:

(X) :(Y) :

Step Width (W): Measured from the water’s edge to the back of the step section. Step Length (L): Measure across one step from side to side.

6950 51st Street Kenosha WI 53144 | Custom Orders: 1-800-574-7665 option 3 | Fax: 1-800-786-5650 | Doheny.com

7. ADDITIONAL CUSTOM SAFETY COVER QUESTIONS – PLEASE ANSWER ALL QUESTIONS CAREFULLY

(Refer to 5a: Plotting a freeform non-standard shape pool for questions G-M)

A. Are there any ladders, hand rails or grab rails? Yes No

If any ladders, hand rails or grab rails are non-removable, please provide the following dimensions:

LADDER

A=

B =

WATER

HAND RAILS

A=

B =

WATER

GRAB RAILS

A =

B. COPING

WATER


Does your pool have rough concrete, brick or stone coping?


C.DECK

Is there at least 3 ft of concrete around the pool? Yes No

If no, is the deck made of wood, loose brick, loose stone, pavers, grass, other?

D.FILL SPOUT

What is the distance from water edge to the fill spout?

E.SLIDE LEGS

What is the distance from the water edge to each of the slide legs?

F.DIVING BOARD STAND

What is the distance from the water edge to the diving board stand?

G.GRAB ROCKS (Please send photo)

What is the distance from the water edge to each of the grab rocks?

H.RAISED BOND BEAMS/RAISED WALLS (Please send photo)

Very accurate dimensions are required of each end of beams/ walls. Also incude measurements along the obstructions. How high are the walls?

I.RAISED SPA (Please send photo)

What are the dimensions of each end of the spa, as well as points along the spa wall?

How high is spa raised above the coping?

Is there is a spillway that must be padded, what are the dimensions?

J.SPA WALL

How thick across is your spa wall?

K.FLUSH PLANTING AREA (Please send photo)

Will planter be strong enough to snap-hook cover to it?

What is the width of coping on this area?

What is the distance between coping and planter?

L.WATERFALLS/ROCKS (Please send photo)

Supply accurate dimensions for each end of obstructions, and at close 1 ft intervals between.

M.CHANGE DECK LEVELS (Please send photo)

Supply critical dimensions.

AGREEMENT BETWEEN DEALER AND POOL OWNER: Cover specifications above were provided by the Pool Owner.

Custom Safety Covers are NOT refundable. Pool owner assumes responsibility for ALL cover specifications. Allow approximately 3 weeks from date of order for delivery.

Pool Owner Signature:


Date:

6950 51st Street Kenosha WI 53144 | Custom Orders: 1-800-574-7665 option 3 | Fax: 1-800-786-5650 | Doheny.com

How to Edit Cover Measuring Form Online for Free

Whenever you need to fill out window measurement pdf, you don't need to install any kind of applications - simply use our online tool. The tool is consistently updated by our staff, acquiring new features and turning out to be greater. This is what you'd need to do to start:

Step 1: Just click the "Get Form Button" at the top of this site to launch our pdf editor. Here you'll find everything that is necessary to fill out your file.

Step 2: With our state-of-the-art PDF tool, you may do more than simply complete blanks. Express yourself and make your documents appear perfect with customized text added in, or fine-tune the file's original input to excellence - all comes with an ability to add almost any images and sign the file off.

With regards to the blanks of this precise PDF, here's what you should do:

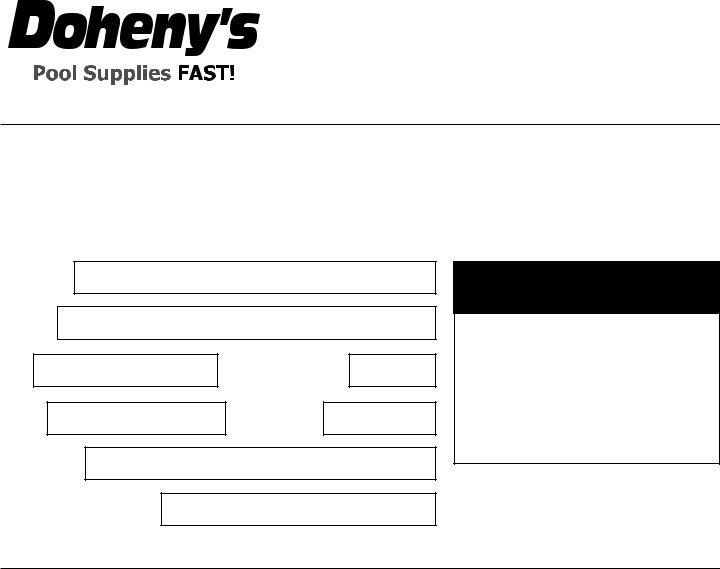
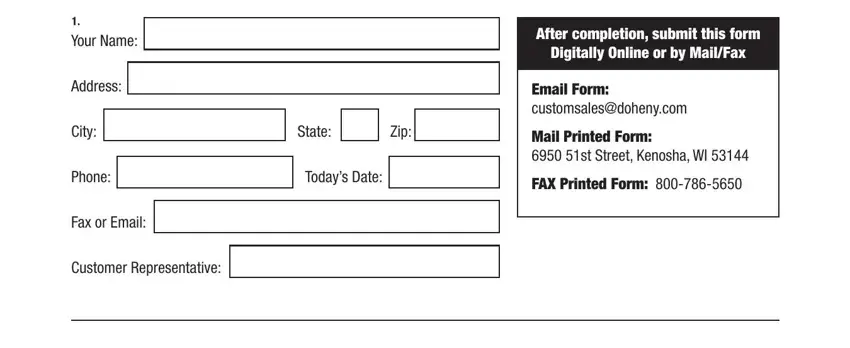
1. Before anything else, once filling out the window measurement pdf, start with the section containing subsequent blank fields:

Step no. 1 for filling in interim life safety measures forms

2. Just after this part is filled out, go to type in the relevant information in all these - Hinsperger Safety Covers Ships in, GLI Safety Covers Blue and green, Year Warranty Standard Solid, Year Warranty Standard Solid, Year Warranty Economy Solid with, Year Warranty Economy Solid with, Year Warranty Aquamaster, Year Warranty Standard Solid, Year Warranty Aquamaster, Year Warranty Standard Solid, Year Warranty Standard Mesh ft, Year Warranty Standard Mesh, Year Warranty Sunblock Mesh ft, Year Warranty Hyperlite Solid, and Year Warranty Standard Mesh ft.

Step number 2 of completing interim life safety measures forms

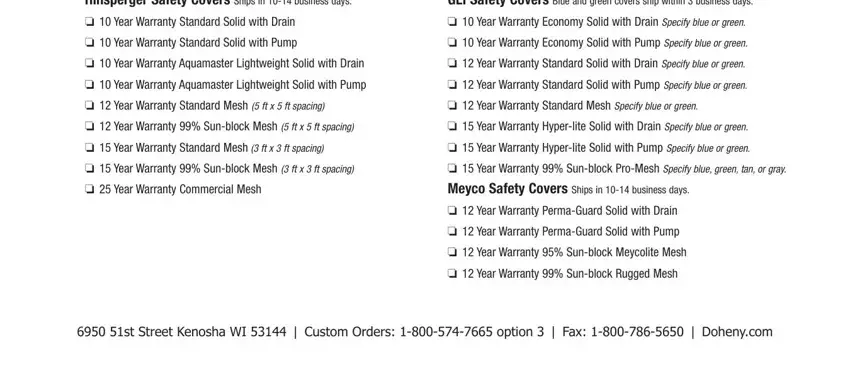
Concerning GLI Safety Covers Blue and green and Year Warranty Sunblock Mesh ft, be sure you take a second look in this current part. Both of these are viewed as the key ones in this file.

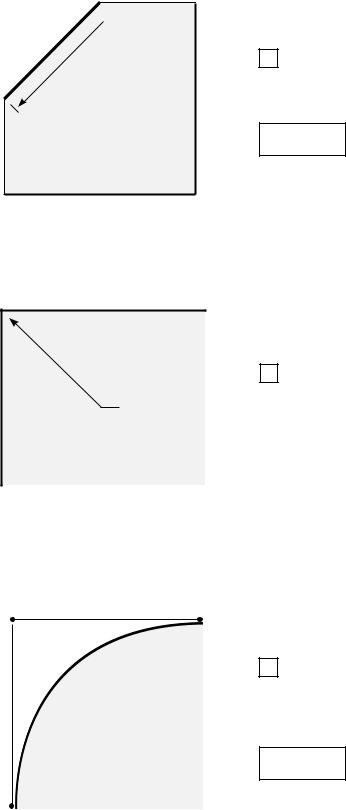
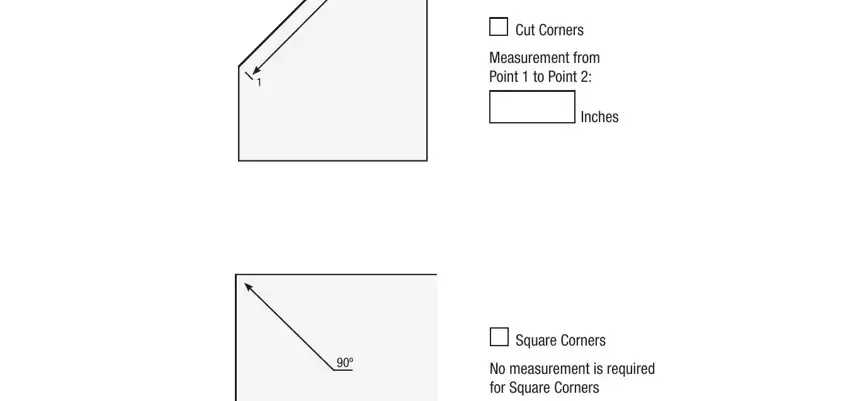
3. Completing Cut Corners, Measurement from Point to Point, Inches, Square Corners, and No measurement is required for is essential for the next step, make sure to fill them out in their entirety. Don't miss any details!

Completing segment 3 in interim life safety measures forms

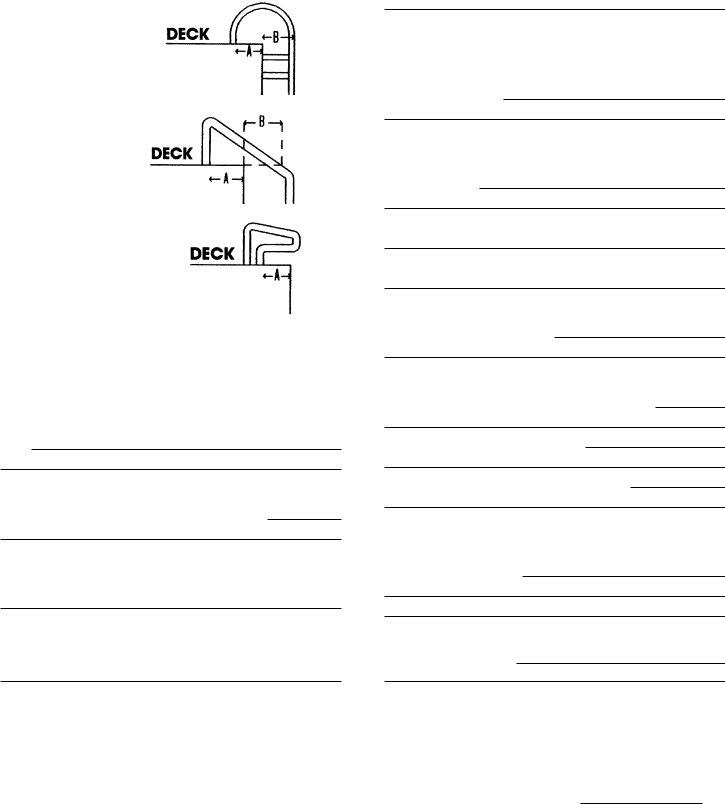
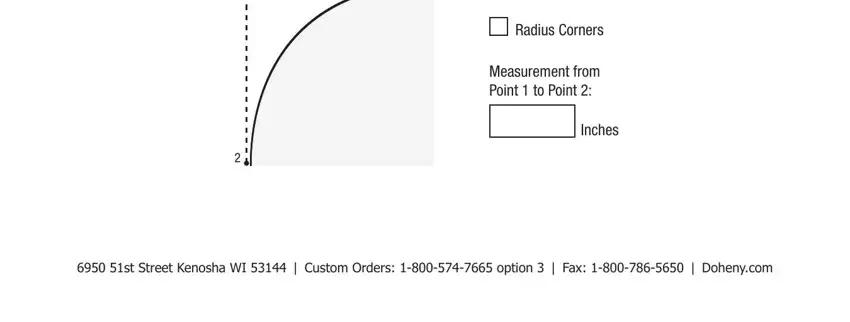
4. This next section requires some additional information. Ensure you complete all the necessary fields - Radius Corners, Measurement from Point to Point, Inches, and st Street Kenosha WI Custom - to proceed further in your process!

How to prepare interim life safety measures forms stage 4

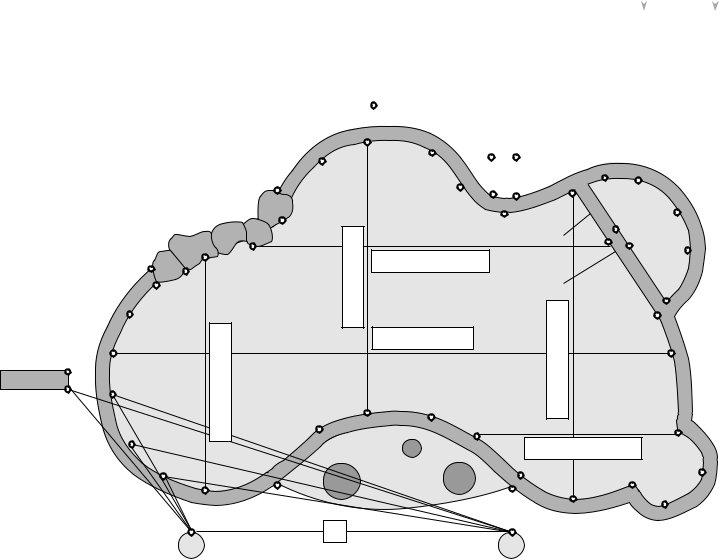
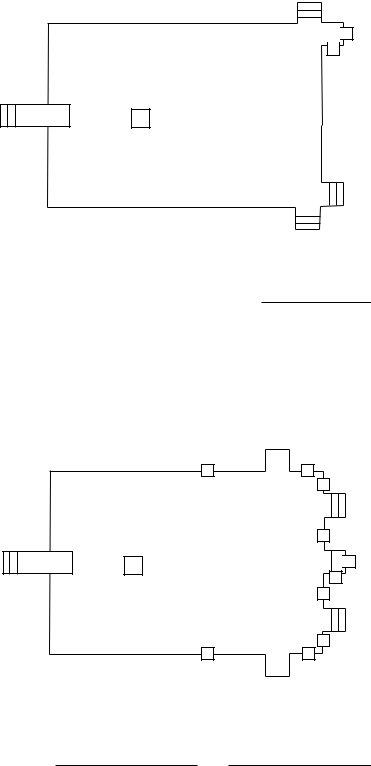
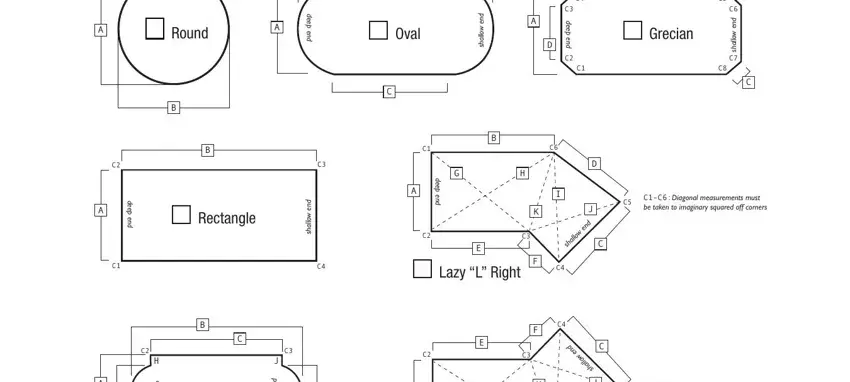
5. As you draw near to the finalization of the form, you will find just a few more things to complete. Mainly, Round, d e e p e n d, Rectangle, d n e w o, l l, a h s, d n e w o, d e e p e n d, d e e p e n d, Oval, d n e w o, l l, a h s, d e e p e n d, and Grecian must all be done.

Writing segment 5 of interim life safety measures forms

Step 3: Make sure that your details are correct and then press "Done" to conclude the project. Try a 7-day free trial account with us and acquire instant access to window measurement pdf - download or edit in your FormsPal account page. FormsPal is invested in the confidentiality of all our users; we make sure all personal data entered into our editor remains protected.