The cultivation of a family's legacy through the meticulous assembly of its historical narrative takes on a sophisticated form with the Family Tree Maker 2012, a software that acts as a bridge connecting past and present generations. This version, an upgrade from its predecessor, Version 16, offers users a suite of enhanced features designed to make the crafting and exploration of one's familial roots not only more interactive but intuitively navigable. It underscores the pivotal integration with Ancestry.com, allowing for seamless uploads and the syncing of trees, which in turn facilitates a connection with a vast network of other researchers. Among the major enhancements are the incorporation of Bing Maps for the visualization of ancestral locations, improved tools for sourcing data from a variety of records, and advanced options for organizing media items related to one’s lineage. Furthermore, users can anticipate a more consistent entry of location data, thanks to a standardized database, and revel in the ability to navigate their tree with ease due to a dynamic interface. The addition of robust charting and reporting tools, alongside the capability to import data from other genealogy programs, rounds off the reasons why upgrading to Family Tree Maker 2012 is considered beneficial. This article aims to provide an encompassing overview of these developments, underscoring how they contribute to the enrichment of personal history through the lens of genealogy.
| Question | Answer |
|---|---|
| Form Name | Family Tree Template Form |
| Form Length | 30 pages |
| Fillable? | No |
| Fillable fields | 0 |
| Avg. time to fill out | 7 min 30 sec |
| Other names | family tree template, family tree fillable, fillable customizable family tree template, family tree pdf worksheet |

Family Tree Maker® 2012
VERSION 16 UPGRADE GUIDE
Copyright © 2011
Ancestry.com Operations, Inc.
360 West 4800 North
Provo, Utah 84604 All rights reserved.
Ancestry.com and Family Tree Maker are registered trademarks
of Ancestry.com Operations, Inc.
All brand and product names are trademarks or
registered trademarks of their respective companies.
No part of this publication may be reproduced in any form
without written permission of the publisher.

TABLE OF CONTENTS
Top Ten Reasons to Upgrade |
1 |
What’s in Family Tree Maker 2012? |
2 |
TreeSync |
2 |
Importing and Exporting |
2 |
Charts |
3 |
Reports |
5 |
Media Items |
7 |
Web Integration |
8 |
Additional Tools and Features |
9 |
How Do I...? |
11 |
Navigate in the Software |
11 |
Start a Family Tree |
13 |
Enter Information about People in Your Tree |
14 |
Add Media Items |
16 |
Create Sources |
17 |
View Maps |
18 |
Create Charts |
19 |
Create Reports |
20 |
View Web Search Results |
21 |
Other Tasks |
22 |
Version Comparison Charts |
23 |
Frequently Asked Questions |
26 |

UPGRADING FROM VERSION 16 TO
FAMILY TREE MAKER 2012
You love Family Tree Maker and you’re comfortable using version 16. But you can’t help wondering what you’re missing out on and whether you should upgrade. Family Tree Maker 2012 has the
TOP TEN REASONS TO UPGRADE
1 |
Enjoy the beneits of more integration with |
|
Ancestry Member Trees (including photos and stories). Use TreeSync to upload and |
|
link your tree to Ancestry and connect with millions of other researchers. |
2 |
Access interactive street and satellite |
your ancestors’ lives using Microsoft® Bing Maps™. Or create a migration map to |
|
|
show event locations for an individual or family. |
3 |
Simplify source |
|
from homemade samplers and online databases to vital records. |
4 |
Organize media items more |
|
video items in one, |
|
your tree and incorporate them into charts and reports. |
5 |
Enter locations |
|
names consistently and in a standard format. |
6 |
Explore your data like never |
|
information and export to a variety of formats. Save settings in one report and |
|
apply them to a diferent report. |
7 |
Navigate your tree with |
|
multiple generations, navigate to any individual in your tree with a click of the |
|
mouse, and add or edit life events. |
8 |
Share your hard work with |
|
templates or use the powerful charting tools to design it yourself. Enhance charts |
with backgrounds, embellishments, and family photos.
9
10
Import data from other genealogy
Manage your tree eiciently and improve
1
WHAT’S IN FAMILY TREE MAKER 2012?
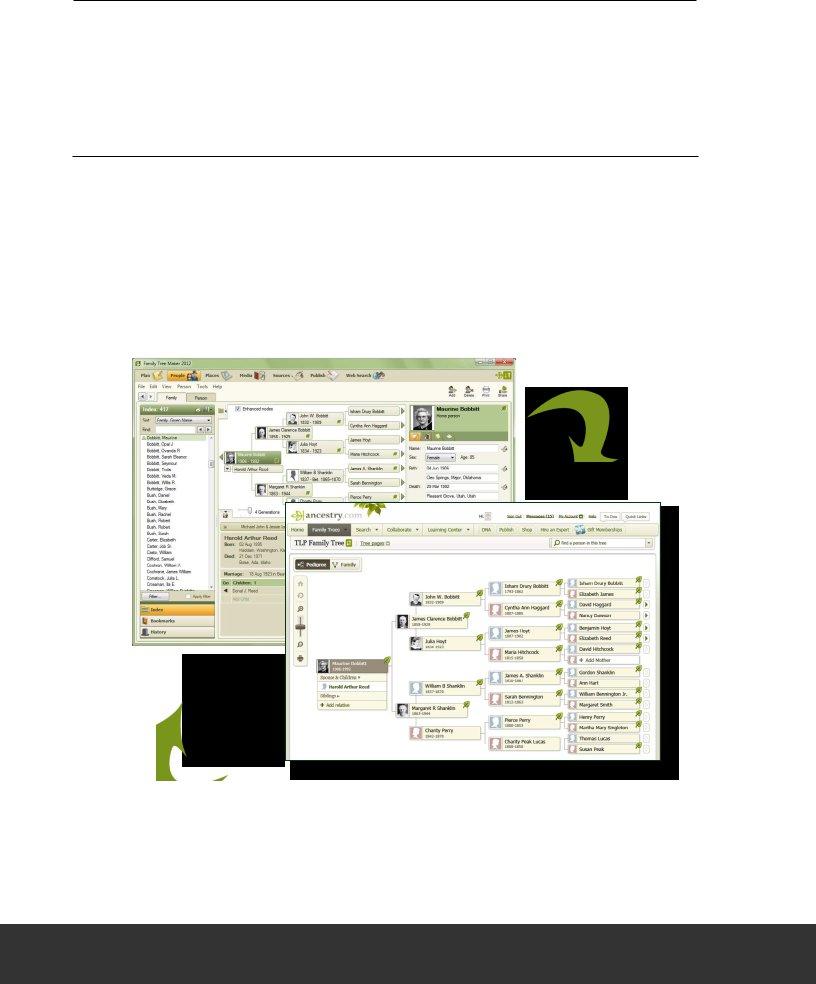
Family Tree Maker 2012 has everything you need to create a lasting family legacy. Beginners enjoy the easy navigation and
TREESYNC™
TreeSync gives you the freedom to access and update your tree no matter where you are. First, create your tree in Family Tree Maker. Then upload and link it to Ancestry.com. When you go to the library or a family member’s
IMPORTING AND EXPORTING
In addition to importing GEDCOMs, you can also import iles created in Legacy Family Tree, The Master Genealogist, and FamilySearch Personal Ancestral File. You can also share your iles with family members who use Family Tree Maker for Mac.
2
CHARTS
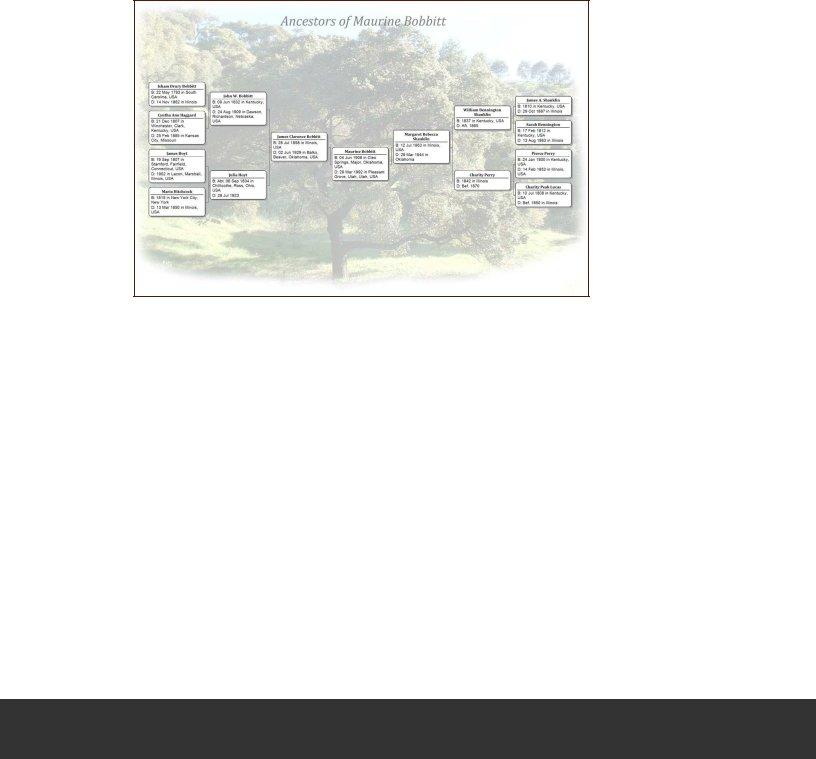
Do you like sharing your family history with your family and friends? If you do, you’ll want to try out some of the exciting new chart options available in Family Tree Maker 2012. You can also create your own custom templates, change fonts based on fact type, and enhance a chart with backgrounds, borders, and embellishments.
CREATE BOW TIE CHARTS
The bow tie chart is a fun alternative to the standard pedigree chart. In this chart the pri- mary individual appears in the middle of the tree, with paternal ancestors branching of to the left and maternal ancestors branching to the right.
VIEW AND PRINT CHARTS FOR RELATIONSHIPS
The relationship chart is a graphical representation of one person’s relationship to
VIEW YOUR ENTIRE FAMILY TREE IN ONE CHART
The extended family chart is similar to the
3
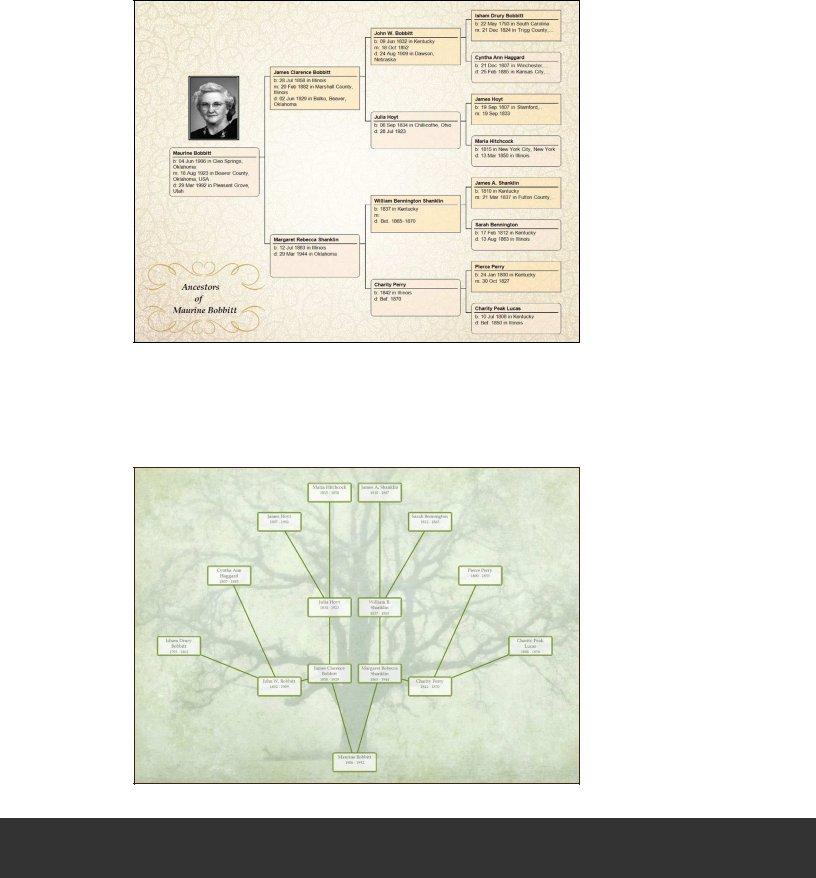
ENHANCE CHARTS WITH EMBELLISHMENTS, FAMILY PHOTOS, AND TEXT
You can personalize your charts and make them more appealing by adding family photo- graphs, borders and embellishments, and text. You can add images from your computer, pic- tures in the Media Collection, or use the borders and images included in Family Tree Maker.
CREATE FAMILY TREE CHARTS
Another new addition is the family tree chart. The primary individual appears at the bot- tom of the chart, with ancestors branching above him or her in a shape similar to a tree— paternal ancestors on the left, maternal ancestors on the right.
Maurine Bobbitt’s
Family Tree
4
REPORTS
New and improved reports let you explore your tree like never before. You can even save your settings for a report so you can use them again.
ACCESS MORE DESCENDANT REPORT FORMATS
Choose from four diferent numbering systems when creating descendant reports: NGSQ, Register, Modiied Henry, and d’Aboville.
SHARE YOUR MEDIA ITEMS
Family Tree Maker 2012 includes three media reports. The Media Item Report shows an item’s caption, date of origin, description, and individuals associated with the item. The Media Usage Report displays a thumbnail of every media item in your tree, lists its name and location, and shows which sources, facts, and individuals the item is linked to. A photo album can be created for a person or relationship and shows a basic summary of an individual’s life events, such as birth and death dates, and also includes all photos associ- ated with the person.
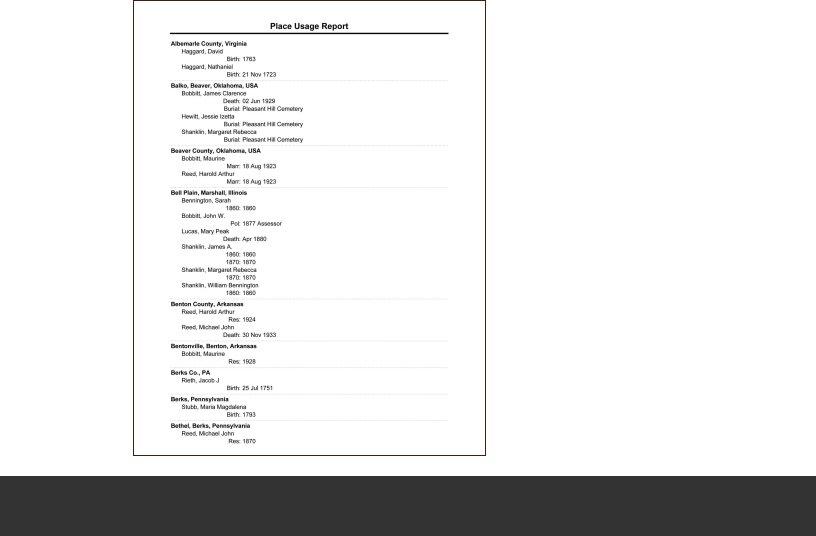
VIEW LOCATIONS YOU’VE ENTERED IN YOUR TREE
The Place Usage Report shows the locations you’ve entered into your tree and each person associated with that location. You can also include speciic events, such as birth or marriage, that occurred in a location.
5
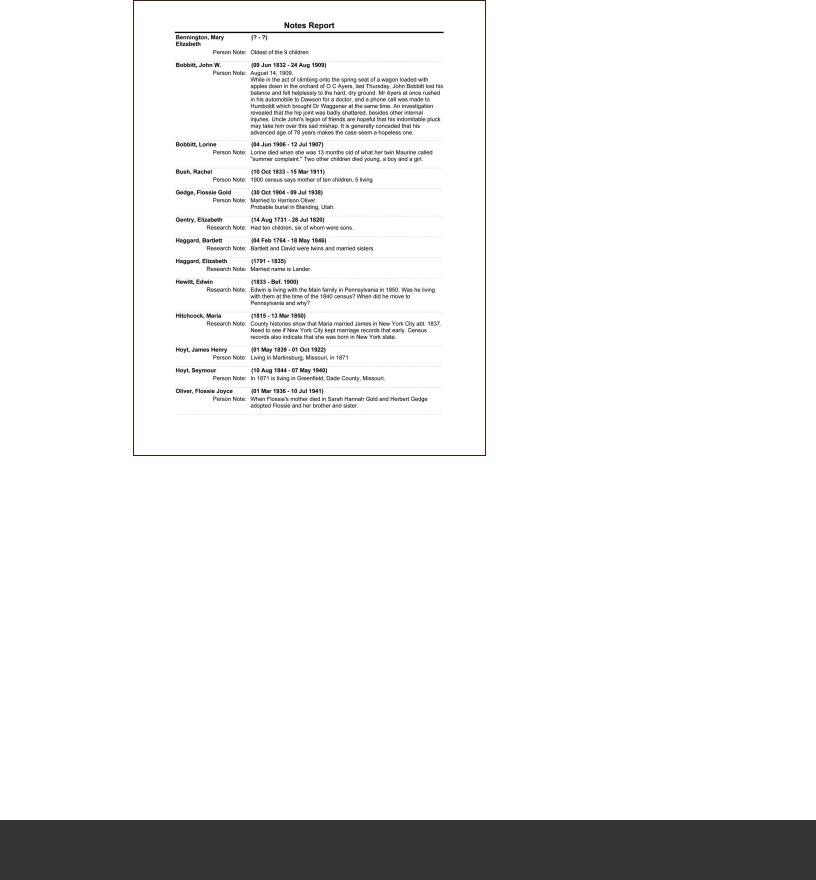
CREATE A LIST OF YOUR NOTES
The Notes Report lets you view the person, research, fact, and relationship notes you’ve entered for a speciic individual, all the individuals in your tree, or just the people you choose.
VIEW THE SURNAMES YOU’VE ENTERED IN YOUR TREE
The Surname Report makes a list of the surnames in your tree, including the total number of individuals with that surname, the number of males and females with that surname, and the earliest and most recent year a surname appears in your tree.
VIEW LDS ORDINANCES
Members of The Church of Jesus Christ of
6
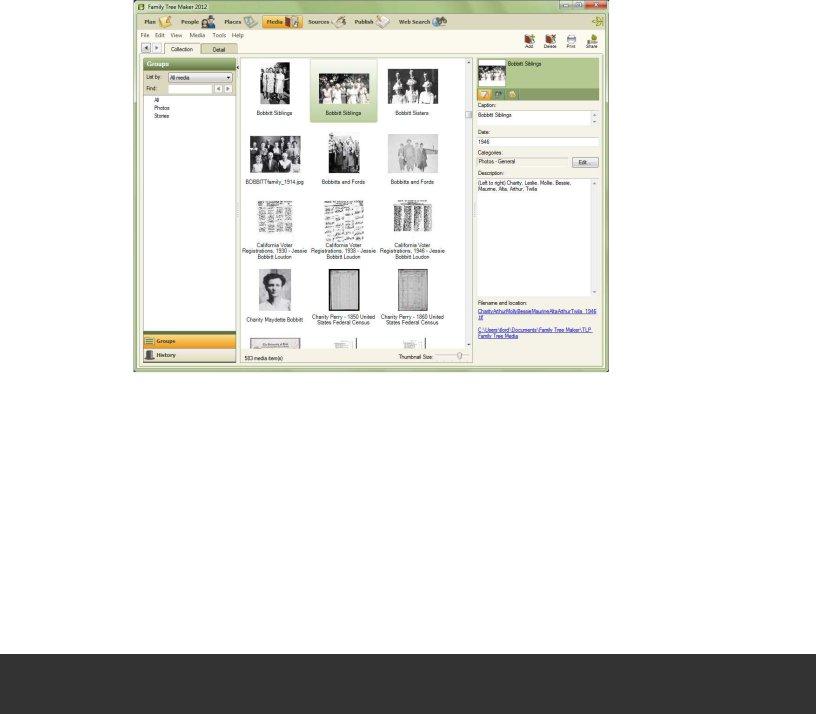
MEDIA ITEMS
If you want to really bring your family to life, you can illustrate your family history with photographs, important documents, and video and sound clips. Each time you add a media ile to your tree, the software can create a link between your tree and the original ile on your hard drive, rather than importing the entire ile into the tree. This minimizes ile sizes that might otherwise slow you down.
ORGANIZE AND MANAGE MEDIA FILES
The Media workspace acts as a storage space for all your media items. On the Media Col- lection tab you can view thumbnails of all your media items and enter information about them. On the Media Detail tab you can add notes for an item and link them to individuals and sources.
FIND MISSING MEDIA ITEMS EASILY
If you’ve moved your media items and Family Tree Maker has marked them as “missing,” the Find Missing Media tool can locate them all at once.
LINK A MEDIA ITEM TO MULTIPLE PEOPLE AND SOURCES
You may have a family photo that includes several individuals in your tree. You don’t have to add the picture to each individual; simply add it once to the media collection and then link it to the necessary individuals. You can also link media items to speciic facts and/or sources.
7
WEB INTEGRATION
The software’s tight integration with online resources lets you search for records, access your Ancestry.com account, and view
UTILIZE ANCESTRY MEMBER TREES
If you have an Ancestry Member Tree, you can download the tree into Family Tree Maker and use it to create a new tree or merge it with your currently open tree. And if you want to share your Family Tree Maker ile with others, you can upload your tree to Ancestry.com in one step; it will contain not only the dates, names, and places, but your media items, sourc- es, and links to Ancestry records too. With TreeSync, you can link your desktop and online trees together so you can update your tree anytime, anywhere.
KEEP UP WITH THE LASTEST NEWS FROM ANCESTRY.COM
One of the new Ancestry resources in Family Tree Maker is the Web Dashboard, which gives you quick access to your Ancestry subscription. You can log in to your account, access your Ancestry Member Trees, read the latest news from Ancestry.com and Family Tree Maker, and even see who else is researching the people in your tree.
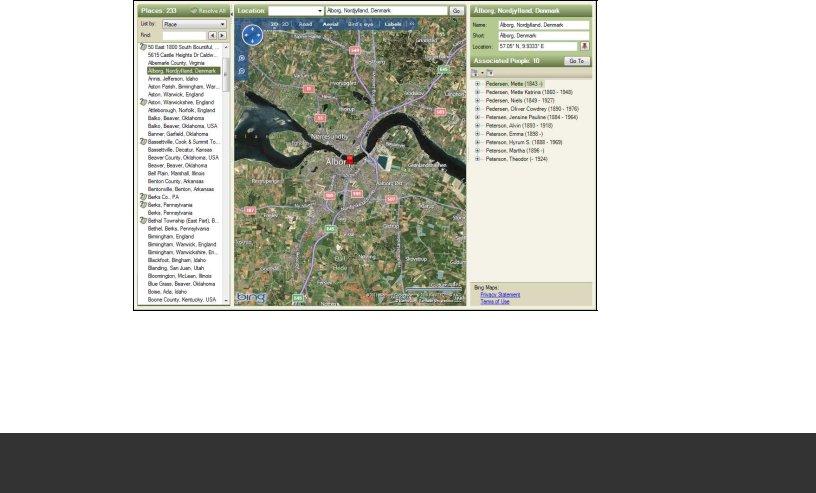
VIEW DYNAMIC ONLINE MAPS
Family Tree Maker has partnered with Microsoft Bing Maps to let you access some of the most exciting technology available today. Bing Maps takes you beyond typical road maps by combining them with special satellite and aerial imagery to let you experience the world as it looks today.
8
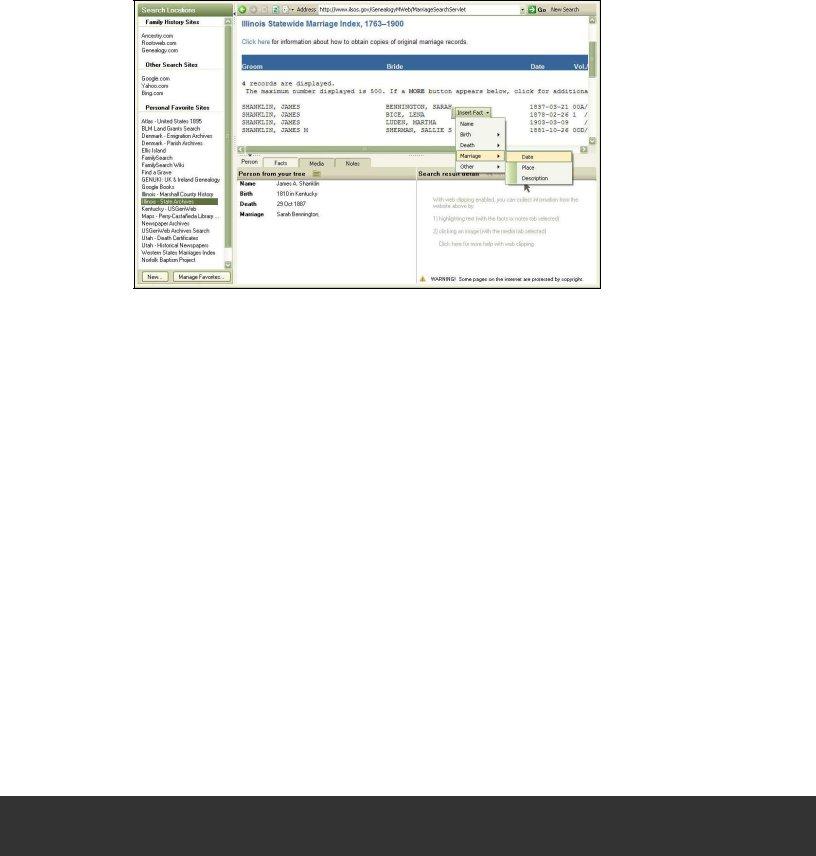
CAPTURE INFORMATION ANYWHERE ON THE WEB
You like being able to view Ancestry.com records within Family Tree Maker and merge them into your tree. Now you can search the entire Web and use the
ADDITIONAL TOOLS AND FEATURES
Family Tree Maker 2012 contains a variety of innovative, advanced tools that both beginner and expert genealogists will enjoy.
FIND DUPLICATE INDIVIDUALS
Fix errors before they become a problem. The Find Duplicate Individuals tool quickly compares names, birth and death dates, places attached to facts, and parents’ names and then creates a list of individuals who could possibly match each other.
CREATE AND DISPLAY CUSTOM FACTS
Although Family Tree Maker comes with a variety of default facts, you may want to create custom facts that work for your family tree. For example, if you are trying to track your ancestors by censuses, you may want to create a custom fact for each census year. You can also customize the editing panel on the Family tab to display any facts you like.
CREATE SOURCES MORE EFFICIENTLY
Family Tree Maker includes more than 170 source templates to help you source everything from homemade samplers and online databases to vital records. The source templates are based on the QuickCheck models used in Elizabeth Shown Mills’s book Evidence Ex-
9
KEEP LOCATIONS CONSISTENT
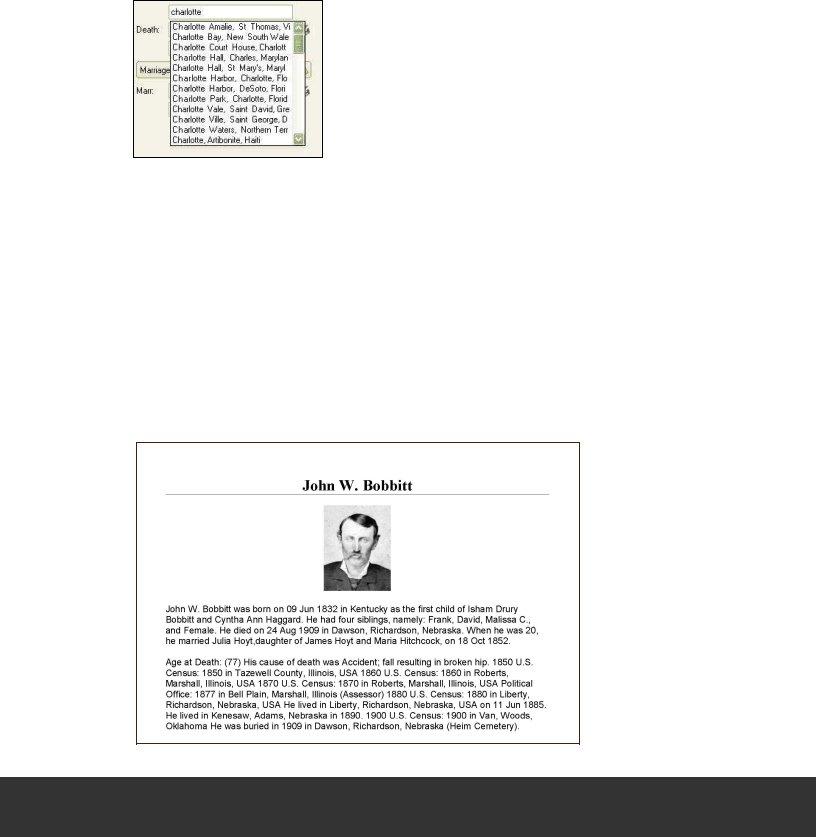
Recording locations in a complete and consistent manner is an important part of creating a quality family history. Family Tree Maker contains a place authority database of more than 3 million place names. When you enter a location name into your tree, Family Tree Maker automatically checks each place name against its database, looking for misspellings and missing data, such as missing counties.
CUSTOMIZE HISTORICAL EVENTS FOR TIMELINES
Family Tree Maker has a database of historical events from all over the world that can be used in timelines. You can edit, delete, and add to these historical events. In addition, when you create a timeline, Family Tree Maker looks at facts entered for an individual and displays the most
CREATE SMART STORIES™
If you’ve always wanted help starting your own family history book, this is the tool you’ve been waiting for. Smart Stories is a tool that helps you quickly ill up those blank pages by letting you use facts, sources, and notes you’ve already entered in your tree. Simply drag-
10
HOW DO I . . .?
Moving to a new version of software can be intimidating. You’re probably accustomed to using Family Tree Maker in a certain way and are wondering if you’ll be able to adapt to a new version. To help you get started, here are some common tasks and how they’re done in Family Tree Maker 2012.
NAVIGATE IN THE SOFTWARE
When you irst open Family Tree Maker 2012, you will immediately recognize many of the fea- tures and options you already use. And you’ll probably notice that Family Tree Maker has a new look and feel. After conducting user research and surveying customers, the interface was rede- signed to make Family Tree Maker even more
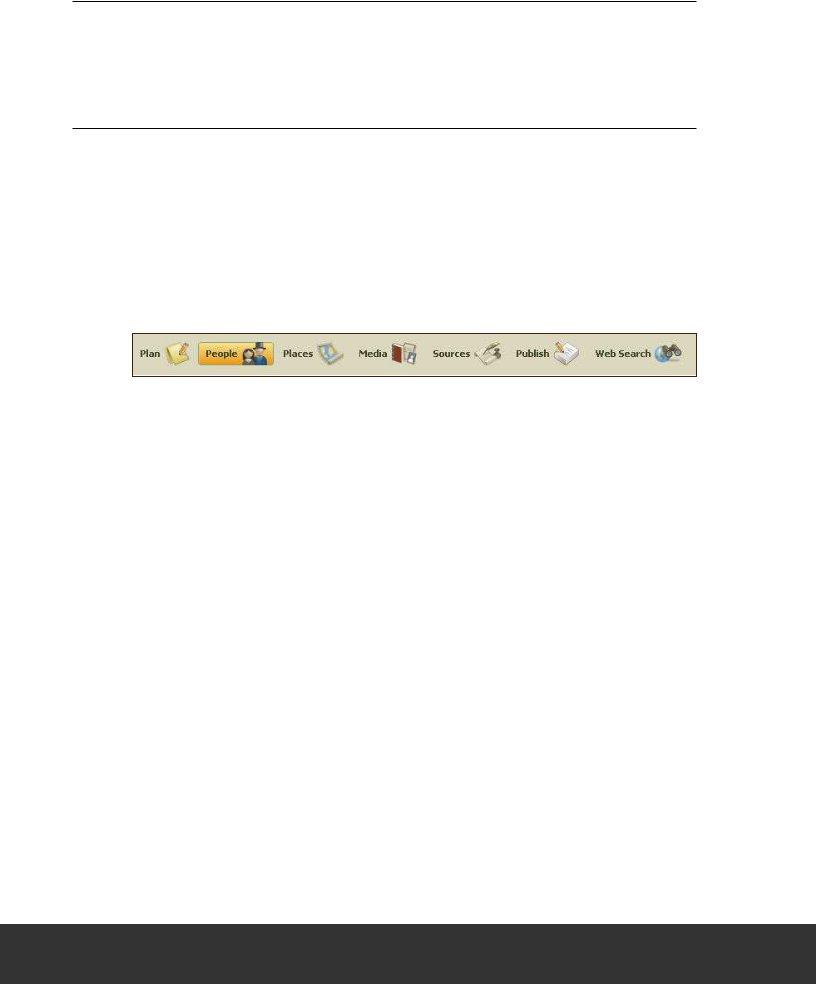
Once you understand the software’s basic structure, you can conidently begin building your tree. The main toolbar in Family Tree Maker, located at the top of the window, is designed to provide quick navigation to seven
PLAN
The Plan workspace is the “control center” where you can start a new tree, import existing trees, manage linked trees, view your
PEOPLE
The People workspace is where you enter information about individuals and families in your
PLACES
The Places workspace lets you view the locations you’ve entered for events and individuals— and gives you the opportunity to access dynamic street and satellite maps, too.
MEDIA
The Media workspace acts as a storage space where you keep your photos, audio recordings, movies, family documents, records, and more.
SOURCES
The Source workspace helps you organize and manage the sources that show where your fam- ily tree information came from.
PUBLISH
The Publish workspace ofers a variety of charts and reports that bring your family history to life as you share them with loved ones.
WEB SEARCH
The Web Search workspace lets you search the vast family history resources on the Web, includ- ing Ancestry.com, the world’s largest online family history resource.
11
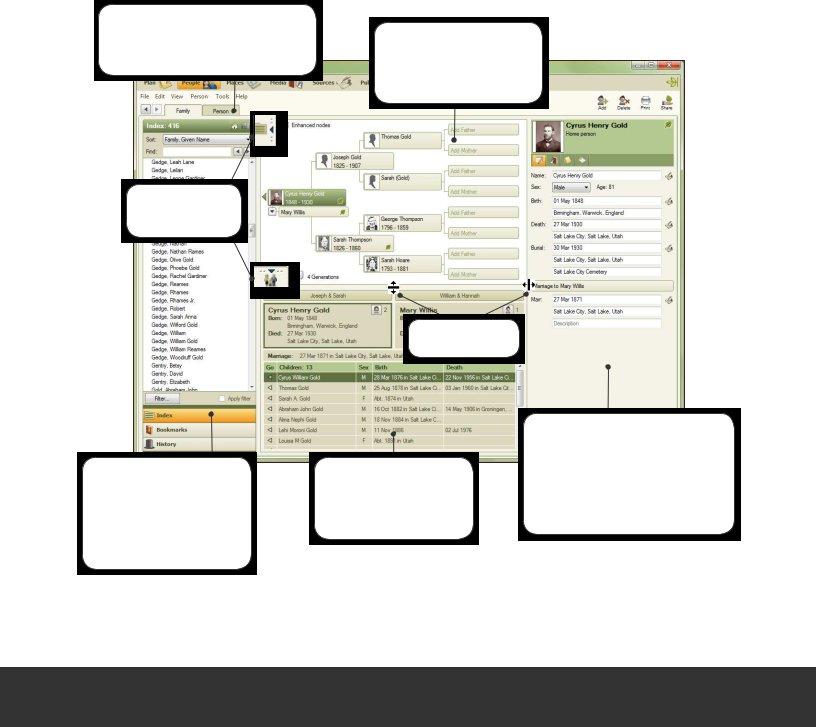
Perhaps one of the biggest changes you’ll notice is that the Family View and the Pedigree View have been combined into one view in Family Tree Maker 2012. They now appear together on the Family tab of the People workspace. By default, the People workspace displays the Index, pedigree view, family group view, and editing panel. (If you are upgrading directly from version 16, you’ll see a simpliied view that doesn’t include the Index panel.) If you feel overwhelmed by so much information or simply want the workspace to look more like the Family Tree Maker you’re used to, you can hide or resize each section of the workspace. To hide a section, simply click the small arrow next to it; click the arrow again to show the panel. To resize a panel, move the pointer to the edge of the panel until the resize cursor appears (two arrows with a line between) and drag the panel until it’s the size you want. To return a panel to its default size,
To add facts and notes for an individual in version 16, you use the Edit button in the Family View. In 2012, you can make these changes on the Person tab.
Click the arrows to show or hide panels on a workspace.
The pedigree view is much the same, and you can view an individual’s ancestors and descendants using the famil- iar navigation arrows.
The Index, Bookmarks, and History lists work the same in both versions. The “Spouses and Children” and “Parents and Siblings” options are no longer needed now that the views are combined.
Drag each panel to the size you want.
The family group view has a layout similar to the Fam- ily View in version 16 and includes much of the same functionality.
The editing panel is a new addition to Family Tree Maker. It displays vital facts for the currently selected per- son. You can also click the buttons in the toolbar to add media items, notes, and tasks for the individual. This panel can be customized to display any facts you want.
12
START A FAMILY TREE
VERSION 16
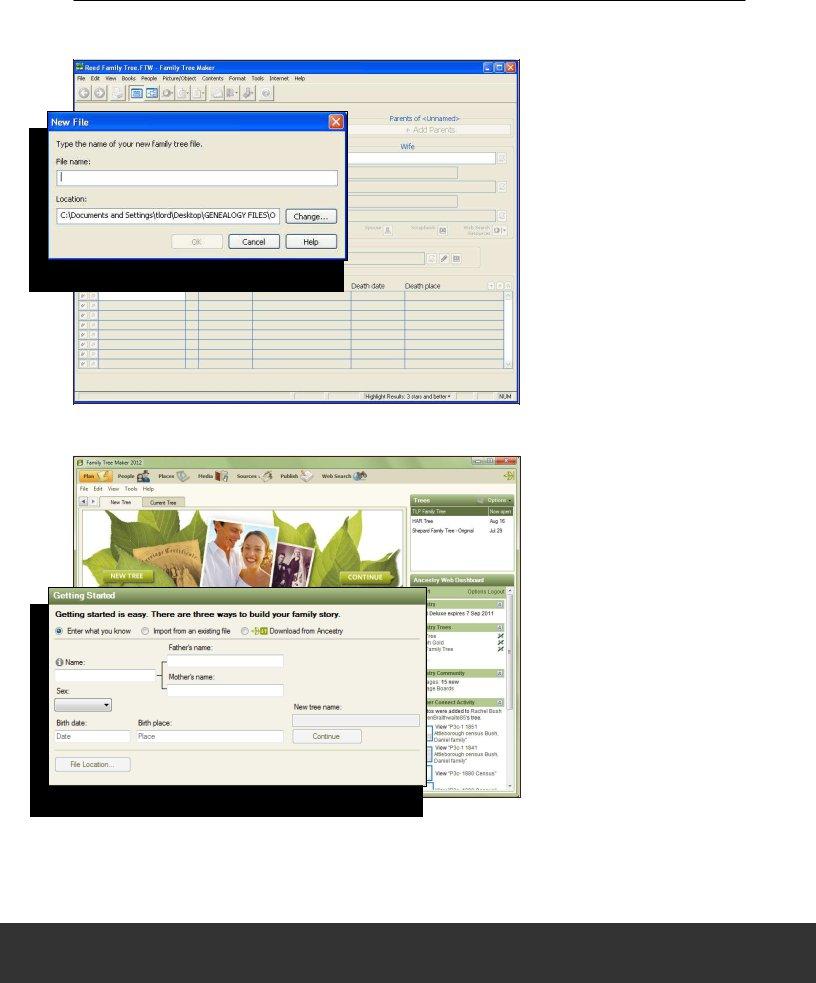
New trees are created using the New option on the File menu. You can also open a ile created in a previous version of Family Tree Maker using the Open option.
VERSION 2012
New trees are created on the New Tree tab of the Plan workspace. You can start a tree in three ways, (1) enter a few quick facts about an individual, (2) import a ile from a previous version of Family Tree Maker, a GEDCOM, Personal Ancestral File (PAF), Legacy Family Tree ile, or The Master Genealogist ile,
(3) or download a tree you’ve created on Ancestry.com.
13
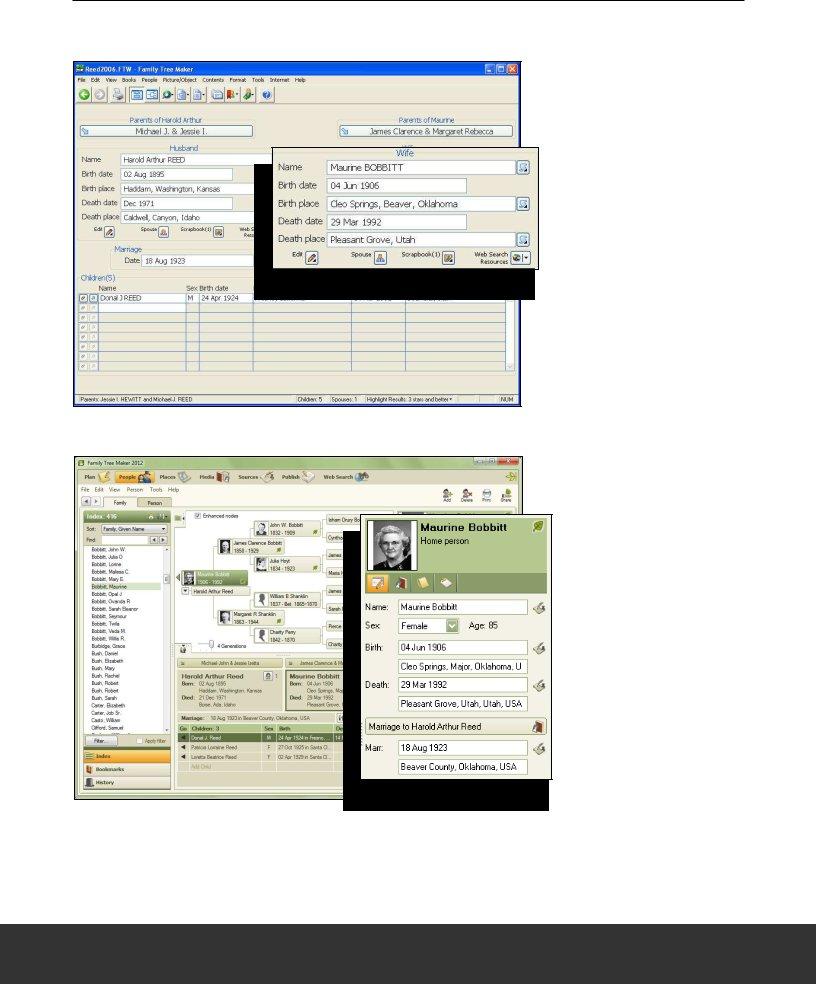
ENTER INFORMATION ABOUT PEOPLE IN YOUR TREE
VERSION 16
Basic details about an individual are entered in the Family View; you can add information about a marriage with the Edit Marriage Details button. By default, this view shows names, birth dates and places, and death dates and places.
VERSION 2012
Basic details about an individual are entered on the Family tab of the People workspace; you can add information about a marriage using the Marriage button. By default, the editing panel shows names, birth dates and places, and death dates and places; however, you can customize the editing panel to display any facts or events you want.
14
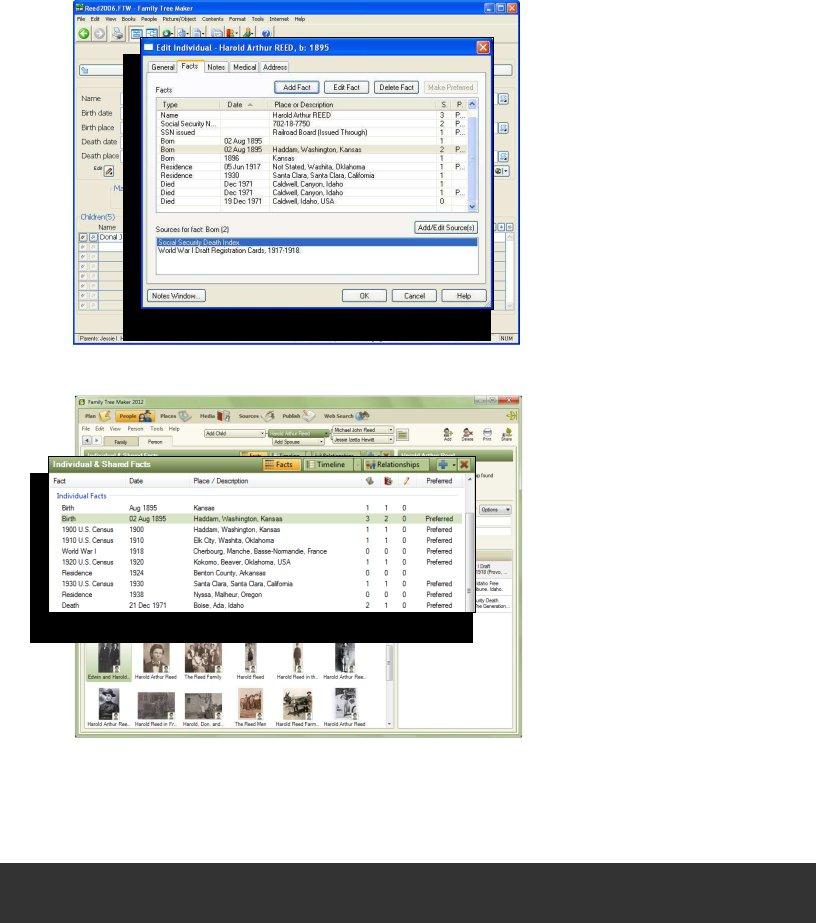
VERSION 16
More
VERSION 2012
More
15
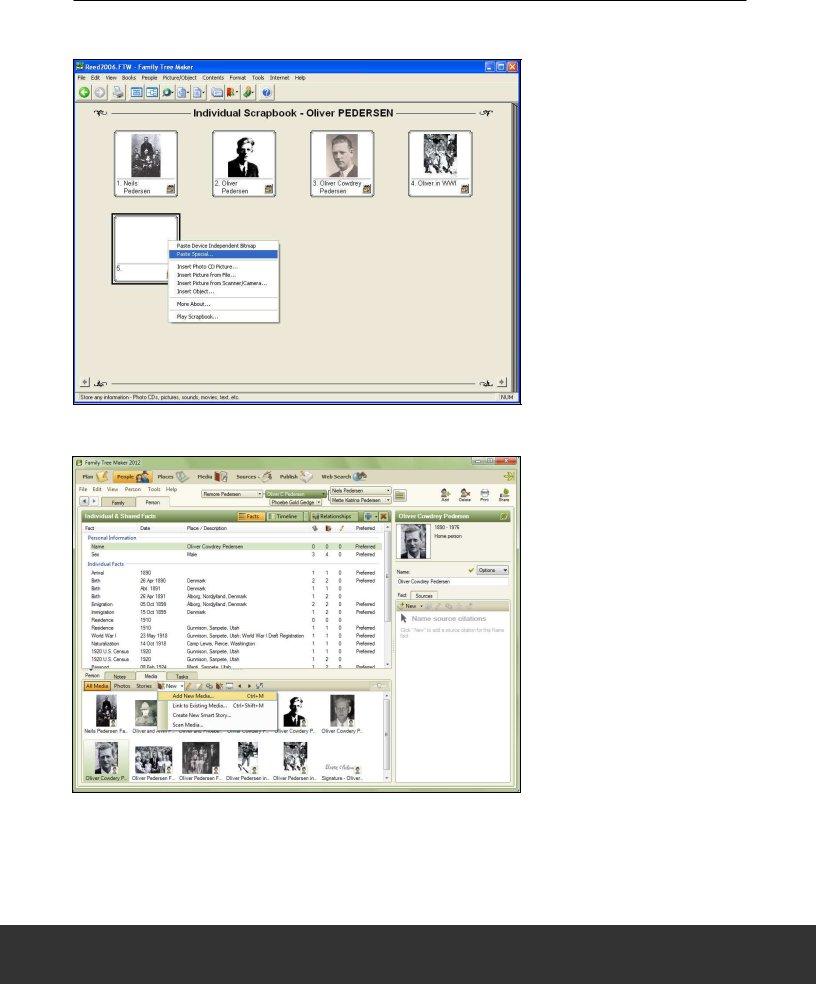
ADD MEDIA ITEMS
VERSION 16
Media items for an individual and/or marriage are added to scrapbooks on the Family View.
VERSION 2012
Media items can be added to an individual on the Family tab and Person tab. You can also add an item to the media collection on the Media workspace and link it to as many people and sources as you’d like.
16
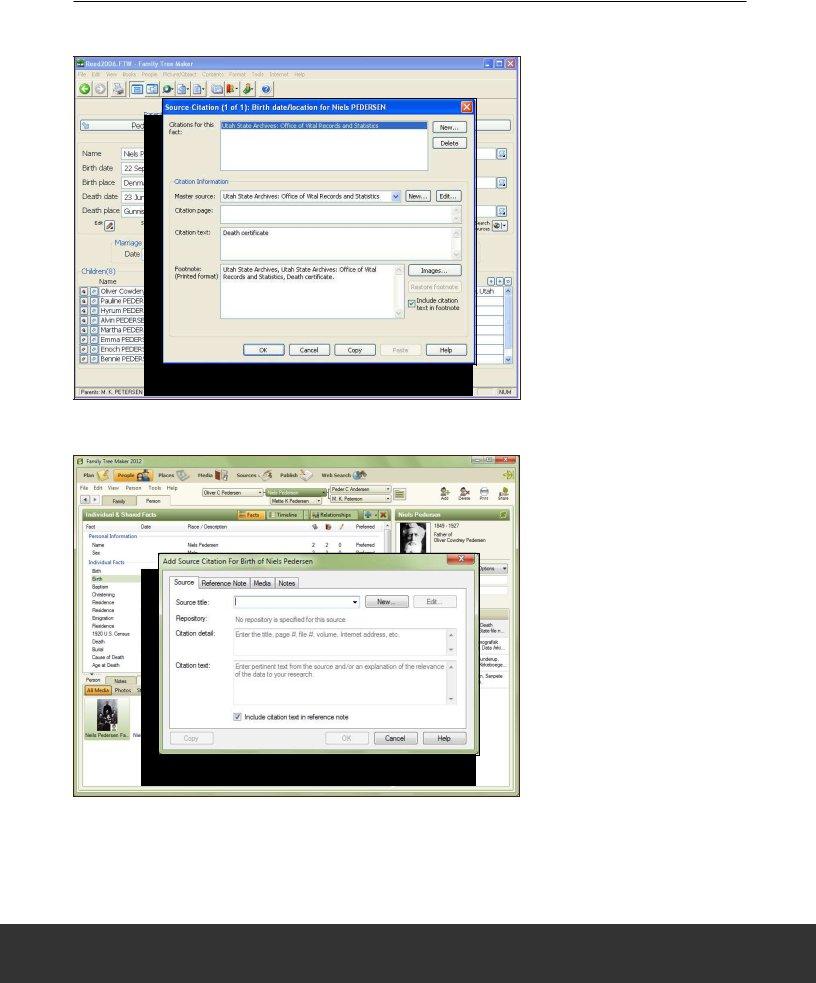
CREATE SOURCES
VERSION 16
Sources can be added to a tree using the Sources/Citations button. On the Source Citation window you can create a new master source and add citation information. The Images but- ton lets you link a media item to the citation.
VERSION 2012
Sources can be added to a tree using the Source Citation but- ton on the Family tab and the Sources tab on the Person tab. On the Source Citation window you can create a new source and add citation information. The Media tab lets you link a media item to the citation. You can also add a source to the Source workspace and link it to as many people and citations as you’d like.
17
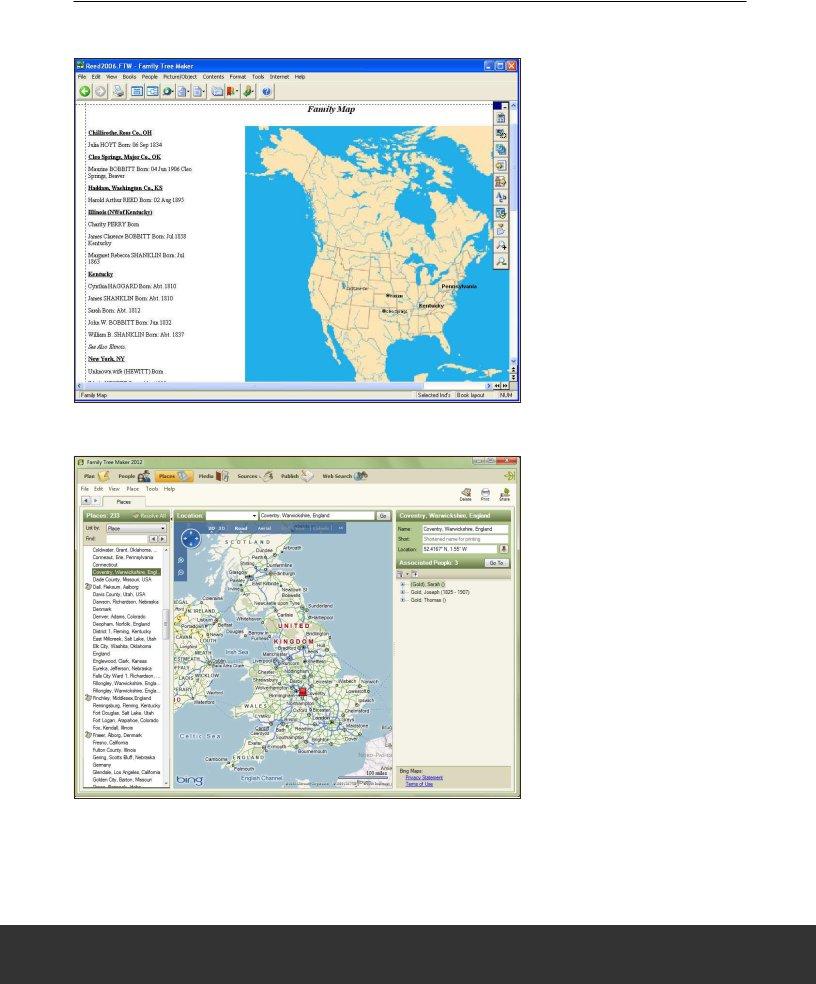
VIEW MAPS
VERSION 16
Relief maps are available us- ing the Map option on the View menu. You can view all the events that took place at a certain
VERSION 2012
Dynamic satellite and road maps are available on the Places workspace. The Places panel (on the left side of the window) shows every location you’ve entered in your tree. The details panel on the right side of the window shows the indi- viduals in your tree who have life events associated with the location. In 2012 you can also view locations as a migration path for an individual and add GPS coordinates for a location.
18
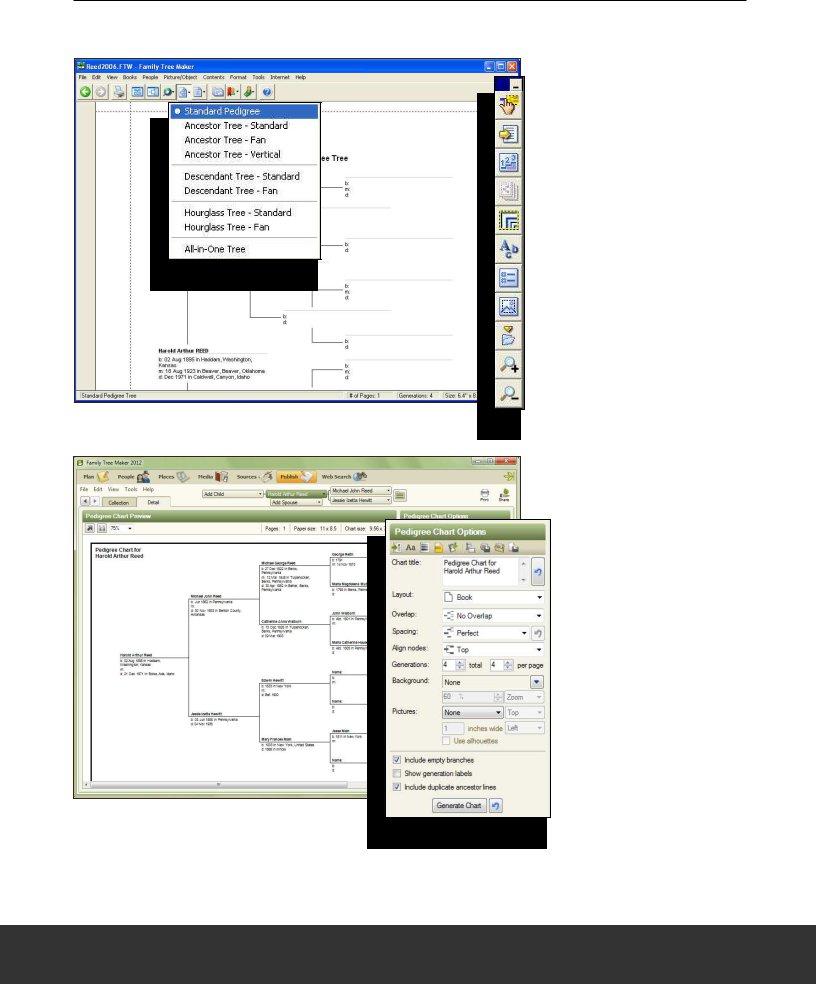
CREATE CHARTS
The People workspace allows you to add additional family members and their life
events to your tree, all from the same screen. This workspace is divided into two
tabs: the Family tab and the Person tab.
About the Family Tab
VERSION 16
The Tree Charts button on the toolbar lets you choose the type of chart you want to cre- ate. To format the chart choose options from the Contents and Format menu or use the but- tons on the chart toolbar.
VERSION 2012
Charts are created on the Publish workspace. The Collection tab lets you choose the type of chart you want to create. The Detail tab lets you format the chart. Notice that all the formatting options are consolidated into one convenient location on the right side of the chart.
19
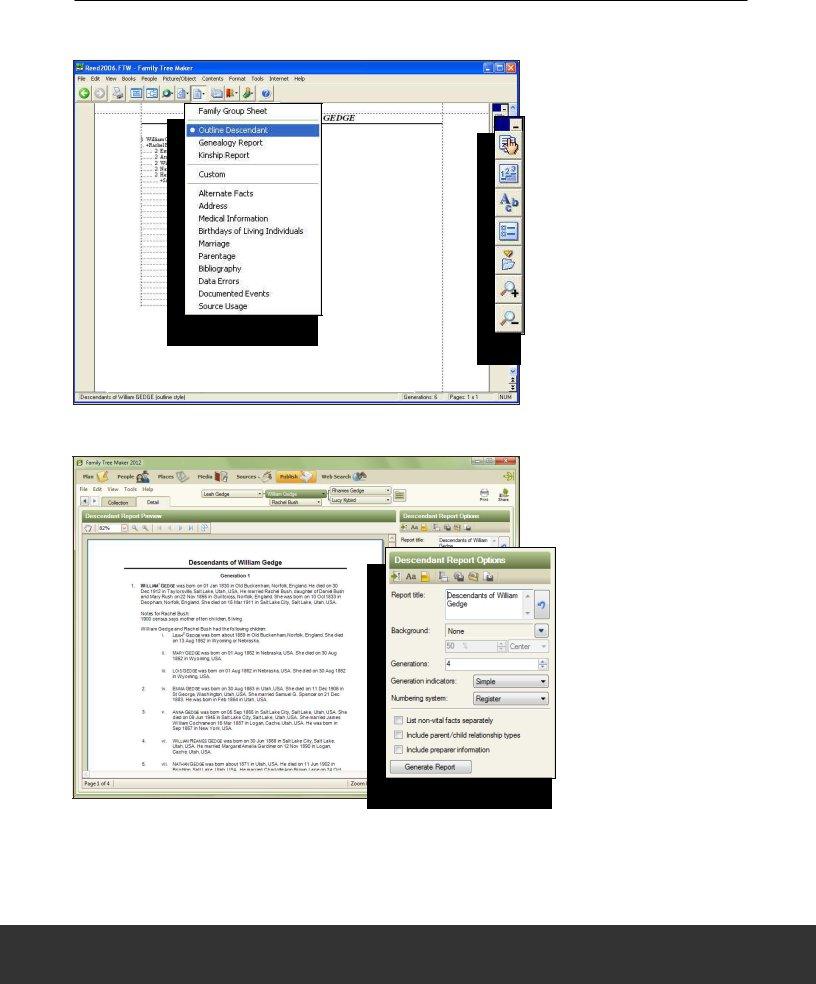
CREATE REPORTS
VERSION 16
The Reports button on the toolbar lets you choose the type of report you want to create. To format the report choose options from the Con- tents and Format menu or use the buttons on the reports toolbar.
VERSION 2012
Reports are created on the Publish workspace. The Collection tab lets you choose the type of report you want to create. The Detail tab lets you format the report. Notice that all the formatting options are consolidated into one convenient location on the right side of the report.
20
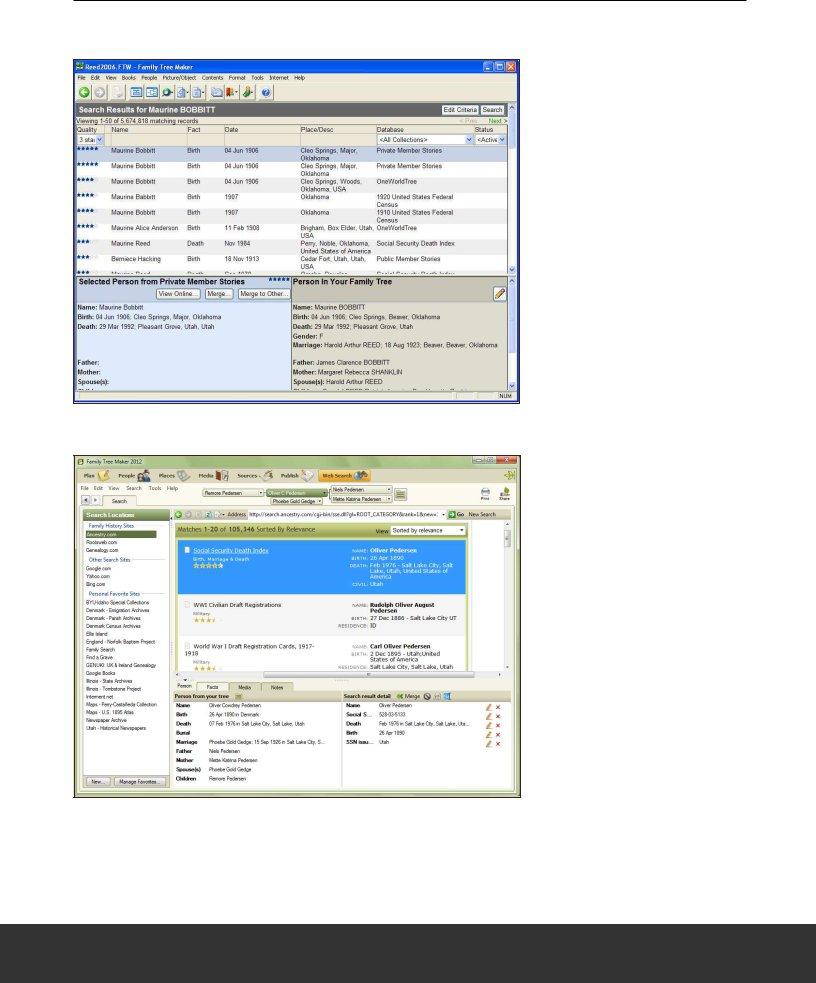
VIEW WEB SEARCH RESULTS
VERSION 16
The Web Search Resources but- ton on the toolbar lets you ac- cess Ancestry.com Web Search results.
VERSION 2012
Ancestry.com Web Search re- sults can be accessed on the Web Search workspace. In ad- dition, you can search any site on the Web and easily down- load discoveries into your tree using the
21

OTHER TASKS
This chart contains a list of some common tasks and how you can perform them in Family Tree Maker 2012.
HOW DO I...?
Access the Index of Individuals |
Press the F2 key or click the Index of Individuals button. |
|
|
Go to the Family tab on the People workspace. Select the |
|
Add an additional spouse |
individual you want to add a spouse to. In the family group |
|
view, click the Choose spouse button and choose Add |
||
|
||
|
Spouse from the |
|
|
Go to the Family tab on the People workspace. Select the |
|
Add an address for an individual |
individual you want and click the Person tab. Click the |
|
Facts button. Then click the Add Fact (+) button. Select the |
||
|
||
|
Address fact and click OK. |
|
|
Go to the Family tab on the People workspace. Click the |
|
Add media items to a marriage or relationship |
Marriage to button in the editing panel. The relationship |
|
window opens. Click the Media tab; then click the New |
||
|
||
|
button. |
|
|
Go to the Family tab on the People workspace. Select the |
|
|
individual you want and click the Person tab. Click the Facts |
|
Add medical information for an individual |
button. Then click the Add Fact (+) button. Select the Cause |
|
|
of Death/Medical Condition/Physical Description fact and |
|
|
click OK. |
|
|
Go to the Family tab on the People workspace. Select the |
|
|
individual you want and click the Person tab. Click the |
|
Change a relationship type (such as adopted) |
Relationships button. Select an individual in the list. In the |
|
|
editing panel choose a relationship from the Relationship |
|
|
||
Create a calendar |
Go to the Collection tab on the Publish workspace. Click |
|
Other; then |
||
|
||
Create a timeline for an individual |
Go to the Collection tab on the Publish workspace. Click |
|
Person Reports; then |
||
|
||
|
Go to the Family tab on the People workspace. Select the |
|
Create a |
individual you want and click the Person tab. Click the Tasks |
|
|
tab; then click the New button. |
|
|
Go to the Family tab on the People workspace. Select the |
|
Enter notes for an individual |
individual you want and click the Person tab. Click the |
|
|
Notes tab at the bottom of the window and enter the text. |
|
|
On the Publish workspace, access the chart or report you |
|
Export a report or chart |
want to export. Click the Share button under the main tool- |
|
|
bar and choose an export option from the |
|
Open a book |
Go to the Collection tab on the Publish workspace. Click |
|
Books. Then |
||
|
||
|
Go to the Family tab on the People workspace. Select the |
|
Play a scrapbook/view a slide show for an individual |
individual you want to view a slide show for and click the |
|
Person tab. Click the Media tab; then click the Create |
||
|
||
|
slideshow button. |
|
Update preferences |
Choose Options on the Tools menu. |
22
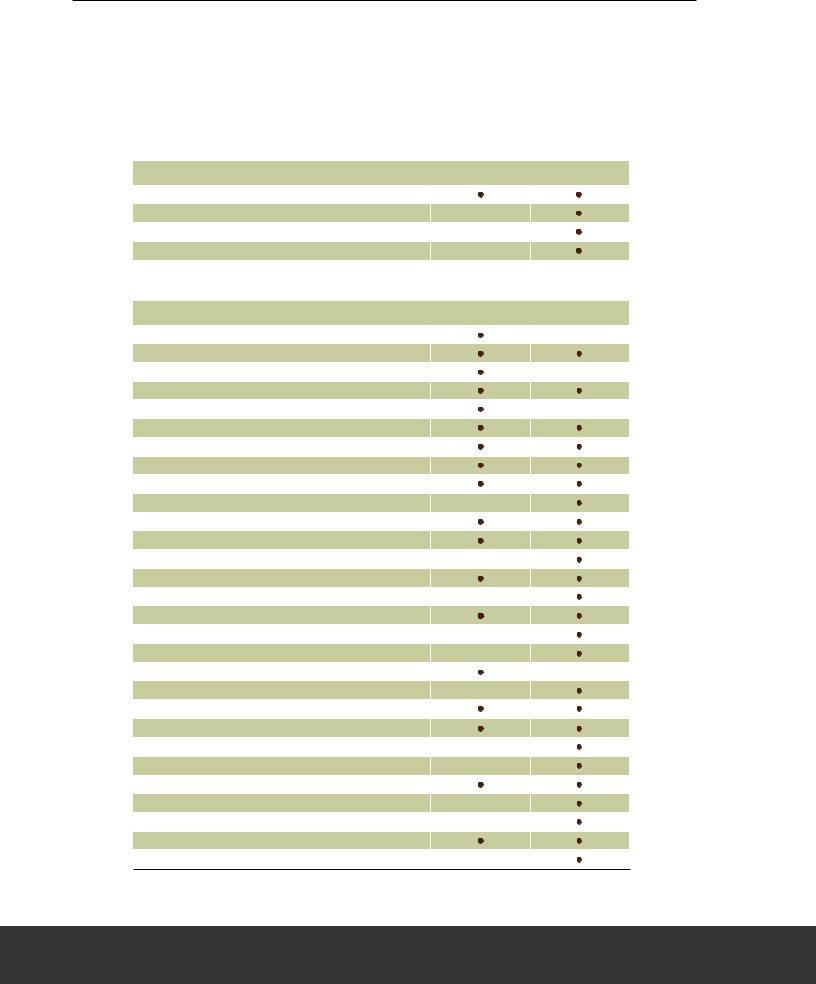
VERSION COMPARISON CHARTS
Compare the two versions and discover why Family Tree Maker 2012 is the most complete resource to help you build and manage your family tree.
VERSION |
VERSION |
16 |
2012 |
IMPORTING AND EXPORTING
Import and export GEDCOMs
Import iles in other genealogy software formats
Include or exclude private facts and notes in exported ile
Export reports and charts as images
REPORTING
Address report
Ahnentafel
Alternate facts report
Bibliographies
Birthdays of living individuals report
Calendar
Custom report
Data errors report
Descendant report (NGSQ and Register formats)
Descendant report (d’Aboville and Henry formats)
Documented events report
Family group sheet
Index of Individuals report
Kinship report
LDS ordinances report
Marriage report
Media item report
Media usage report
Medical information report
Notes report
Outline descendant report
Parentage report
Photo album
Place usage report
Research journal
Source usage report
Surname report
Timeline
Ability to save report settings
23
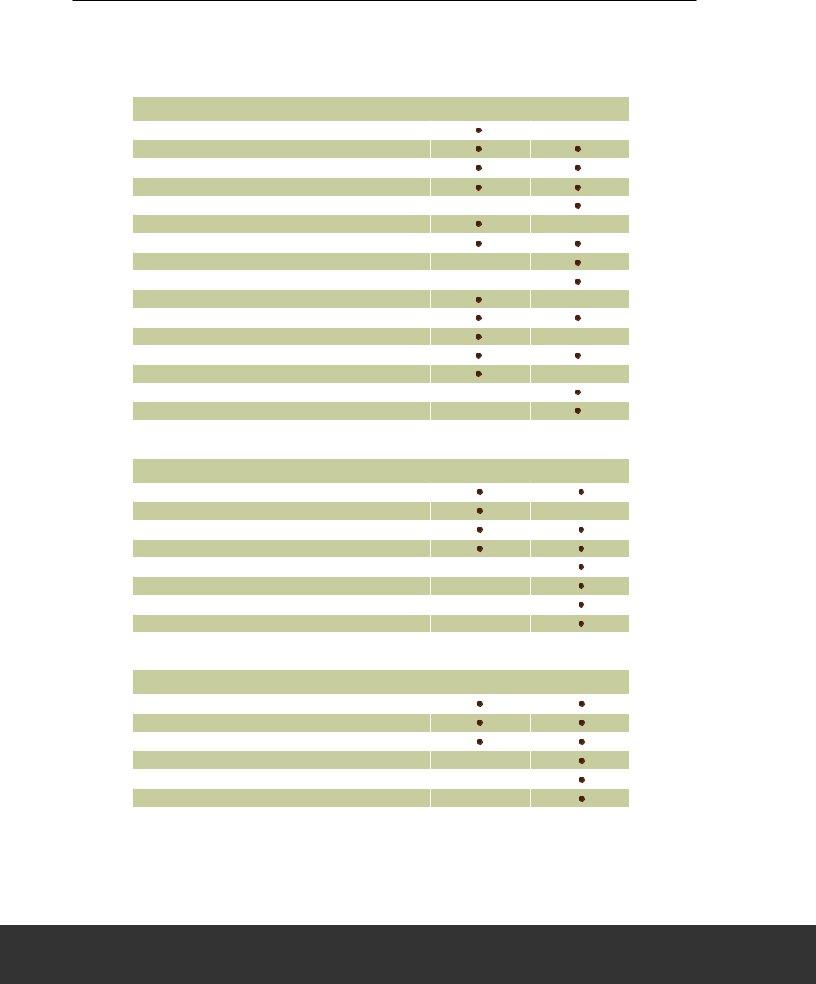
VERSION COMPARISON (cont.)
VERSION |
VERSION |
16 |
2012 |
PUBLISHING
Ancestor tree
Ancestor tree
Books
Bow tie chart
Descendant
Descendant
Extended family chart
Family tree chart
Hourglass
Hourglass
Labels and cards
Pedigree chart
Personal Web page
Relationship chart
Add embellishments, photos, and text anywhere on chart
MEDIA
Import images, documents, and audio/video iles
Enhance images within software
Scan images directly into software
Create slide shows
Categorize media items in groups
Find missing media items
Link an image to multiple individuals or sources
Manage all media items in one central location
DATA ENTRY
Assign reference numbers to individuals
Create custom facts
Use Fastields
Create person and research notes
Enter foreign language characters
Enter locations consistently with the place authority
24
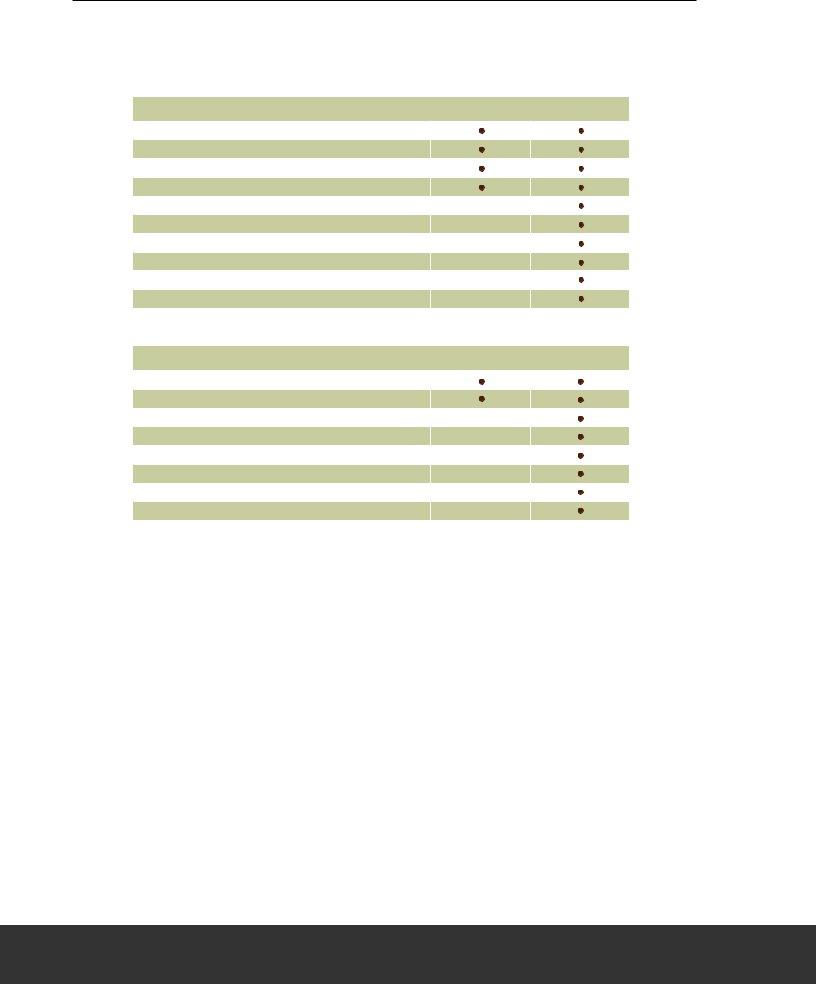
VERSION COMPARISON (cont.)
VERSION |
VERSION |
16 |
2012 |
WEB INTEGRATION
Contact other researchers through Ancestry.com
Merge Ancestry.com records directly into a tree
Receive hints from Ancestry.com
Upload a tree to Ancestry.com
Download an Ancestry Member Tree
Link your desktop and online trees together
Use Web Dashboard to view community activity and news
Access dynamic online maps
Create and print books and posters online
Use
ADDITIONAL FEATURES
Find and replace errors in your tree
Find duplicate people
Add and edit historical events for timelines
Create migration maps for individuals and families
Customize the editing panel to display the facts you want
Rate sources with standardized or personal criteria
Use source templates for consistent sourcing
Create biographies of ancestors with Smart StoriesTM
25

FREQUENTLY ASKED QUESTIONS
Where can I purchase Family Tree Maker 2012?
Family Tree Maker is available for purchase on FamilyTreeMaker.com, Ancestry.com, Amazon.com, and in select retail stores.
I am running Windows XP. Will I still be able to use Family Tree Maker 2012?
Yes. Family Tree Maker 2012 is compatible with Microsoft Windows® 7, Windows XP
SP2, and Vista™. To see a list of the minimum system requirements your computer needs in order to run the program, go to <www.familytreemaker.com>.
Will Family Tree Maker 2012 replace the old version of my software?
No. Family Tree Maker 2012 installs as a completely separate program and will not afect your old program.
Do I need to install an earlier version of Family Tree Maker before I can install 2012?
No. Because Family Tree Maker 2012 installs as a separate program you can install 2012 directly without having to install any other software.
Do I need to keep the old version of the software on my computer after I upgrade?
No. Once you have imported your iles into Family Tree Maker 2012, you can uninstall the old version.
Will Family Tree Maker 2012 open my version 16 iles?
Yes. You can import your old iles directly into the software without losing any data. If you have multiple iles in the old program that represent diferent families, you will need to import each one separately.
I can’t ind my Family Tree Maker iles on my computer. How can I locate them?
The default location is a Family Tree Maker folder in your Documents folder. You can use the Find File feature in Family Tree Maker 16 (choose Open from the File menu and then click Find ile) or the Search utility available in Windows.
When I import my old iles, where does Family Tree Maker 2012 save them?
The default location is a Family Tree Maker folder in your Documents folder. If your iles aren’t there, you may have changed the ile location during import. You can use the Search utility in Windows to locate the iles.
If I have questions about how to use some of the new features, how can I get help?
A variety of Help resources are available for Family Tree Maker 2012. You can access a
26