Welcome to the world of professional sound engineering with the MSR-602 Manual, a comprehensive guide aimed at sound engineers, installers, and consultants looking to fully harness the capabilities of the MSR-604 II. Introduced on April 29, 1996, this manual breaks the traditional mold by offering a user-friendly experience that reads more like a book than a standard technical guide. Structured under broad headings for quick access, it delivers crucial information right from the start of each section, gradually delving into more detailed insights as you progress. Central to this manual is its intent to not only educate on the system's full capability but also to encourage open communication for further inquiries or comments, thereby fostering a supportive user community. With a stern reminder on copyright, the manual emphasizes its exclusivity for legal owners’ personal use. Moreover, the MSR-602 and 604 II units are celebrated for their compliance with European Standards for Electromagnetic Compatibility, ensuring their reliable performance. Whether it’s navigating the complexities of signal splitting, powering up through the MSR-602 II, or optimizing system implementation, the manual provides a thorough walkthrough, accompanied by practical diagrams and specifications, to address all conceivable operational needs. Beyond the technical depths, it also touches upon compatibility issues with pre-Mk II systems, offering solutions to integrate newer models seamlessly into existing setups.
| Question | Answer |
|---|---|
| Form Name | Msr 602 Manual Form |
| Form Length | 36 pages |
| Fillable? | No |
| Fillable fields | 0 |
| Avg. time to fill out | 9 min |
| Other names | nser form, nser data request form, nser survey form pdf, nser check online |

V1.4 29 April 1996 |
We lc om e |
Welc om e to the
This manual is provided to assist sound engineers, installers and consultants to fully understand the
As opposed to most manuals, the contents can be read like a book.
At the same time, the information is structured under a series of broad headings for easy access. So where possible within each section:
·The most immediate information appears at the head of each section under the main title.
·As you read further into each subsequent section, more detailed, specific information is given.
Should you have any comments or questions about applying the
M
U ser's M anual
This Manual is the COPYRIGHT of BSS Audio. All reproduction and copying, other than for the legal owner's personal use, or disclosure of part or whole to a third party, without prior written authorisa- tion, is in violation of the European Copyright Convention. BSS Audio 1996
1

M SR- 600 II Se rie s
This equipment has been tested and found to comply with the following European Standards for Electromagnetic Compatibility.
Emission Specification EN55013 1990 Class B (Associated equipment)
Immunity Specification EN50082/1 1992 |
(RF Immunity, Fast |
|
|
|
Transients and ESD) |
Mains Disturbance |
EN61000/3/2 1995 |
|
For continued compliance ensure that all input and output cables are wired with cable screen connected to pin 1 of the XLR. The input XLR pin 1 on BSS equipment is generally connected to chassis via a capacitor to prevent ground loops whilst ensuring good emc compatibility.
2

Ta ble O f C onte nts
Ta ble Of Conte nts
1.0 |
Introduc tion |
4 |
1.1 |
5 |
|
1.2 |
6 |
|
2.0 |
Unpa c king |
7 |
2.1 |
Wa rra nty |
7 |
2.2 |
Wa rning |
7 |
3.0 |
Conne c tions a nd Control De sc riptions |
8 |
3.1 |
AC p o w er c o nnec tio ns a nd c o ntro l setting s |
9 |
3.2 |
DC p o w er c o nnec tio ns |
11 |
3.3 |
Aud io c o nnec tio ns |
12 |
3.4 |
13 |
|
3.5 |
14 |
|
4.0 |
Syste m Imple me nta tion a nd Use |
16 |
4.1 |
Ra c king |
16 |
4.2 |
Ground ing |
18 |
4.3 |
Cha nnel c o d ing |
19 |
4.4 |
Dua l p o w er sup p ly o p era tio n |
20 |
4.5 |
Outp ut d rive level setting |
20 |
4.6 |
Multip le o utp ut Distrib utio n Am p lifier |
|
|
c o nfig ura tio n |
22 |
4.7 |
Stereo Sum m ing Co nfig ura tio n |
24 |
5.0 |
Compa tibility With Pre M k II Syste ms |
25 |
5.1 |
Insta lling |
25 |
5.2 |
Insta lling p re Mk II |
26 |
5.3 |
Insta lling a Mk II p o w er sup p ly into a Mk I SYSTEM |
|
|
a nd vic e versa |
26 |
6.0 |
Appe ndix A |
27 |
6.1 |
System b lo c k d ia g ra m a nd c irc uit d esc rip tio n |
27 |
6.2 |
Tra nsient Sup p resso r rep la c em ent |
28 |
7.0 |
Appe ndix B |
29 |
7.1 |
Inp ut tra nsform er b a la nc ing |
29 |
7.2 |
Outp ut tra nsfo rm er b a la nc ing |
29 |
8.0 |
Te c hnic a l Spe c ific a tions |
30 |
9.0 |
Wa rra nty |
33 |
3
M SR- 600 II Se rie s
Introd uc tion
1.0Intro d uc tio n
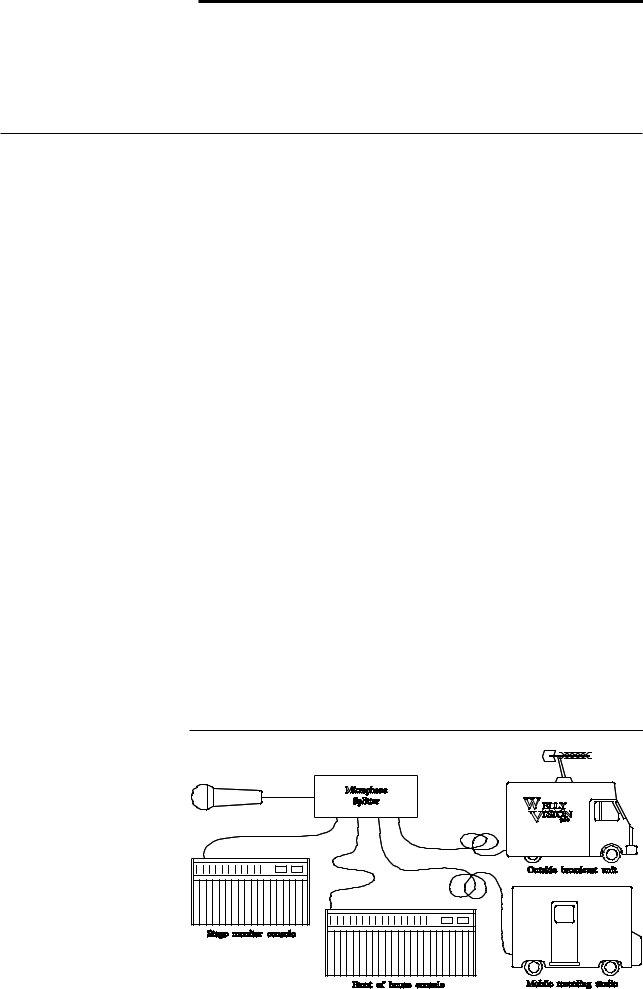
It is not uncommon within a sound system which uses microphones as a source of programme, for that microphone to be connected to the input of a number of different processing facilities.
An example of this would be in sound reinforcement work where a stage microphone is required to drive the main ‘front of house’ mixing console, the stage monitoring mixing console, a mobile recording studio and quite possibly an outside broadcast recording vehicle.
It is also common within such a system for the microphone to be connected to considerable lengths of shielded cable before being terminated at the processing facilitys input connector.
Such a load on the microphone is very much in excess of its design capability, and as a consequence the level and quality of the sound is impaired. (Fig. 1)
A further complication can arise within such a system from multiple earthing as each of the processing facilities would be providing its own ground.
To overcome these problems it is quite common for a multiple winding transformer to be used which provides separate secondary windings for each of the required outputs. This solution will solve the multiple grounding problems, however it does not tackle the sound level and quality problem as, being a passive device, it has no power amplification capability.
Cost effective active electronic solutions proved elusive until the introduction of the original BSS
Fig . 1 M ic ro p ho ne
Lo a d ing
4

M SR- 604 II M ic rophone Signa l Splitte r
1.1
flexibility of gain and level control, internal bus routing, signal meter- ing and a headphone monitoring facility.
The
The
The low noise floor requirement necessitates a remote power supply system, the
A MIC/LINE switch introduces a 20dB input pad, which in combination with the 5 step GAIN switch allows any input signal below + 33dBu to be perfectly matched to the
Each channel also provides a separate phantom powering selector switch providing an independent 48V across the ‘mic input’ connector.
Each channel has two low impedance electronically balanced outputs on the rear panel to feed the MAIN (Front of House) and the MONITOR mixing consoles. These outputs may be independently configured by internal header blocks to drive at mic (+3dBu clip) or at line (+23dBu clip) levels. A third setting allows these outputs to be driven at +13dBu clip which gives a gain/headroom structure compatible with earlier versions of the
5

M SR- 600 II Se rie s
M SR- 602 II Powe r Supply
1.2
The
The HEADROOM LED meter and high quality headphone amplifier give the operator absolute confidence in signal integrity during setting up, and provide an indispensable aid to trouble shooting and fault detection. The signal wiring involved is contained with the power wiring in a multicore cable for simple interconnection between units.
In addition it also carries the main system ground switch which has important considerations within a large system for both safety and noise.
PLEASE READ SECTIO N 4.2 CAREFU LLY PRIO R TO O PERATIN G TH E CO M PLETE SYSTEM .
6

Unp a c king
Wa rra nty
Wa rning
2.0Unp a c king
2.1 Wa rra nty
2.2 Wa rning
As part of our system of quality control, this product is carefully inspected before packing to ensure flawless appearance. After unpacking the units, please inspect for any physical damage and retain the shipping carton and all relevant packing materials, should the unit require repacking.
In the event that damage has occurred, immediately notify your dealer, so that a written claim to cover damages can be initiated.
The
No other warranty is expressed or implied.
If the unit is faulty, it should be sent, shipping prepaid, to an authorised dealer of the manufacturer stating the faults found.
The serial number must be quoted in all correspondence relating to this warranty.
Because this equipment is connected between the microphone and mixing console or patching system, it is important for safety and system noise that a proper earthing system is implemented within the cabling system.
CO N SEQ U EN TLY SECTIO N 4.2 O F TH IS M AN U AL M U ST BE READ PRIO R TO IN STALLATIO N AN D U SE.
7
M SR- 600 II Se rie s
C onne c tions a nd C ontrol De sc riptions
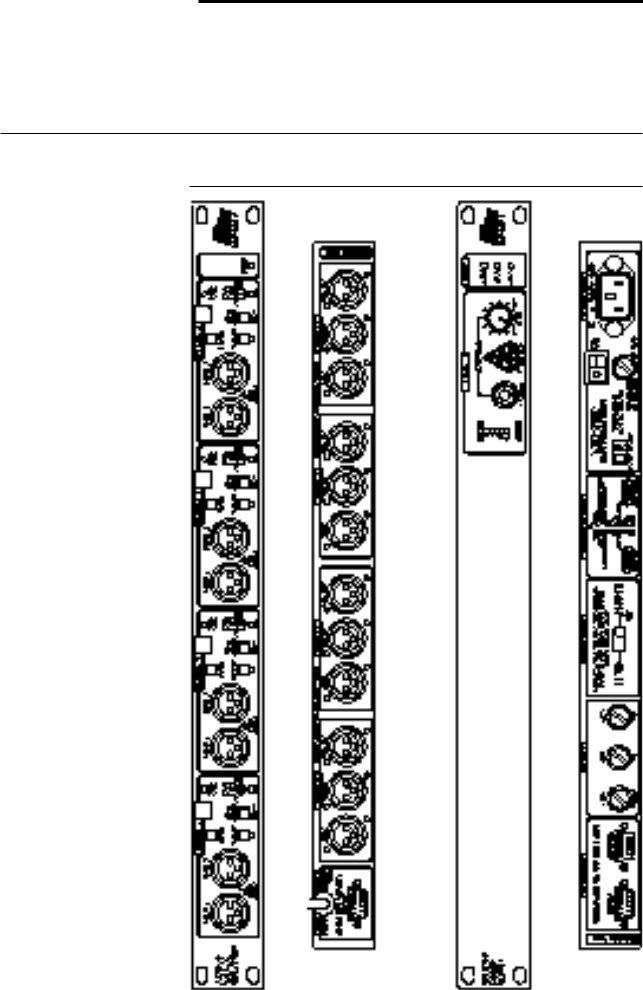
3.0Connec tions a nd Control Desc rip tions
Fig . 2 M
M
8
AC Powe r C onne c tions a nd C ontrol Se ttings
3.1AC Pow er Connec tions a nd Control Setting s
Before connecting the
The power cord attached to this unit carries the following informa- tion label.
WARNING: THIS APPLIANCE MUST BE EARTHED
IM PO RTAN T: The wires in this mains lead are colour coded in accordance with the following code.
Green and yellow : |
Earth |
|
Blue |
: |
Neutral |
Brown |
: |
Live |
As the colours of the wires in the mains lead of this appliance may not correspond with the coloured markings identifying the terminals in your plug, proceed as follows:
The wire which is coloured
earth symbol which is ‘ ‘, or coloured green or
The wire which is coloured blue must be connected to the terminal which is marked with the letter ‘N’ or coloured black.
The wire which is coloured brown must be connected to the terminal which marked with the letter ‘L’ or coloured red.
Those units that are supplied to the North American market will have an integral moulded 3 pin connector which is provided to satisfy required safety standards.
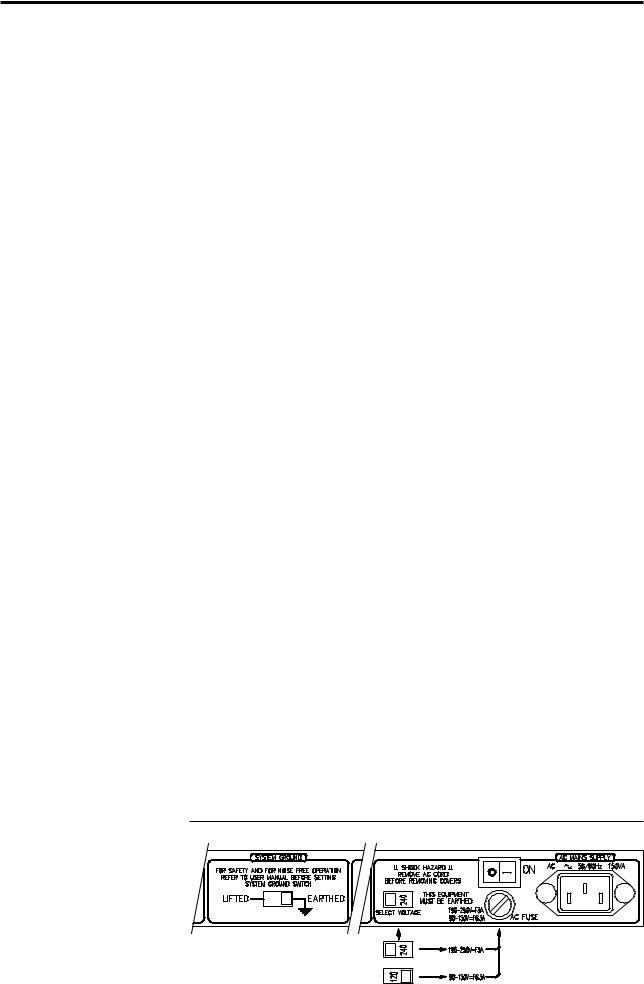
Fig . 3 M
Vo lta g e Sw itc h a nd
M a ins Fuse
9
M SR- 600 II Se rie s
Volta ge Se tting
Sa fe ty Ea rthingAC Powe r Fusing
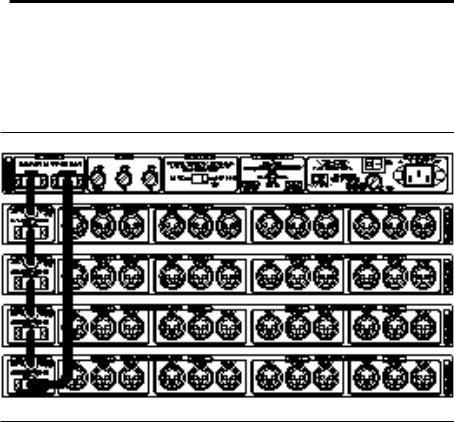
Fig . 4 DC C o nne c tio n
C a b ling
3.11Volta g e Setting
The mains voltage selector switch provides simple, external adjust- ment for operation on all international AC power standards.
At each switch position there is an acceptable tolerance over which the performance of the unit will not be affected and this is
3.12Sa fety Ea rthing
The green/yellow wire of mains cord must always be connected to the electrical installations Safety Earth or Ground. I t is essential for personal safety, as well as proper operation of the unit, and is internally connected to all exposed metal surfaces. Any rack framework that this unit might be mounted into is assumed to be connected to the same grounding circuit. the
3.13AC Pow er Fusing
The incoming mains power is fused within the
It is very unlikely that this fuse will fail during normal use, and must be treated with some caution as to the cause, if it should do so. One of the most likely reasons will be because the mains voltage switch on the rear panel is incorrectly set. Another reason can be the inadvert-
1 0
DC Powe r C onne c tions
Fig . 5 C a b le Wiring
De ta ils
3.2DC Pow er Connec tions
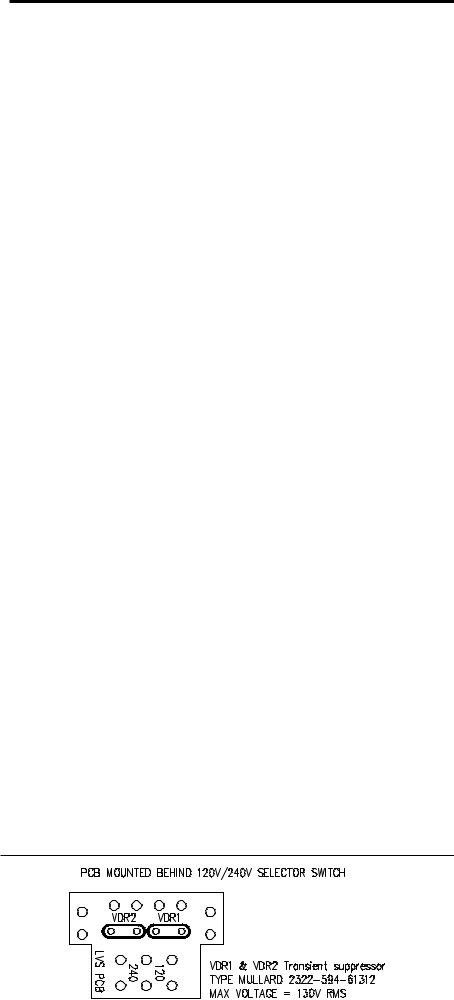
ent connection of line to line rather than line to neutral phase voltages when using a three phase supply. In either case internal transient suppressors (VDRs) can become damaged and will consistently blow replacement fuses. You may be assured that they have protected your unit from damage, but they will need removal to allow further use of your unit, and should be replaced as soon as possible to ensure con- tinued protection. If you feel this has happened, please refer to the appropriate section at the rear of this manual for the removal and replacement procedure.
DC connection between the
The topmost
This ‘ring’ circuit allows a more reliable system set up, since an indi- vidual
11

M SR- 600 II Se rie s
Audio C onne c tions
3.3 Aud io Connec tions
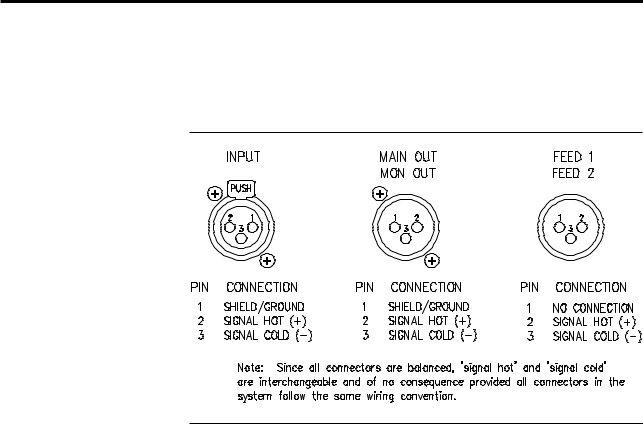
IN PU T (REAR PAN EL):
M AIN O U T (REAR PAN EL):
M O N O U T (REAR PAN EL):
FEED 1 AN D FEED 2 (FRO N T PAN EL):
The audio connections to the
Attention must be given to maintaining a consistent earthing system for safe and noise free operation. Please refer to section 4.2 for a fuller explanation and design guides.
This is electronically balanced, non floating and is for direct connection to the microphone, DI box or other source of programme. The input is fully RFI suppressed and has excellent common mode rejection performance.
Care should be taken to ensure continuity of the pin 1 earth connection.
The 48v phantom powering appears across this input when the channel phantom switch is operated. (Refer to section 3.2)
This is electronically balanced, non floating and should be connected to the ‘front of house’ mixing console or main control area. The remote attenuator facility looks at this connector for detection of phantom power voltage. This output should not be connected to an unbalanced input.
For consistent remote attenuator switching and microphone screening, it is important that the pin 1 earth connection is maintained. (See section 4.5 for configuring the output drive level.)
This is electronically balanced, non floating, and should be connected to the stage monitor mixing console or ancillary console which is being operated within the same grounding system.
This output should not be connected to an unbalanced input.
It is probable that the pin 1 earth connection will need to be disconnected at this point to avoid earth loops. (See section 4.5 for configuring the output drive level.)
These two identical outputs are actively buffered, fully transformer balanced and floating with primary/secondary isolation of 2.5kV. They are for connection to any other facility requiring a signal and are totally isolated and independent.
There is no connection to the pin 1 earth and all cable screening should be derived from the receiving end.
It is also important to ensure there is no earth connection to the shell of the mating female connector as this would make connection to the
1 2

M SR- 602 II C ontrols
Since all the audio connections are balanced, the convention of pin 2 or pin 3 ‘hot’ is of no consequence provided all connections are wired in a similar manner.
Please refer to appendix B for details of the transformer balancing options.
3.4
SYSTEM GRO U N D :
PO W ER:
This switch, located on the rear panel, is the main grounding point for all the
The switch will connect the electronic/signal ground to chassis earth when in the ‘EARTHED’ position.
The switch will disconnect the electronic/signal ground from chassis earth when in the ‘LIFTED’ position.
For a more detailed explanation of the grounding arrangements and implications of this switch, please refer to section 4.2.
The LEDs are used to indicate that the power is turned on and present. The LEDs are wired after the main DC Fuses, so should a fuse blow the corresponding LED will go out. The DC fuses are on the rear panel and are clearly marked with value and function. Always replace blown fuses with the correct value.
LISTEN : H EAD RO O M The HEADROOM meter is calibrated to show signal level relative to the M ETER: clip point. In practice, the red 0db LED will illuminate when the signal
is approximately 0.5dB below actual clip. The meter indication is not affected by HEADPHONE LEVEL control.
LISTEN : H EAD PH O N E Adjusts the level of the headphone amplifier from off to full level. LEVEL: Because the amplifier is designed to produce high monitoring levels into
any impedance headphones extreme caution must be used when setting headphone levels.
CAU TIO N ! ALW AYS TU RN LEVEL D O W N BEFO RE LISTEN IN G TO
U N KN O W N SIGN ALS. H IGH EFFICIEN CY H EAD PH O N ES AN D A
H O T SIGN AL CAN PRO D U CE D AN GERO U S SO U N D PRESSU RE
LEVELS. O BSERVE TH E W ARN IN G SYM BO L N EXT TO TH E
H EAD PH O N ESO CKET.
The gain of the monitor system is such that the amplifier will not clip or distort even if the level control is turned fully up. This ensures that if any distortion or clipping is heard it is not due to the monitoring system and needs to be corrected at the signal source or by adjusting the channel gain settings.
13

M SR- 600 II Se rie s
M SR- 604 II C ontrols
3.5
PH AN TO M O N / O FF
The
Phantom power is indicated by a front panel LED .
It should be noted that phantom powering is interlocked to the LINE/MIC switch so that when LINE input is selected phantom power and the LED indicator are disabled.
LIN E/ M IC This switch introduces a 20dB pad into the input circuit of the unit, and raises the input impedance to suit line level signals. In the mic position the maximum signal level is +13dBu (with the GAIN set to
GAIN The GAIN switch allows the input amplifier gain to be changed in 10dB steps from
The absolute system gain is dependent upon the internal system configurations chosen, but with factory default settings and in the MIC position the gain indicated on the GAIN switch setting is correct, i.e. with a mic input, 0dB gain selected and default jumper settings the output level is the same as the input signal.
CLIP LED The CLIP LED which is situated below the GAIN switch illuminates when the peak signal level approaches within 1dB of clip. It features a fast acting full wave rectifier and a hold circuit which ensure that all transient peaks are unambiguously indicated.
1 4

M SR- 604 II C ontrols
REM O TEATTEN U ATO R
LISTEN
A 10dB input pad is activated when the channel detects a +48v phan- tom signal is present on the MAIN OUTPUT. This allows the front of house mixing engineer to remotely reduce the input signal if he de- tects that the channel is being overdriven. This is a not uncommon occurrence in live rock and roll, when musicians get into the spirit of a performance and sing louder than during sound checks.
A front panel LED indicates when REMOTE ATTENUATOR is active.
Because the attenuator slightly degrades the noise and common mode performance of the unit it is recommended that the system is set up and calibrated without the remote attenuator activated, and that it is reserved for emergency use as described above.
The remote attenuator function cannot be disabled, so the engineer should observe the same caution with the desk phantom switch as he would if a phantom powered microphone were directly connected to the desk input.
CAU TIO N ! U SE O F TH E D ESK PH AN TO M SW ITCH IS ALM O ST CERTAIN TO PRO D U CE AN AU D IBLE CLICK SO IT IS
RECO M M EN D ED TH AT TH E CH AN N EL BE CLO SED BRIEFLY D U RIN G SW ITCH IN G.
Pressing the LISTEN switch connects the channel signal to the HEADROOM meter and headphone amplifier on the
The listen bus is arranged in such a way that only one channel will register on the monitor section at any time. If two listen switches are pressed at the same time the one that is closest in the chain to the PSU will register. See the
CAU TIO N ! ALW AYS TU RN LEVEL D O W N BEFO RE LISTEN IN G TO U N KN O W N SIGN ALS. H IGH EFFICIEN CY H EAD PH O N ES AN D A
H O T SIGN AL CAN PRO D U CE D AN GERO U S SO U N D PRESSU RE LEVELS. O BSERVE TH E W ARN IN G SYM BO L N EXT TO TH E H EAD PH O N E SO CKET.
15
M SR- 600 II Se rie s
Syste m Im ple m e nta tion a nd Use
Ra c king
4.0System Im p lem enta tion a nd Use
4.1 Ra c king It is envisaged that a number of the
The metal case of the
Fig . 6 Physic a l
Dim e nsio ns
1 6

Ra c king
the
Please read section 4.2 for discussion of grounding of the electronic 0v.
The
If a power supply unit needs to be mounted below a
a)Leave a gap of at least 1U between the PSU and the closest
b)Contact your BSS agent to obtain a mumetal shield which may be affixed to the top cover plate of the
c)Reduce the number of units in the system. (The stray magnetic field is proportional to the current demanded from the PSU .)
In all cases, the
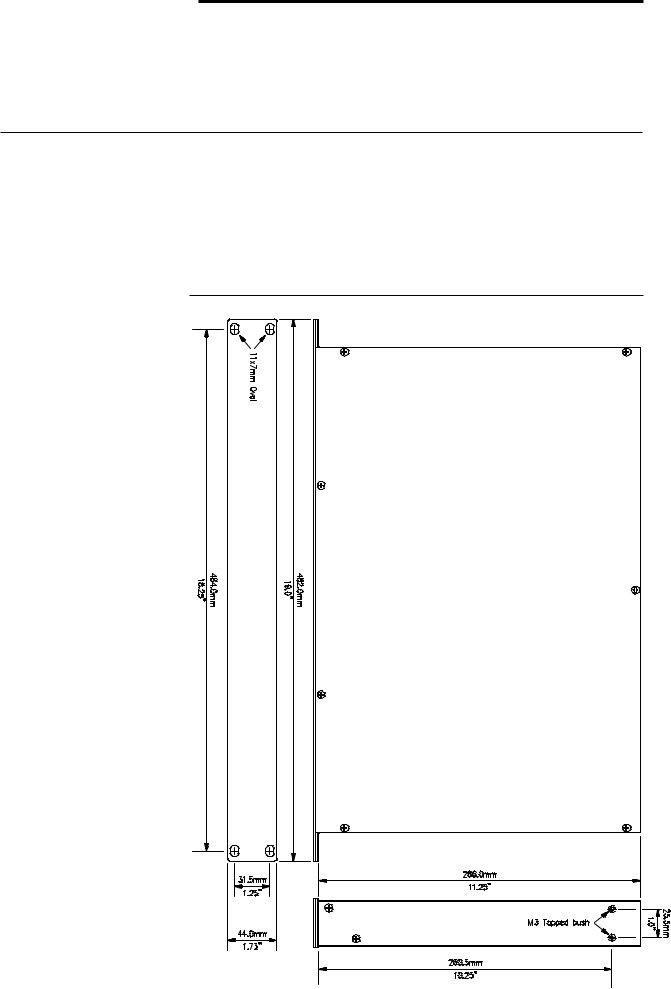
The physical dimensions and mounting points for the
In large touring systems, it is envisaged that the rear panel input and output connectors will be wired into a multiway distribution panel forming part of the same rack. In this way, all cabling for the main system is kept tidy and away from the front of the unit. The isolated feeds appearing on the front of the unit are available for the external facilities, and their connection will not interfere with the
As with any microphone stage box system it is advisable to avoid the close proximity of heavy power cabling, power transformers and all forms of lighting control equipment.
17
M SR- 600 II Se rie s
G round ing
Fig . 7 M SR G ro und ing
4.2 Ground ing In any
system to minimise any possible noise interference and hum loops.
With the use of microphones it is especially important to ensure reliable earthing and screening not only for these noise considerations but also for safety of the performers.
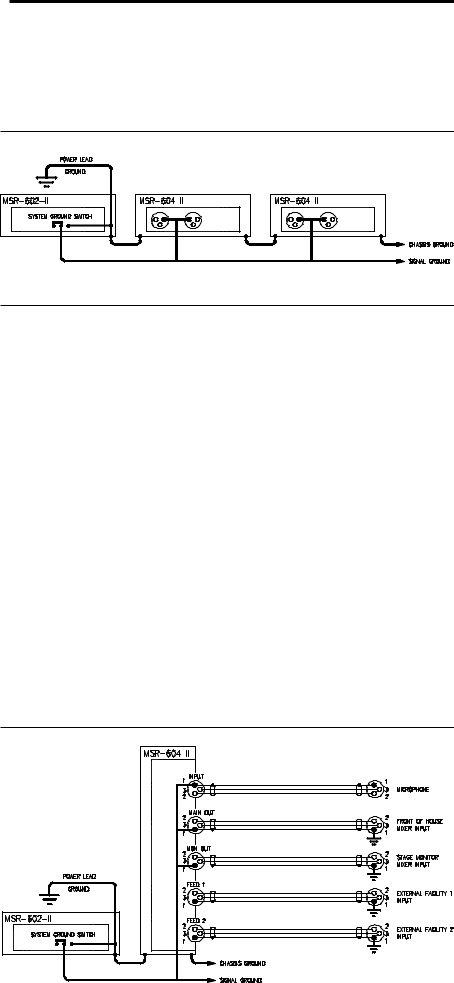
Figure 7 shows the internal grounding arrangements for the
The star grounding point is the main ‘front of house’ mixing console, and this earth is the one used to shield all cables and the microphone body. There should be no connection between this earth and that of the MSR- 604 II chassis, and the system ground switch on the
All the metal casing associated with the
Fig . 8 Syste m
G ro und ing
Arra ng e m e nts
1 8

C ha nne l C oding
4.3Cha nnel Co d ing
Fig . 9 C ha nne l C o d ing
In general the stage monitor console will be connected to the stage mains power grounding system so the signal connecting cables to the ‘MON OUTPUT’ connector will require the earth connection to be disconnected. That is, the cable screening will be derived from the monitor console, but should not be connected to the electronic 0v earthing system of the
Other systems of earthing can be implemented, such as using the stage earth as the main star point, in which case the system ground switch would be set to ‘grounded’, or to use the stage monitor console as the main star point.
In any system it is important to remember:
a)Choose one star point for all grounding.
b)Ensure all microphone screening is permanently held to this ground.
c)Ensure that the two main earthing systems, namely stage and front of house, do not accidently short together.
d)Avoid sending signal currents along cable screens.
If these simple guide lines are followed, then implementation of the
In a system with more that one
19
M SR- 600 II Se rie s
Dua l Powe r Supply O pe ra tion O utput Drive Le ve l Se tting
4.4Dua l Pow er Sup p ly Op era tion
Fig . 10 Dua l Po w e r Sup p ly C o nne c tio n
4.5Outp ut Drive Level Setting
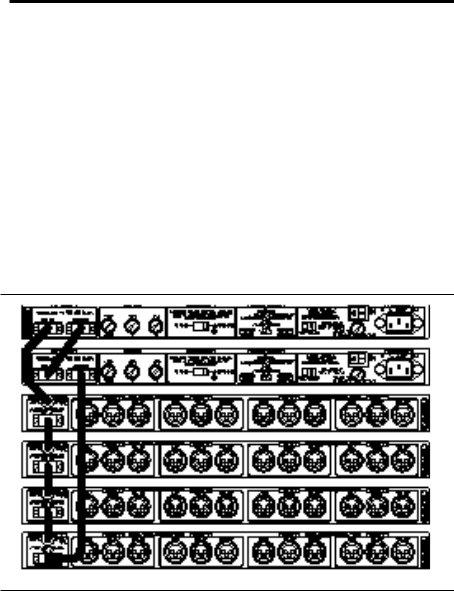
The power supply of the
This is implemented within the
Each MAIN output and MON output can be individually set to drive at mic or line level. A third setting which may be described as ‘Hot mic level’ is also available in order to provide a headroom structure which is compatible with previous versions of the
All outputs are set to mic level when the
The OUTPUT LEVEL SELECT header blocks are clearly marked on the main PCB and are described in Table 1
TABLE 1 O U TPU T LEVEL SELECT JU M PERS
Function |
Jumper N o. |
PCB identification |
Channel 1 MAIN OUT |
JP2 |
CH1 MAIN O/P |
Channel 1 MON OUT |
JP1 |
CH1 MON O/P |
Channel 2 MAIN OUT |
JP6 |
CH2 MAIN O/P |
Channel 2 MON OUT |
JP5 |
CH2 MON O/P |
Channel 3 MAIN OUT |
JP10 |
CH3 MAIN O/P |
Channel 3 MON OUT |
JP9 |
CH3 MON O/P |
Channel 4 MAIN OUT |
JP14 |
CH4 MAIN O/P |
Channel 4 MON OUT |
JP13 |
CH4 MON O/P |
2 0
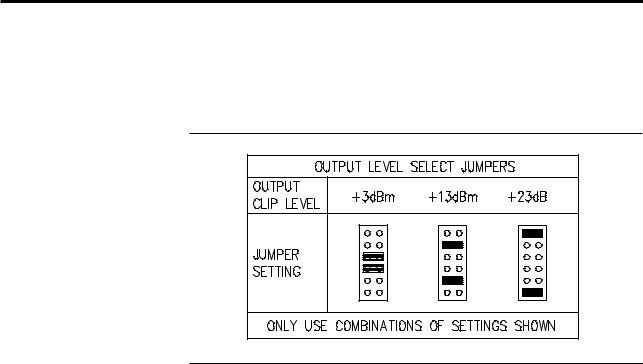
Fig . 11 O utp ut Le ve l
Se le c t Jum p e rs
The permissible settings are shown in Figure 11, and the effects of each on system gain and headroom is described in Table 2. Note that combinations of header settings other than those shown should not be used as they do not give a proper balanced drive.
TABLE 2 O U TPU T LEVEL SELECT H EAD RO O M AN D GAIN
STRU CTU RE
Setting |
O utput clip |
System gain |
D escription |
|
|
Level |
/ dB (N ote 1) |
|
|
3dBm |
+3dBm |
0 |
Mic level output. Factory default |
|
13dBm |
+13dBm |
+10 |
||
23dBu |
+23dBu |
+20 |
|
Line level output |
(Note 1. Gain between input XLR and output XLR with channel Gain switch set to 0dB and input pad set to MIC).
NOTE: The output levels are referred to using both dBm and dBu for different settings. This is because the unit is capable of driving 3dBm or 13dBm into a 600Ω load but the 23dBu output, although capable of driving 600Ω will, drop slightly in level for loads below 2kΩ .
21
M SR- 600 II Se rie s
M ultiple O utput Distribution Am plifie r C onfigura tion
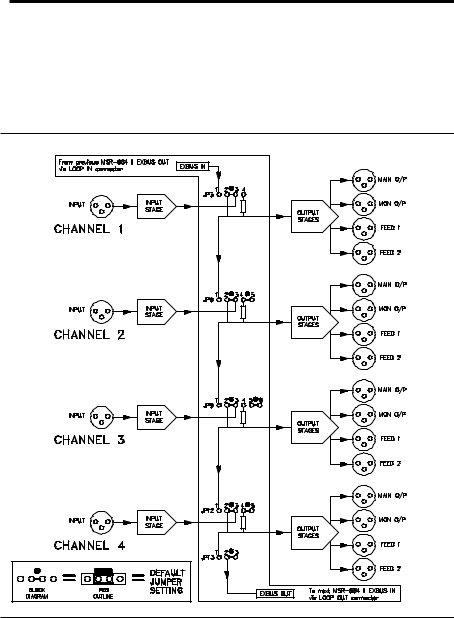
Fig . 12 Bus Linking Blo c k
Dia g ra m .
De fa ult Jum p e rs
4.6Multip le Outp ut Distrib ution Am p lifier Config ura tion
JU M PER SETTIN G
For use as a distribution amplifier, or in any situation where more than four outputs per channel are required, the
The simplified block diagram, Figure 12 shows the segmented internal bus which runs between adjacent channels. This bus is continued via the multiway LOOP connector between
2 2
M ultiple O utput Distribution Am plifie r C onfigura tion
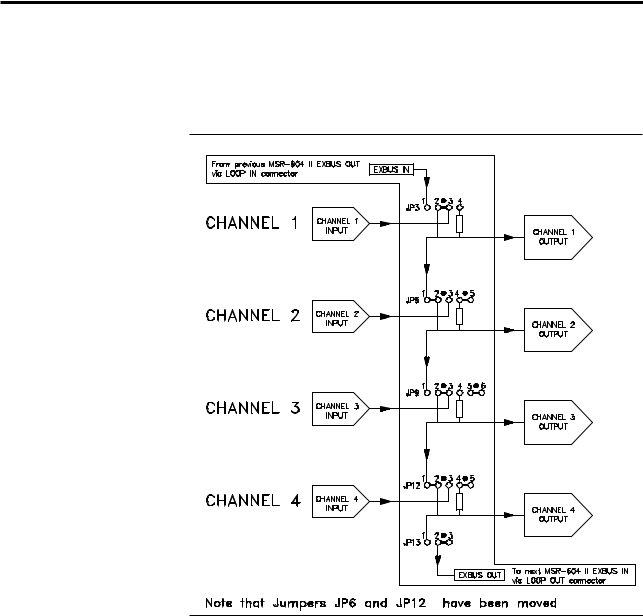
Fig . 13A Bus Linking
C h1 Drive s O ut1 a nd 2
C h3 Drive s O ut3 a nd 4
The signal labelled
The limiting factor on how many channels may be linked is the paral- lel loading that occurs on the drive from the input stage. The recom- mended maximum is sixteen, which equates to sixty four outputs. This will result in an overall drop in system gain of about 0.7dB but should not significantly affect noise or distortion.
It is strongly advised that in order to have a configuration work first time, that the required system is first planned out on paper, and with reference to Figures 12, 13A and 13B, a list of jumper settings is produced. Implementing the system then becomes a simple mechani- cal task of setting the relevant jumpers.
23
M SR- 600 II Se rie s
M ultiple O utput Distribution Am plifie r C onfigura tion Ste re o Sum m ing C onfigura tion
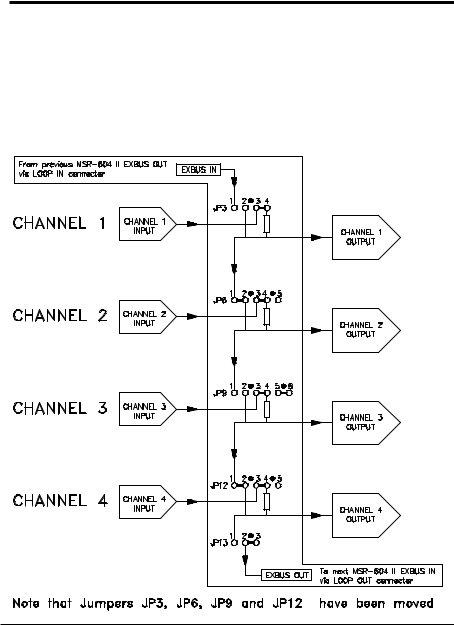
Fig . 13B Bus Linking
In1+In2 Drive s O ut1 a nd 2
In3+In4 Drive s O ut3 a nd 4
CO N TRO LS
4.7Stereo Sum m ing C o nfig ura tio n
When a group of channels is linked as a D .A., the controls associated with the chosen input section are used to set the required operating conditions. the controls on the other channels are disabled, except for the CLIP LEDs and the LISTEN switches which may be used to confirm that the signal is reaching all the linked output stages.
Figure 13B above shows an alternate bus configuration where a stereo pair of inputs is used to drive two output channels in parallel. Each output is a sum of the pair of inputs reduced by 6dB.
2 4

C om pa tibility With Pre M kII Syste m s
Insta lling M SR- 604 IIs in a M k 1 Syste m
5.0 Com p a tib ility With Pre MkII System s
5.1Insta lling
Limited compatibility exists between early
Please order adaptor leads as
01.This pair of cables is required for any of the system combinations described below . Only one adaptor set is required per system no matter how many new units are to be to be installed.
The
SETTIN G SYSTEM JU M PERS
RACK IN STALLATIO N
Remove the top cover plates on
The new units should be mounted at the top of the rack, away from the
25

M SR- 600 II Se rie s
Insta lling Pre M k II M SR- 604s Into a Ne w Syste m
Insta lling a M k II Powe r Supply Into a M k I Syste m a nd Vic e Ve rsa
5.2Insta lling Pre Mk II
RACK IN STALLATIO N
5.3Insta lling a Mk II Pow er Sup p ly Into a Mk I System a nd Vic e Versa
together as described in section 3.2. Finally the pair of adaptor leads are used to insert the Mk II units into the systems power circuit.
Early
No changes are required to any internal jumpers or settings and provided that the Mk I units are installed at the ‘end’ of the DC daisychain, the performance of the Mk II units will not be affected in any way.
The Mk I
Mixing Mk I and Mk II power supplies and systems is not generally recommended. Since they are designed to work at different DC rail voltages, performance and facility will be reduced to the lowest common denominator at best. Contact your BSS agent for availability and
2 6
Appe ndix A
Syste m Bloc k Dia gra m a nd C irc uit De sc ription
6.0Ap p end ix A
6.1System Bloc k Dia g ra m a nd
Circ uit Desc rip tion
Fig . 14 M
advice if a replacement or a second power supply is required for a Mk I system.
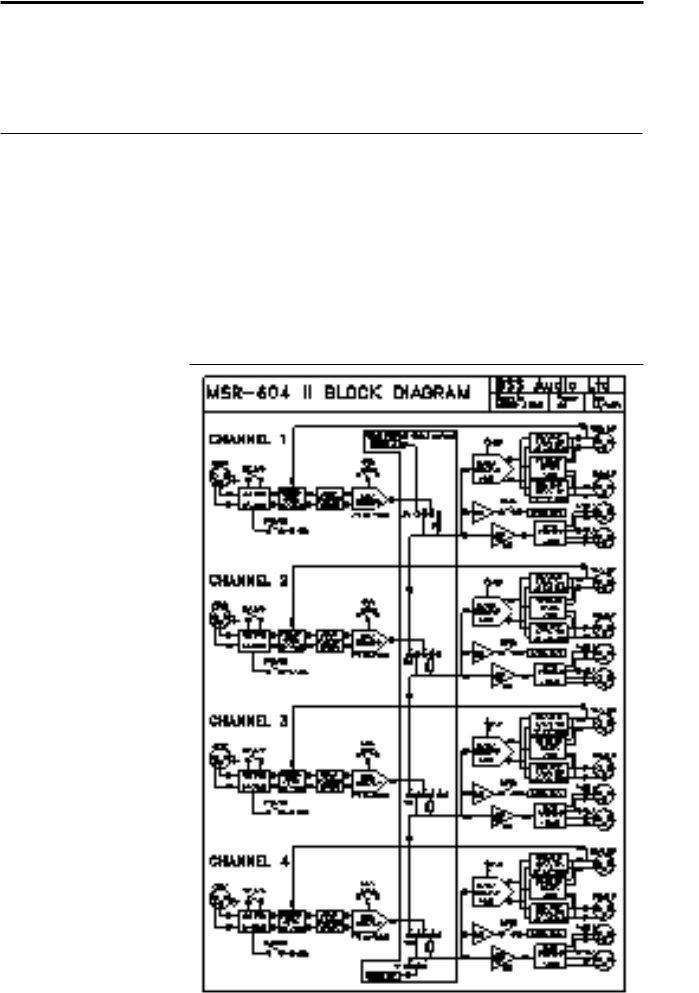
Figure 14 shows the block diagram of the audio section of the MSR- 604 II. The DC supply regulator circuits (not shown) are common to all channels. The rails to each channel are protected by fusible resistors so that in the event of a short circuit fault in one channel the other three are not affected.
The input signal passes via RFI filters to the MIC/LINE switch, a bal- anced 20dB pad, and then to the REMOTE ATTENUATOR. This is a
27
M SR- 600 II Se rie s
Tra nsie nt Suppre ssor Re pla c e m e nt
6.2Tra nsient Sup p ressor
Rep la c em ent
Fig . 15 Tra nsie nt Sup p re sso r De ta ils
balanced 10dB pad using a relay controlled by a circuit which moni- tors the MAIN OUTPUT XLR for the presence of phantom DC voltage. The balanced signal then passes through the optional input trans- former, if fitted, and DC blocking capacitors to the low noise INPUT AMPLIFIER. This stage provides the common mode rejection trim, GAIN switch and provides a line level low impedance unbalanced drive signal to the BUS LINKING HEADERS. In the default mode the channel signal is not routed to the bus but is passed to the channel output stages.
The OUTPUT AMPLIFIER has two out of phase line driving outputs which are DC blocked and passed to both the balanced MAIN OUTPUT ATTENUATOR and the balanced MONITOR OUTPUT ATTENUATOR. The signals are then fed to the MAIN OUT and the MON OUT XLRs respectively. The low impedance attenuators ensure that a faulty cable or load on one output will not affect the other and also allow the output drive levels to be independently set to +23dBu, +13dBm, or +3dBm at clip. If the optional output transformers are installed, they are fitted in place of the attenuators and the output headroom is preset at +3dBu.
The FEED AMPLIFIER buffers the signal and drives the dual secondary isolating FEED TRANSFORMER which is connected to the two FEED output XLRs mounted on the front panel.
The LISTEN AMPLIFIER buffers the signal before presenting it to the LISTEN switch. This in turn is connected to the listen bus for monitor- ing on the HEADROOM METER and HEADPHONE AMPLIFIER which are located in the
The primary of the mains transformer within the
Should the
Even in this case of extreme overvoltage, the
2 8

Appe ndix B
Input Tra nsform e r Ba la nc ing
O utput Tra nsform e r Ba la nc ing
7.0Ap p end ix B
7.1Inp ut Tra nsform er Ba la nc ing
Figure 15 indicates the location and specification for the suppressors.
In some situations it might be necessary to provide a transformer balanced input and provision has been made within the
Please order as
7.2Outp ut Tra nsform er Ba la nc ing
Provision has been made within the
29

M SR- 600 II Se rie s
Te c hnic a l Spe c ific a tions
8.0Tec hnic a l Sp ec ific a tions
Channels |
Four: |
Independant or internally interconnected |
|||||
Inputs |
|||||||
|
|
|
|
Microphone |
Line |
|
|
|
Impedance |
|
2kΩ |
|
10kΩ |
|
|
|
Max. input level |
+13dBu |
|
+33dBu |
|||
|
CMRR |
>90dB @ 1kHz |
>75dB 50Hz to 10kHz |
||||
Phantom Power |
48VDC via panel switch and LED indicator |
||||||
O utputsM ain (FO H ) & M on, |
|||||||
|
|
|
|
|
(Transformers optional) |
||
|
Max level (internally preset) |
|
|
|
|||
|
|
|
|
+3dBm |
+13dBm |
+23dBu |
|
|
Impedance |
|
<23Ω |
<71Ω |
|
<100Ω |
|
|
Max load |
|
200Ω |
600Ω |
|
600Ω |
|
Feeds: |
Two, |
|
|||||
|
Max level |
|
+3dBu |
|
|
|
|
|
Impedance |
|
<50Ω |
|
|
|
|
|
Max load |
|
600Ω |
|
|
|
|
|
Isolation |
|
2.5kV ACrms for 1 minute |
||||
Gain |
|
|
|
||||
|
Gain switch |
|
|||||
|
Mic/Line pad |
|
|
||||
|
Remote pad |
|
|||||
|
Output scaling |
+20/+10/0dB via internal jumper |
|||||
|
|
|
|
blocks (Main & Mon only) |
|||
Frequency Response |
|
|
|||||
N oise (E.I .N .) (20H z to 20kH z) |
|
|
|
|
|||
|
|
|
|
|
|||
|
0dB gain |
|
|
|
|
||
|
10dB gain |
|
|
|
|
||
|
20dB gain |
|
|
|
|
||
|
30dB gain |
|
|
|
|
||
D istortion (T.H .D .) |
<0.01% 20Hz to 20kHz @ 10dB below clip |
||||||
Level M etering & M onitoring |
|
|
|
|
|
||
|
Channel |
|
Clip LED @ 1dB below clip |
||||
|
Headroom meter on |
|
|||||
|
|
Six point LED meter: |
|||||
|
|
Via Listen switch (momentary) |
|
||||
|
Headphone monitor on |
|
|||||
|
|
Via Listen switch (momentary) |
|
||||
3 0

Te c hnic a l Spe c ific a tions
|
Stereo/Mono |
1/4in Jack socket |
|
Load Impedance 4Ω to 600Ω |
|
|
Max output |
1W rms |
|
Level control |
|
Pow er |
||
|
Connectors |
9 pin ‘D’, with lock jackscrews |
3.8kg Net |
|
||
Size |
1.75" x 19" x 11.6" (44 x 482 x 293 mm) |
||
|
|
excluding connectors |
|
AC Input |
|||
|
Connector |
3 pin IEC with locking clip |
|
|
Voltage selector |
Rear panel 120/240V |
|
|
Switch |
Rear panel |
|
|
Fuse |
|
Rear panel F6.3A(120V) / F5A(240V) |
D C O utputs |
+27V unregulated @ 4A max: low ripple |
||
|
|||
|
+48V |
||
|
Rear panel Fuses F5A(+27V) |
||
|
Connectors |
9 pin ‘D’ female Loop out |
|
|
|
|
9 pin ‘D’ male Loop return |
System Ground Lift |
Rear panel |
Slide switch |
|
Indicators |
3 LEDs, post fuse, on +27V, |
||
H eadroom M eter |
|
|
|
|
Via Listen bus and |
||
|
|
(momentary) |
|
Six point LED meter 0,
Input via DC Loop out connector
H eadphone M onitor
Via Listen bus and
Input: |
via DC Loop out connector |
Connector |
Stereo/Mono 1/4 Jack socket |
Load impedance |
4Ω to 600Ω |
Max output |
4Ω :860mWrms 200Ω :750mW rms |
Level control |
Continuously variable |
Headroom |
In keeping with our policy of continued improvement, BSS Audio reserve the right to alter specifications without prior notice.
31

M SR- 600 II Se rie s
Te c hnic a l Spe c ific a tions
W eight |
7.0 kg Net |
Siz e |
1.75" x 19" x 11.6" (44 x 482 x 293mm) |
|
excluding connectors |
Should you experience any difficulty in operating this equip- ment please contact your local dealer who will also be able to supply you with information on the full range of equipment manufactured by BSS Audio.
and Splitting System.
3 2

Wa rra nty
9.0Wa rra nty Inform a tion
|
This unit is warranted by BSS Audio to the original end user purchaser |
|
against defects in workmanship and the materials used in its manufac- |
|
ture for a period of one year from the date of shipment to the end user. |
|
Faults arising from misuse, unauthorised modifications or accidents |
|
are not covered under this warranty. No other warranty is expressed |
|
or implied. |
|
If the unit is faulty it should be sent, in its original packaging, to the |
|
supplier or your local authorised BSS Audio dealer with shipping |
|
prepaid. |
|
You should include a statement listing the faults found. The unit’s serial |
|
number must be quoted in all correspondence relating to a claim. |
|
We recommend that you record your purchase information here for |
|
future reference. |
IM PO RTAN T |
D ealer N ame: |
|
|
|
D ealer Address: |
|
|
|
|
|
Post/ Zip Code: |
|
|
|
D ealer Phone N o.: |
|
D ealer Contact N ame: |
|
Invoice/ Receipt N o.: |
|
D ate of Purchase: |
|
U nit Serial N umber: |
In keeping with our policy of continued improvement, BSS Audio reserves the right to alter specifications without prior notice.
This product was designed, developed and produced by BSS Audio,
Hertfordshire, England.
Phone (+44) (0)1707 660667. Fax (+44) (0)1707 660755.
33

M SR- 600 II Se rie s
USER NO TES
3 4

USER NO TES
35

M SR- 600 II Se rie s
USER NO TES
3 6