At the heart of veterinary nursing is the profound need for skilled animal handling and restraint, a topic thoroughly explored in Chapter 10 from the BSAVA Textbook of Veterinary Nursing. This chapter welcomes veterinary students into a comprehensive study aimed at equipping them with the necessary skills to correctly handle and restrain dogs, cats, horses, and exotic pets for examination, transportation, and treatment. It sheds light on understanding animal body language, which is crucial in identifying signs of fear and potential aggression, thus guiding how veterinary staff can minimize fear and stress in their furry patients. This segment is not just about physical restraint; it encapsulates a holistic approach to patient care, emphasizing the avoidance of unnecessary pain or distress. It delves into the intricacies of canine and feline communication, offering insights into the diverse meanings behind a wagging tail or the subtleties of a cat's posture. The chapter goes beyond theory, offering practical advice for day-to-day veterinary practice, including how to approach animals in the presence of their owners—a scenario that can dramatically influence an animal’s behavior. Handling techniques and safety measures are discussed, with attention to protecting both the animal and the veterinary staff from harm. This educational journey through Chapter 10 not only underscores the technical proficiency needed in veterinary nursing but also highlights the compassion and understanding required to ensure the welfare of pets in the clinical setting.
| Question | Answer |
|---|---|
| Form Name | Bsava Veterinary Nursing From Form |
| Form Length | 29 pages |
| Fillable? | No |
| Fillable fields | 0 |
| Avg. time to fill out | 7 min 15 sec |
| Other names | bsava vet nursing book, veterinary books pdf, bsava textbook of veterinary nursing 6th edition pdf, veterinary nursing books download |
Chapter from BSAVA Textbook of
Veterinary Nursing
5th edition
(formerly Jones’s Animal Nursing)
Edited by Barbara Cooper, Elizabeth Mullineaux and Lynn Turner
Equine consulting editor: Tim Greet
© BSAVA 2011
All rights reserved. No part of this publication may be reproduced, stored in a retrieval system, or transmitted, in form or by any means, electronic, mechanical, photocopying, recording or otherwise
without prior written permission of the copyright holder.
The publishers, editors and contributors cannot take responsibility for information provided on dosages and methods of application of drugs mentioned or referred to in this publication. Details of this kind must be verified in each case by individual users from up to date literature published by the manufacturers or suppliers of those drugs. Veterinary surgeons are reminded that in each case they must follow all appropriate national legislation and regulations (for example, in the United Kingdom, the prescribing cascade) from time to time in force.
www.bsava.com
Chapter 10
Animal handling, restraint and transport
Trudi Atkinson, Jane Devaney and Simon Girling
Learning objectives
After studying this chapter, students should be able to:
•Describe how to handle and restrain
dogs, cats, horses and exotic pets correctly for examination, transportation and treatment
•Understand basic animal ‘body language’, including signals indicating fear and potential aggression
•Explain how to minimize fear and stress in veterinary patients during approach, handling and restraint
•Understand the techniques used when handling aggressive or potentially aggressive animals, and the use of any equipment that may be required
•Apply the principles of handling and restraint to use in everyday veterinary practice
Introduction
A frequent task for the veterinary nurse in practice is the handling and restraint of animals requiring treatment or examination. How an animal is handled can greatly affect the ease and eficiency with which procedures are carried out. Ineficient or inappropriate handling can subject the patient to unnecessary stress and discomfort, which is not only dam- aging to patient welfare but may also result in the develop- ment of, or an increase in, defensive aggression towards veterinary staff. Proiciency in handling and control is one of the most essential and valuable skills for a veterinary nurse to acquire.
The aims of the nurse when restraining an animal should be as follows:
•To enable an examination or procedure, such as the application of dressings or the administration of medication, to be carried out as eficiently as possible
•To avoid injury or further injury to the patient. For example, if sharp instruments such as scissors are used to cut the animal’s hair or a scalpel blade is used to take a
skin scrape for examination, injury may result if the animal moves excessively or unexpectedly. Likewise, excessive or sudden movement may result in further injury while attempts are made to examine or treat a fracture or open wound
•To prevent the animal injuring handlers, veterinary staff or other persons
•To achieve the above without causing additional or unnecessary pain or distress to the animal.
In order to handle dogs, cats, horses and exotic pets suc- cessfully it is important irst to understand a little about how these species behave and are likely to respond to attempts to handle and restrain them.
Canine and feline communication
Pain and fear may cause an animal to behave very differ- ently in the veterinary surgery from how it might do under other circumstances. An elementary knowledge of canine and feline communication can help the veterinary nurse assess the possible reactions of an individual animal in its current situation and adapt the means of handling and re- straint accordingly.
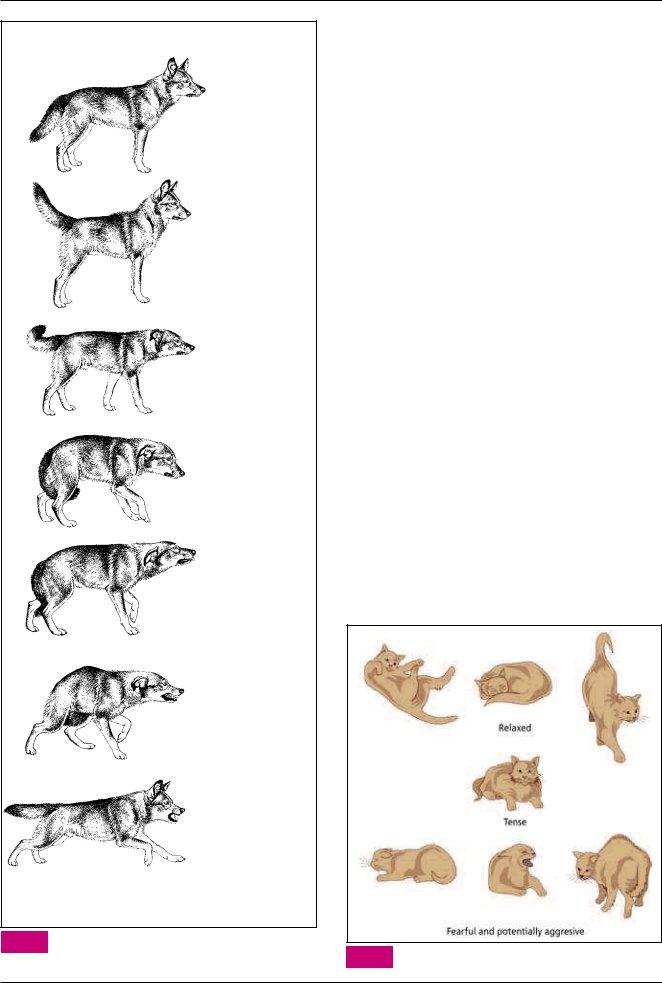
Canine ‘body language’ and facial expressions
Figure 10.1 illustrates the typical range of canine body postures and facial expressions (changes in body posture will also occur depending on the dog’s current activity).
Tail wagging
A wagging tail can have several meanings, including a willing- ness to interact (possibly aggressively) by an assertive dog, or a sign of appeasement by a nervous and potentially de- fensively aggressive dog. The veterinary nurse should always consider other aspects of the dog’s body language and never assume that a dog with a wagging tail is friendly and will not bite.
228
Chapter 10 Animal handling, restraint and transport
Relaxed, neutral
Alert, aroused
Greeting
Fearful
Fearful, pacifying
Fearful, defensively aggressive
Overt,
defensive agressive attack
10.1Canine body language and facial expressions. (Illustrations by Priscilla Barrett; redrawn after
Fox and Bekoff, 1975)
Dominance, aggression and fear
‘Dominance’ is a commonly misunderstood concept. It is purely the ability of an individual at a given point in time to gain or maintain preferential access to a desired resource. It
is incorrect and potentially damaging to equate ‘dominance’
with aggression or other undesirable behaviour. Fear is the underlying cause of almost all episodes of aggression, espe- cially in a veterinary situation.
A fearful dog may appear conident and assertive if it has previously had the opportunity to learn that aggression can be effective in making a potential threat ‘back off’ or keep its distance, even if only momentarily. It is important to real- ize that attempts to reprimand a fearful animal will only result in an increase in fear and consequently an increase in defen- sive aggression (see also Chapter 11).
Feline communication
Figure 10.2 shows the typical body language of a cat.
Relaxed
•Body: If resting, cat may be on its back with belly exposed, or curled up. Feet may not be in contact with the ground.
•Tail: Extended or loosely wrapped if cat is resting. If standing or if in motion, tail may be held down in ‘U’ shape away from body, or upright, sometimes with curl at the end as friendly greeting.
•Ears: Normal ‘relaxed’.
•Eyes: May be half closed if cat is relaxed; pupil size dependent on available light. A ‘slow eye blink’ may be directed towards other animals, including people, as a signal of
•Vocalization: May purr while relaxed, or chirrup or meow as friendly greeting.
Tense
•Body: May explore area looking for ways of escape or rest in ‘ready’ position with feet in contact with the ground so cat can move quickly if necessary.
10.2Feline communication.
229

Chapter 10 Animal handling, restraint and transport
•Tail: Usually wrapped around body.
•Ears: Slightly lattened sideways.
•Eyes: Open, pupils dilated.
Fearful
•Body: May be held low and away from source of fear with all four feet on the ground, or may attempt to hide.
•Tail: Very tight to body.
•Ears: Flattened sideways.
•Eyes: Wide, with dilated pupils.
Fearful/defensively aggressive
•Body: Flattened and backed away from source of fear. If approached, may ‘lash out’ with front feet, but with body held back.
•Tail: Tightly wrapped or ‘lashing’.
•Ears: Fear and submission signalled by holding ears down and to the side; however, to protect them from injury, ears are held back and down if an aggressive encounter becomes more likely.
•Eyes: Wide, pupils fully dilated, and focused on the source of fear.
•Vocalization: May growl, hiss or spit.
A cat confronted by a sudden, unexpected danger, such as an unknown or unfriendly dog, may arch its back and luff out the hairs along its back and tail in an attempt to appear much larger than it really is.
Purring
Cats often purr when relaxed or as a way of soliciting food or attention, but they may also purr when in extreme pain or distress. This may be one way that the cat tries to reduce its level of stress, in the same way that people may whistle or hum if anxious or frightened.
Initial approach and handling of dogs and cats
Handling with the owner present
When handling any species of animal in front of its owner the veterinary nurse should always remember that how the owner witnesses their pet being handled will relect upon the type and standard of care that they expect from the veterinary practice in general; if the pet is handled roughly or inefi- ciently they may choose to take their pet and their custom elsewhere. The way in which the animal is handled whilst with the owner may also affect the way that the pet behaves; this is especially the case for dogs.
It may be tempting to ask an owner to help with handling or restraining their pet, particularly if it is nervous; however, practice staff should be aware of the possibility of litigation should an owner be injured, even if the owner volunteered their services. Owners might usefully administer treats or distractions to their pet to ease examinations, etc. but
generally should be dissuaded from putting themselves in any position of potential risk. A second member of staff should be asked to help if two people are needed to restrain and examine the pet. For more information on staff and client safety see Chapter 2.
Some owners may unintentionally reinforce their pet’s fear and aggression, and if an animal is dificult to handle it may be easier to deal with away from the owner. When separating dog and owner it is often more successful to ask the owner to leave the room irst and then lead the dog away.
Handling dogs
It is helpful to spend a little time ‘chatting’ with the owner before attempting to handle or approach a dog. This time can be spent watching the dog and making a general assess- ment of its temperament. The dog will take cues from its owner as to whether or not something or someone is a po- tential threat. A minute or so talking with the owner in a ‘friendly’ manner can often help to convey the message to the dog that you are not a threat.
A dog may, however, still regard you as a threat, either due to a previous negative experience in a veterinary context or because of a generalized fear of strangers, and may react in a defensive and aggressive manner, not only if approached directly but also if an approach is made towards the owner. Therefore, until you are certain of the pet’s temperament and its perception of you as ‘friend or foe’, it is advisable not to attempt to shake the owner by the hand or perform other similar actions.
•Whenever possible, a dog should be encouraged to approach the vet or nurse, rather than the vet or nurse directly approaching the dog.
•Cornering a dog, leaning over it or prolonged direct eye contact, all of which the dog may consider threatening, should be avoided.
•Crouching down to the dog’s level can help with nervous individuals, but not so close that your face could be within ‘biting’ distance.
•Grabbing a dog by the collar or scruff should be avoided, as this could frighten the dog and cause it to turn and bite.
Nervous animals that are normally obedient may be reas- sured by giving them a few easy commands to help them relax, especially if the owner has previously associated these responses with rewards. However, veterinary staff must also be aware that if a dog has been subjected to punitive training methods, the use of commands could have the opposite effect of increasing fear and associative defensive behaviour.
Occasionally, dogs are reluctant to leave the safety of a hospital kennel and may become defensively aggressive if confronted or if attempts are made to enter the kennel in order to remove them. If a lightweight lead is left on the dog, the end can be extracted using a broom handle or cat catch- er, allowing the handler to take hold of the lead safely with- out needing to confront the dog. In most instances, once the handler has hold of the lead the dog will leave the kennel and walk willingly with the handler.
WARNING
To avoid injury if leaving a lead on a dog in a kennelled situation, the lead must never be attached to a choke chain or slip lead and the dog must be regularly supervised.
230
Chapter 10 Animal handling, restraint and transport
Handling cats
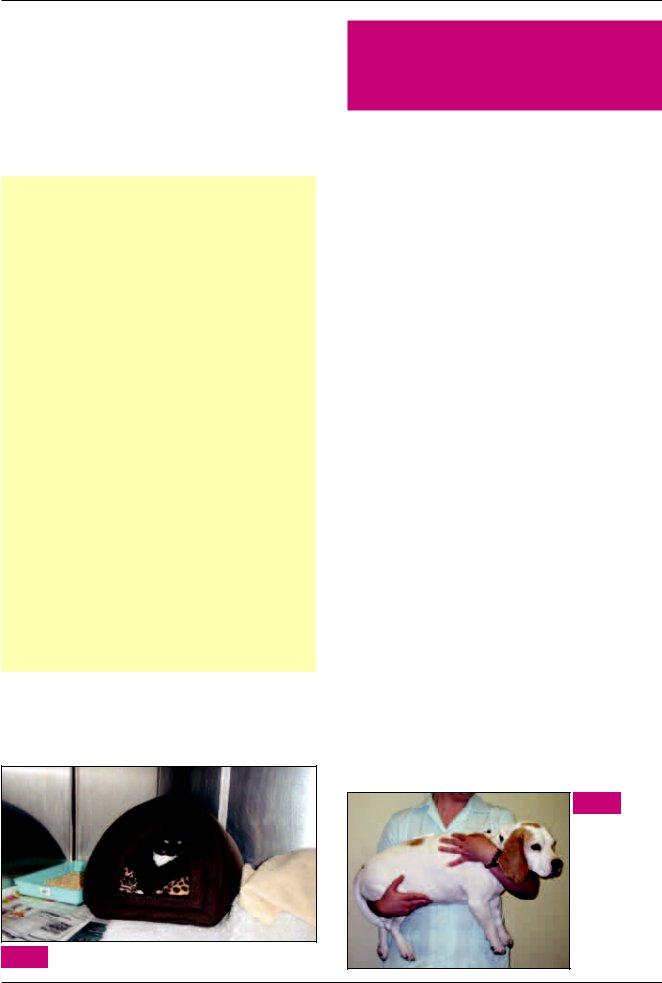
Examination or procedures should be carried out on cats as soon as possible. Cats often have a limited ‘tolerance period’, i.e. they will put up with so much for so long and then sud- denly decide that they have had enough and try to escape or become defensively aggressive. Cats often feel very vulner- able in hospital kennels. Providing a box or similar in which they can hide (Figure 10.3) can help a cat feel more secure and therefore easier to approach and handle.
Extracting a cat from a carrier
1.Lift the lid slowly. Most cats will prefer to stay in the carrier but some may try to jump out as soon as the lid is lifted, so be prepared.
2.Stroke the cat to settle it and assess its temperament.
3.Make sure the cat is well supported underneath (see Lifting and carrying) and lift it out and on to the examination table.
1.Open the front and try to encourage the cat out without putting a hand inside the carrier, which the cat may ind threatening, making it less willing to leave the safety of the carrier.
2.If the carrier can be separated into two halves, remove the top half and lift the cat out as you would with a
3.If none of the above is possible, gently tilt the carrier, which may help to encourage the cat out.
A cat should only be forcibly extracted from its carrier as a last resort; if this is necessary try to do so gently and be aware that the cat may become defensive. Do not pull
the cat out by its scruff unless it is absolutely necessary
and all other methods have been tried. Doing so can be frightening and potentially painful for the cat, thereby increasing the likelihood that the cat may become progressively more dificult to handle.
Once the cat is out, the carrier should be placed on the ground or otherwise out of the cat’s sight. If the cat can see the carrier it may repeatedly try to get back in and may be- come fractious when prevented from doing so.
10.3Providing a place to hide can make a cat feel more secure.
Moving, transporting and lifting dogs and cats
Dogs must always be on a lead attached to a well itting collar if they are to be walked from one area of the surgery to another.
•Always check that the collar is not too tight, or so loose that the dog could slip out of it.
•For added security, use a lightweight slip lead as well.
If cats or other small animals are to be transported from one area to another, they must be securely contained in an appropriate carrier.
Lifting and carrying
Handlers should be aware of any possible medical conditions or injuries that could be causing an animal pain or discomfort before attempting to lift or carry it. Points of pain should be kept away from the handler’s body as the animal is carried, to reduce the risk of causing further discomfort.
It is important to ensure that the animal is aware of the handler’s approach and intent before an attempt to lift it is made.
•Small to
•Large, heavy (>20 kg) or injured dogs should be lifted and carried by two people of similar height (Figure 10.5).
•Large, immobile or severely injured dogs are best carried by two or more people in a blanket (Figure 10.6) or on a stretcher (Figure 10.7).
•Cats should be tucked in under the arm with the forearm supporting the underneath of the cat and with the hand gently holding its front legs (Figure 10.8). The other hand can be used to stroke the cat over the head and neck, ready to take hold of its scruff if necessary.
Always follow the health and safety guidelines when lifting (see Chapter 2):
•Keep the back straight, legs slightly apart and bend at the knees
•Always get assistance before attempting to lift a heavy or awkward weight
•Keep the load close to the body.
10.4
Lifting a small dog. (Courtesy of E Mullineaux)
231

Chapter 10 Animal handling, restraint and transport
10.5Lifting a large dog requires two people. (Courtesy of J Niehoegen)
10.6Lifting a dog with a blanket. (Courtesy of J Niehoegen)
10.7Carrying a dog on a stretcher. (Courtesy of E Mullineaux)
10.8Lifting a cat.
Transport of anaesthetized or unconscious animals
Anaesthetized or unconscious animals should be transported on a wheeled trolley, or similar, and monitored at all times. To maintain the animal’s airway the neck should be pulled slightly forward and the tongue extended. Placing the tongue under the patient’s lower jaw will prevent the tongue falling back into the mouth and blocking the airway if the animal is not intubated.
International transport of small animals: the Pet Travel Scheme
The Pet Travel Scheme (PETS) relates to the movement of pets (dogs, cats and ferrets) into the UK. While allowing ease of movement without quarantine, there are control measures (vaccination) to prevent rabies from entering the UK. Animals travelling from ‘unlisted’ countries may also travel but require more stringent controls, including a
A Pet Passport may be obtained from a veterinary surgeon; in the UK this is a local veterinary inspector for Defra.
Export and import licences are required for the transport of other mammalian species and for birds, as well as for dogs, cats and ferrets to or from countries outside the Pet Travel Scheme.
For further details and current information see the Defra website.
Restraint of dogs and cats for examination or treatment
Restraint of pet animals should be irm but gentle, using no more than the minimum amount of restraint necessary. Care must be taken not to cause undue pain or discomfort by ap- plying any more pressure than is required. It may be necessary to adjust the irmness of your hold momentarily, depending on the animal’s reactions to the procedure being performed.
The means of restraint used is dependent on both the procedure to be performed and the reactions of the indi- vidual animal.
Restraint of dogs
Figure 10.9 shows two methods of steadying a dog’s head. The
Figure 10.10 shows a dog being held for cephalic venepunc- ture. It is often useful to have an additional person available to steady the back end of the dog if it starts to struggle.
232

Chapter 10 Animal handling, restraint and transport
(a)
(b)
10.9 |
Restraining a dog’s head. (a) The hands are |
|
placed either side of the neck and the head is |
||
|
gently pushed forwards with the ingers. (b) A
10.10Holding a dog for cephalic venepuncture.
Figure 10.11 shows a dog being restrained on its side. It may be possible to manoeuvre a dog into this position by irst getting the dog to lie down, on command if possible, or by drawing the dog’s legs forward whilst it is in a sitting position and then gently rolling the dog over using the forearm to push the dog’s head down whilst also holding on to the dog’s legs. If the position cannot be achieved by the above method, the dog’s legs that are closest to the handler are grasped and pulled away, causing the dog to fall towards the handler. The dog is then gently lowered down against the handler’s chest and on to the surface. However, it is necessary to be aware that this manoeuvre and being held in this position can be frightening and may cause the dog to panic and attempt to bite. Gentle reassurance is essential and muzzling the dog beforehand may be advisable.
10.11Restraining a dog on its side. (Courtesy of J Niehoegen)
Restraint of cats
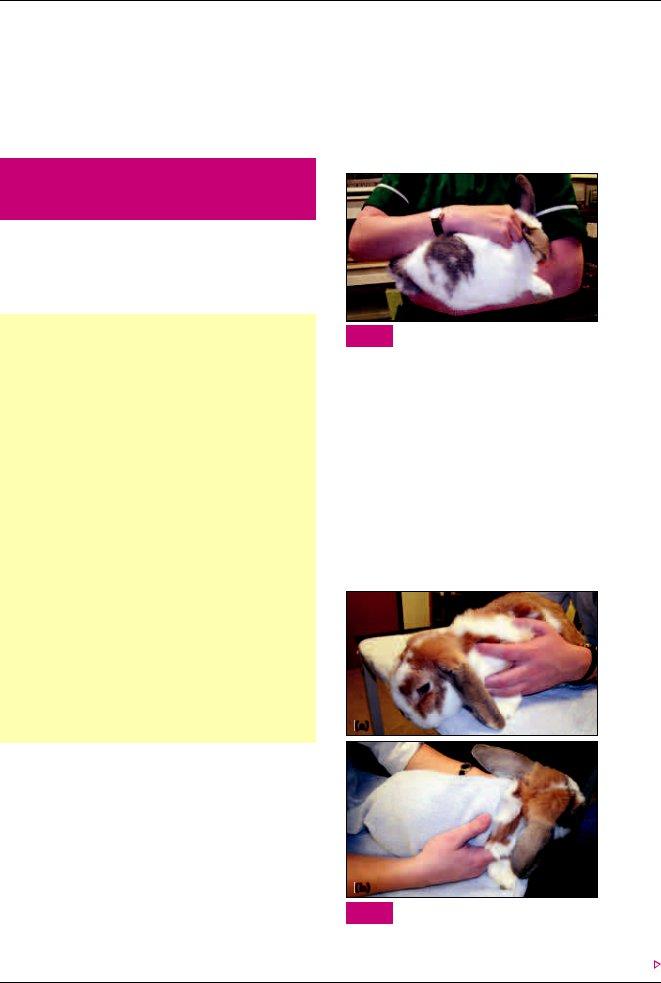
Figure 10.12 shows general restraint for examination or treatment of the head area. The cat’s body should be held close to the handler to prevent the cat from backing away. A irm but gentle hold around the front legs prevents the cat using its front claws.
Figure 10.13 shows raising of the cephalic vein or restraint for examination or treatment of the foreleg. One hand is used to steady the head the other to raise the vein or present the forelimb to the other person.
Figure 10.14 shows two methods of restraint for jugular venepuncture. In Figure 10.14a, one hand is used to restrain the forelimbs and the second to raise the cat’s chin in order to present the jugular area to the person taking the blood sample. The sampler raises the vein. In Figure 10.14b one hand is used to hold the forelimbs and the other to raise the vein.
It may occasionally be necessary to hold a cat by the scruff of the neck if irmer restraint is required. However, this should be considered as a last resort, as being held by the scruff can be frightening and potentially painful and many otherwise calm and tolerant cats can become fractious and dificult to handle as soon as attempts are made to handle them by the scruff.
Distraction
Gentle distractions can often help to calm an animal and allow procedures to be carried out more eficiently.
•Talking to the animal in a calm and friendly manner, especially if the animal’s name is used, can often help to distract and calm a patient.
•Fingers can be used to gently stroke, scratch or massage the animal.
•A short whistle can often ‘still’ a struggling dog, allowing a few moments to get a needle into a vein, take a radiograph or perform any other procedure that requires the animal to be still and distracted for a second or two.
10.12Restraint of a cat to
allow treatment or examination of the head.
233
Chapter 10 Animal handling, restraint and transport
10.13Raising a cat’s cephalic vein or restraint for examination of foreleg.
(a)
(b)
10.14Alternative methods of holding a cat for jugular venepuncture. (a, Courtesy of D Mactaggart;
b, Courtesy of E Mullineaux)
Handling dificult or aggressive dogs and cats
Many animals are scared by the veterinary clinic and what happens there. It is a strange place where potentially unpleas- ant things can happen. Good sensitive handling will obvi- ously help to minimize this problem. The use of dog and cat pheromone diffusers and sprays in the clinic may also help to reduce an animal’s anxiety. Remember that a frightened animal may use aggression as a defence. Any unnecessary actions that may increase an animal’s fear or cause it to be fearful should therefore be avoided.
Dogs
Raising of the paw,
Growling
If a dog growls:
•Do not attempt to punish the dog: A confrontation will only teach the dog that it has good reason to be defensive.
•Do not attempt to comfort or reassure the dog as this may be misinterpreted by the dog and so increase its fear and defensive behaviour.
Instead:
•Do muzzle the dog: A growl may not cause you to back off but a set of sharp teeth heading in your direction will. If this happens the dog will learn that direct aggression is effective even if a warning growl is not. Dogs that have already learnt this can be some of the most dangerous and unpredictable to handle.
•Do try to appear unconcerned by the growl: Backing away or appearing fearful or angry may reinforce the growling and potential aggression.
•Do try to understand why the dog is growling. Is the dog in pain? Is it the way in which it is being handled? Is it the procedure that is being carried out? Unless the procedure is almost inished, or is one that will only take a few seconds, it is best to stop and then continue once the dog is muzzled.
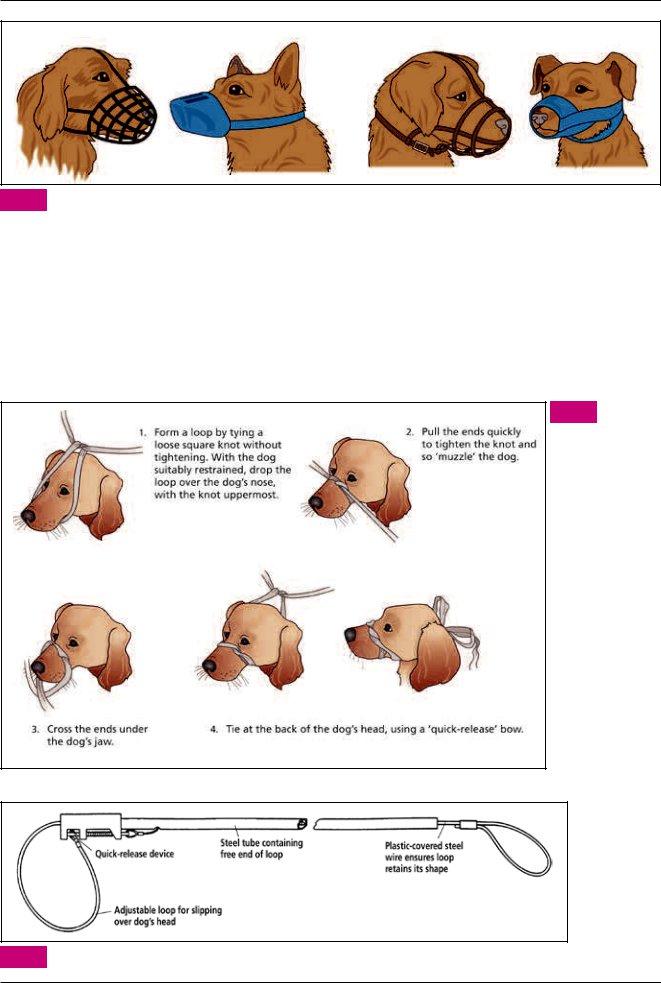
Muzzles
Whenever possible, a dog should be muzzled before it tries to bite. It can be far more dificult to put a muzzle on a dog that has already decided that you are a threat and has discov- ered that trying to bite is effective in making you back off.
A variety of fabric, plastic and leather muzzles is available (Figure 10.15). A good selection of different types and sizes should always be to hand. Note that
If a dog is to be muzzled for longer than a few minutes, it is important always to use a
If a dog is a regular patient and frequently needs to be muzzled, it is a good idea to provide the owner with a suit- able muzzle to take home. The owner should be advised to put the muzzle on the dog frequently for short periods and reward the dog with food treats, play, affection, and even walks whilst wearing the muzzle. The dog will then make pleasant associations with wearing the muzzle, making it easier for the owner to put the muzzle on the dog before bringing it into the surgery.
234
Chapter 10 Animal handling, restraint and transport
10.15Examples of muzzles, from left to right: closed basket type; closed plastic;
Applying a tape muzzle
Figure 10.16 shows the steps in applying a tape muzzle. The tape must be pulled tight in order for the muzzle to be effec- tive, but this can be uncomfortable for the dog and may even cause some slight injury. Therefore this muzzle should only be used in an emergency or if it is not possible to get close enough to the dog to use any other type of muzzle. Often a commer- cial muzzle can be placed over the tape muzzle and once se- curely in place the tape muzzle can be allowed to come loose.
Using a
The noose of the
10.16 Applying a tape
muzzle. Use a length of tape or non- stretch bandage at least 100 cm long for a
10.17A
235
Chapter 10 Animal handling, restraint and transport
Cats
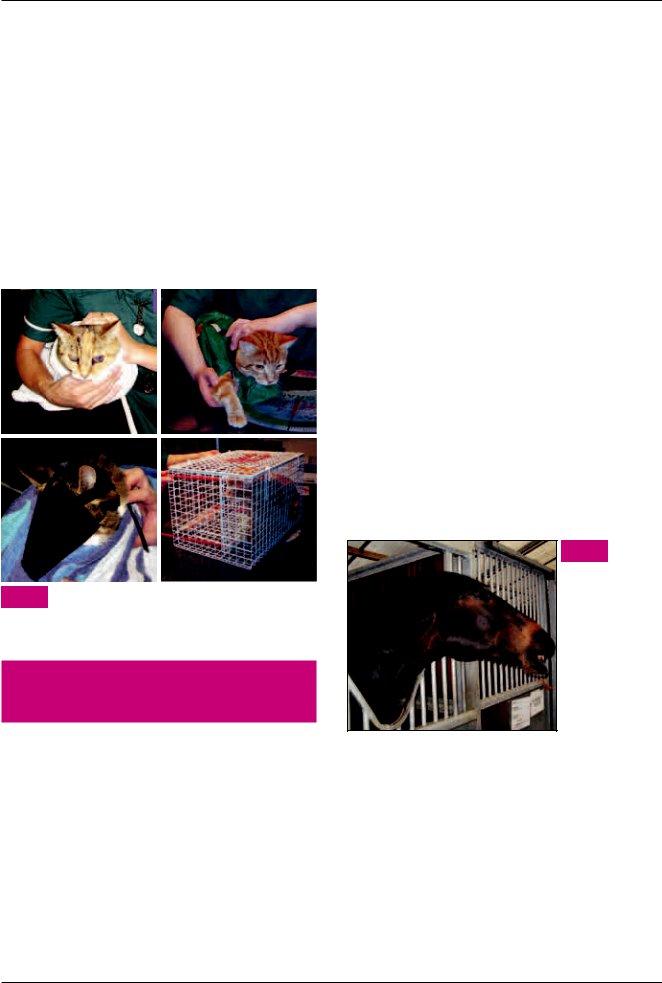
Fractious cats can often be adequately restrained by wrap- ping them in a large towel. An alternative is a ‘cat restrain- ing bag’. Cat muzzles may also be of use. Both cat muzzles and restraining bags can also help to calm a fractious cat (Figure 10.18).
Use of a ‘crush cage’ may be necessary with cats that can- not be handled. This is similar to a wire cat carrier but with a movable partition that is used to press the cat against one side of the cage, allowing an injection to be given through the mesh of the cage. If a crush cage is not available, or if the cat cannot be moved from its carrier, the lid or door of the carrier can be opened just enough to allow thick towels to be pushed into the carrier but not enough to allow the cat to escape. The towels are then used to press the cat against the side of the cage, allowing an injection to be given.
(a) |
|
(b) |
|
|
|
(c) |
|
(d) |
|
|
|
10.18Ways of restraining fractious cats. (a) Wrapping in a towel. (b) Cat restraining bag. (c) Cat
muzzle. (d) Crush cage.
Handling and restraint
of horses
The principles of handling other equine species are similar to those described here for horses and ponies. Donkeys in par- ticular can become very stressed if not used to handling or transportation. It is usual practice with donkeys to provide a companion if possible during travel and also to hospitalize them with a companion, as they become very stressed on their own. The reader is referred to The Professional Handbook of the Donkey for more information.
Understanding equine behaviour
Normal equine behaviour can be understood if they are ob- served in their natural state in a herd setting. Horses are prey animals, which affects their behaviour when placed in stress- ful situations. Horses are, however, also naturally inquisitive
animals that will investigate things in the irst instance and then escape if danger is presented. When handling a horse it is important to be aware of signals that may indicate a change in its behaviour (e.g. if it becomes fearful or aggresive), that indicate potential danger if actions are not taken.
Aggression
Horses may demonstrate aggression for a number of reasons.
•Aggression may be used as a protective mechanism; for example, a mare that is
•Horses may become aggressive if stabled for a protracted period of time and boredom sets in, causing anxiety and/or stable guarding.
•Horses may also demonstrate aggression toward each other as normal dominance behaviour in a herd. Animals that are at the top of the ‘pecking order’ in their herd will want to continue this behaviour in any setting when mixed with other horses. Care must be taken not to place yourself in the area of danger from kicks or bites.
Horses displaying aggression will normally exhibit some outward signs, including tail swishing and obvious baring of teeth (Figure 10.19); the ears will lay lat against the head and some horses will strike out with the front legs or swing the quarters round to kick out with the hindlimbs.
Some stallions, in particular, are very dificult to handle, especially if used for breeding purposes. Any stallion admitted for clinical reasons into a hospital setting should be treated with caution. They should be separated, if possible, from mares and sometimes they are more cooperative when hand- led by male personnel.
10.19 A horse showing
aggression: ears lat to head and teeth bared.
Fear
Horses that display fear may also display signs of aggression. They may retreat to the back of the stable or move away in the ield but, when pressed, can also kick out.
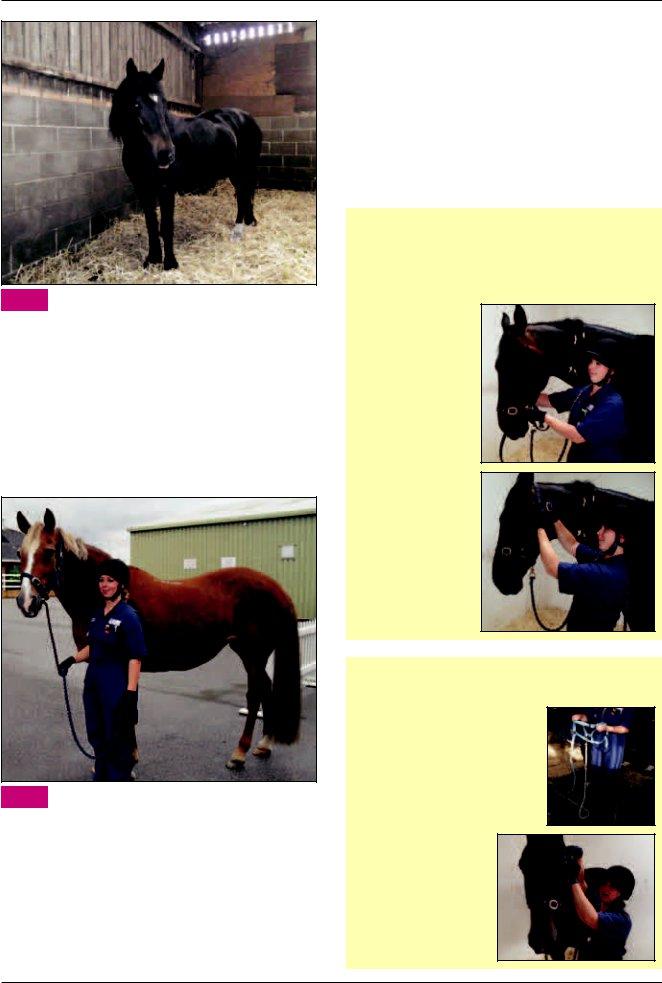
Content/normal behaviour
A ‘happy’, relaxed horse (Figure 10.20) will stand to the front of its stable and approach with an inquisitive mind, with the ears forward or slightly to the side. The relaxed horse will often sleep if contented in the stable/ield environment. Horses are able to lock the joints of their limbs so that they can sleep whilst standing (see Chapter 3). In a herd situation, one horse may be left standing whilst the remainder are able to lie completely recumbent.
236
Chapter 10 Animal handling, restraint and transport
10.20A horse showing a normal relaxed resting stance. (Courtesy of B. Cooper)
Approach
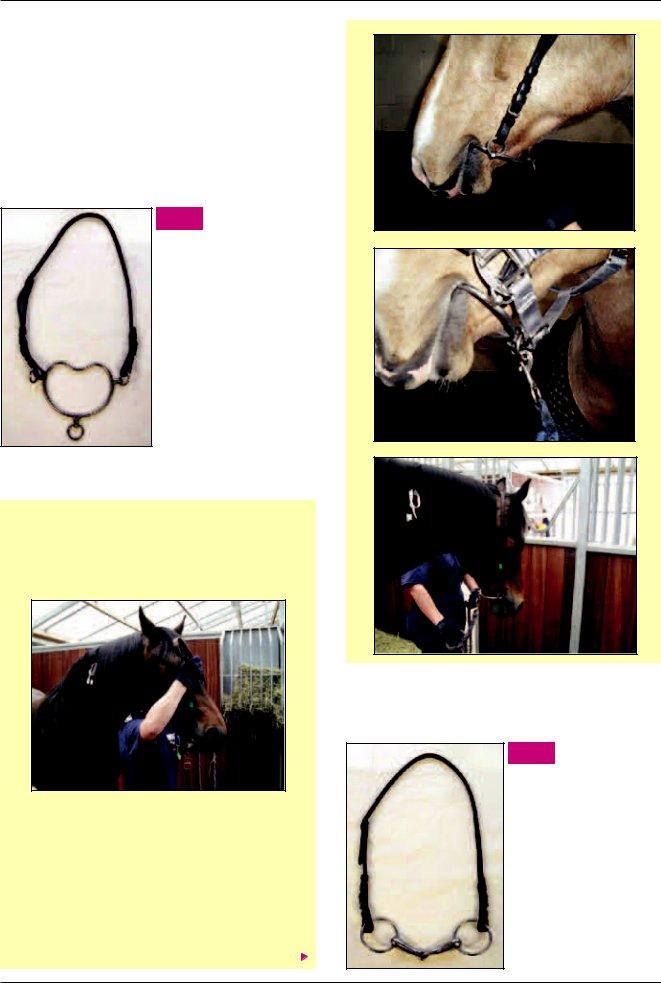
Before performing a task with the horse, everything required should be to hand so that the procedure runs smoothly with- out interruption. Personal protective equipment (Figure 10.21) should include suitable footwear (preferably with steel toe caps), leather gloves,
10.21Handling for lungeing and trotting up, wearing gloves and skull cap.
Horses should be approached in the same manner whether in the ield or stable. Common to many prey ani- mals, their eyes are situated on the side of the head, en- abling them to see the area to either side in a panoramic fashion. However, vision directly in front of and behind the horse is inhibited and the horse should not be ap- proached from those angles. Traditionally, horses are taught to be led from the near side (the horse’s left shoul- der), although most horses should be able to be led from either side when necessary.
Putting on a head collar
The horse should be approached towards the shoulder and verbal communication used. At this point it may be advisable to slip the
How to put on a head collar
1.Ensure that you have a large enough head collar and rope to be able to secure the horse.
2.Get the horse’s attention so that it knows that you are going to enter the stable.
3.Stand next to the horse’s near side (left) shoulder, facing forward, and place the noseband over the nose, slowly inserting the nose through the large hole (nosepiece).
4.Take the long strap up and over behind the ears and secure the buckle fastener on the left side of the cheek.
5.Make sure you can it a hand’s width under the chin; this ensures the head collar is not too tight.
Considerations when putting a head collar on a horse
•Do not allow the
✗
•Do keep the
✓
237
Chapter 10 Animal handling, restraint and transport
Putting on a bridle with a bit
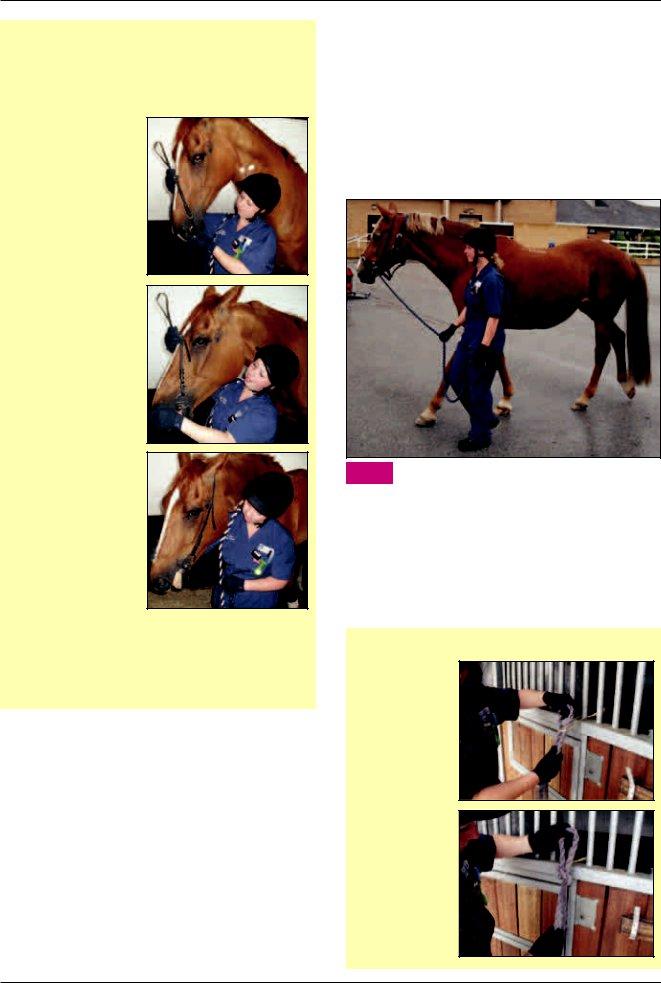
Most horses can be led by a simple bridle or headpiece with a head collar over the top. However, more dificult or young animals may require the use of a Chifney
10.22Simple headpiece with Chifney.
Using a Chifney bit
1.Place the bit with the top edge between the horse’s lips and with a thumb behind the incisors. The bottom edge with the ring should be below the horse’s jaw.
2.Secure the bridle over the ears.
A bridle with a simple bit, such as a simple loose ring snaf- le (Figure 10.23), may also be used for handling.
10.23 Simple headpiece with loose ring
snafle.
3.Check that any forelock is pulled from beneath the bridle and that the Chifney is sitting in a comfortable position in the gap between the incisors and cheek teeth.
4.Once the head collar is on, attach the
238
Chapter 10 Animal handling, restraint and transport
How to put on a bridle with a bit
1.Approach the horse from the left shoulder and place your hand around its head to secure the horse in a comfortable position; note the bridle cannot be placed with the head in an elevated position.
2.Hold the headpiece up against the head, apply gentle pressure with the bit and place your thumb in behind the incisors at the same time.
3.Once the bit has been accepted by the horse, place the headpiece over its ears.
4.Once in position, adjust the headpiece to it, so that there are no more than two creases in the edge of the lip and the bit is not dangling on the incisors.
5.Place the head collar over the headpiece to prevent the headpiece from being pulled over the head if the horse runs backwards sharply.
To remove the bridle, take hold of it from behind the ears and allow the bit to gentle drop between the incisors; a hand should be held under the nose to catch the bit to prevent it banging on the teeth.
Leading a horse
Once the head collar is on, the horse should be walked at its shoulder (Figure 10.24). The horse should not be allowed to get too far ahead as it may run off. The remaining
conjunction with the head collar to facilitate more control, especially if ‘trotting up’ or exercising on a lunge is to be per- formed. When leading a horse for dynamic evaluation a suit- able level area should be sought, where the horse can be walked or trotted for 20 m in a straight line. When turning the horse (turning should be done in walk only) the handler should turn the animal away from them in a fairly wide circle to pre- vent the horse from treading on human toes. It is only common sense to try to ensure that this is carried out in an area from which the horse cannot escape. Potentially severe conse- quences can result from horses escaping on to public roads.
10.24Walking the horse from the shoulder with bridle and head collar.
Tying up a horse
Horses should always be tied up using a
How to tie a
1.Thread the
2.Thread the
continues
239
Chapter 10 Animal handling, restraint and transport
continued
3.Pull the knot to secure it, and thread the remaining end through the second loop made to prevent the horse from pulling on the end and untying itself.
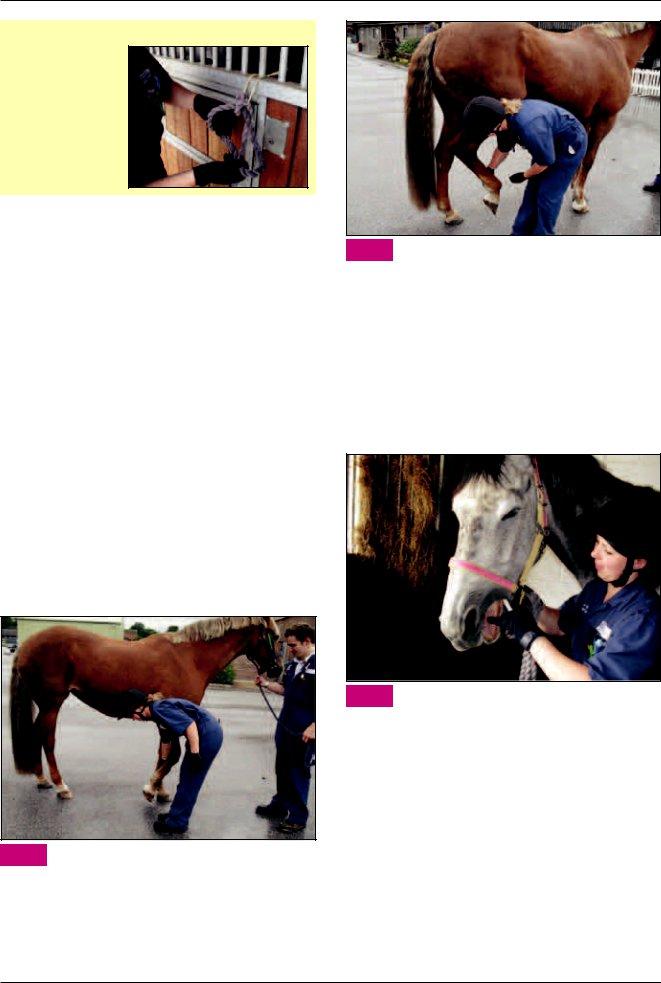
Picking up a foot
The horse should be restrained by a handler or tied to a suit- able tie ring with a
Forefoot
The handler should stand facing the tail at all times. To lift the forefoot, the handler’s hand should be placed on the shoulder of the horse and run down the caudal and then palmar aspect of the limb until the fetlock is reached. Gentle pressure should then be applied to the area and the horse commanded to lift the limb (the command would usually be ‘up’). As the horse lifts the limb, the area from the dorso- medial aspect of the foot should be supported and held gently (Figure 10.25). Keeping in close contact with the horse’s shoulder will allow the handler to detect any movement from the horse and anticipate the horse snatching the foot down; the handler should stay ahead of the horse to prevent injury from the horse striking out with its limb. Examining and clean- ing of the hoof (see Chapter 16) should be carried out twice a day, especially in a hospital environment where the horse is standing in the stable and fungal infection can occur as a result of poor foot care.
10.25Picking up a forefoot.
Hindfoot
The hindfoot should be approached in a similar manner, with the approach from the front of the horse back to the quarters and down the caudal then plantar aspect with pressure to the fetlock. The handler should again remain close to the
10.26Picking up a hindfoot.
horse to minimize the risk of being kicked. The foot should not be restrained, but instead the limb should be supported, as a pressured horse will kick out (Figure 10.26).
Examination of the mouth
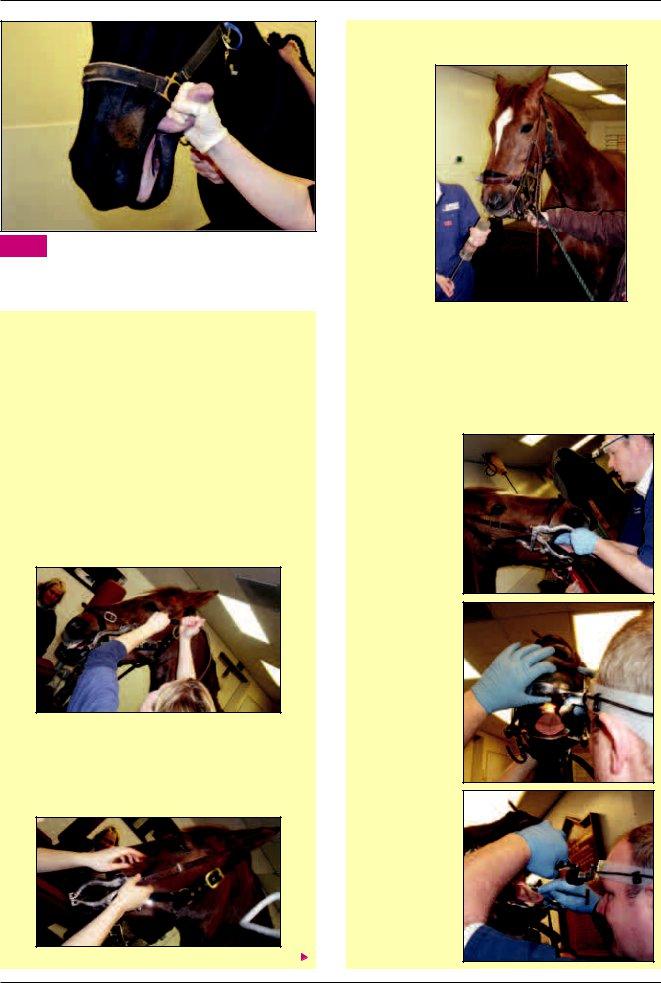
Some medications, such as worming,
10.27Giving oral medication to a horse. The syringe is placed in the corner of the mouth and directed
towards the back of the tongue.
A cursory examination of the equine mouth can be made by gently holding the tongue in one hand through the side of the mouth between the canine and premolar teeth (Figure 10.28). To examine a horse’s mouth properly, and to carry out any dental work, a gag is needed (typically a Hausmann’s gag).
Apart from rasping teeth with a hand rasp, all other pro- cedures (including any tooth extractions and use of motorized dental instruments) must be carried out by a veterinary sur- geon or a
240
Chapter 10 Animal handling, restraint and transport
10.28Holding the tongue to examine the mouth. The tongue is gently withdrawn into the space
between the canine and premolar teeth allowing the teeth on the opposite side of the mouth to be examined.
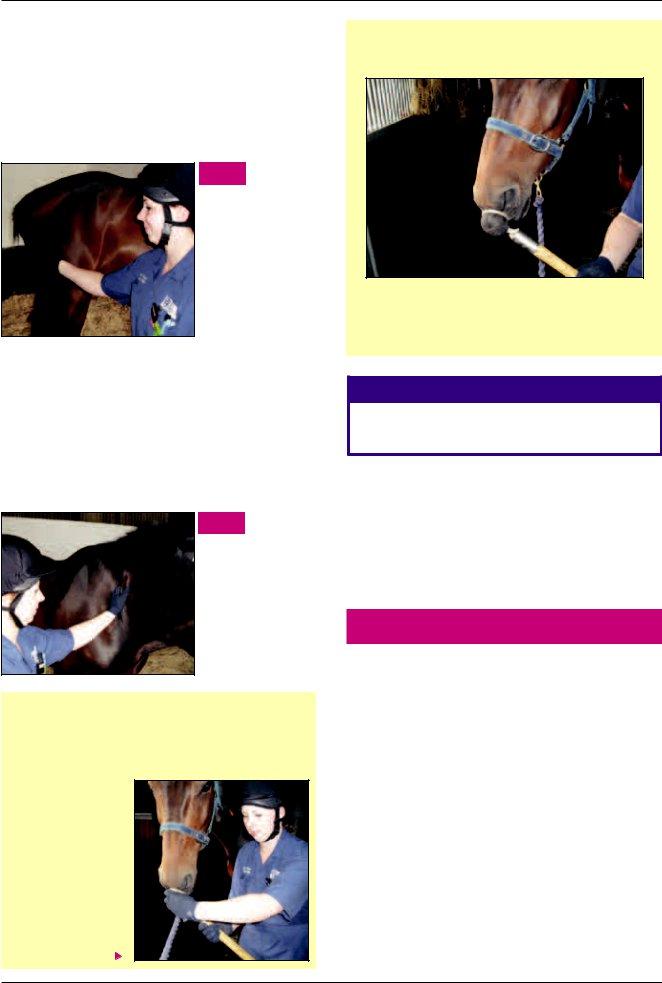
Mouth examination procedure
A set of stocks may be used to prevent the horse from moving about during examination. The area should be well lit, to facilitate the oral examination, and quiet to prevent interruption.
1.Once the patient is in situ, a Hausmann’s gag can be placed in its mouth. It is very important that the size of the gag its the patient; one size will not it all. The gag should be carefully placed on the horse. The strap must sit behind the ears in a normal headpiece position and then be tightened until the plates it neatly between the teeth; there should be no gap between the front of the bite plate and the incisor teeth. A loose strap will allow the gag to slip and the horse’s mouth to close on the vet.
3.The mouth is irst washed to remove any food material.
4.The dental examination can then begin, followed by any necessary dental work. Note that one hand should be placed on the gag whilst the other is in the mouth to control the horse’s head. The horse may be rested several times during the procedure to prevent temporomandibular joint pain. Oral extractions may take several hours, so patience is required.
Mouth being palpated for abnormalities.
Oral examination with a head- torch.
2.Once the gag is safely in place the plates can be widened one click at a time, going from one side of the gag to the other, giving the horse time to adjust each time the gag is widened. Once the gag is wide enough to allow the vet to palpate the teeth safely, examination can begin.
Teeth being rasped.
241
Chapter 10 Animal handling, restraint and transport
Restraint for procedures
When performing tasks such as intravenous catheterization or nerve blocks, additional restraint may be required; this may be as simple as holding the tail to keep the horse weight bearing (Figure 10.29), or lifting and holding a foreleg in order to examine a hindleg. More involved restraint tech- niques, such as the application of a twitch or chemical re- straint, may be required in some cases.
10.29
Holding the tail to keep the horse weight bearing.
Application of a ‘twitch’
Applying a skin twitch to the neck or shoulder may encourage the horse to remain still for a procedure. This can be done by holding a small amount of skin irmly in the hand (Figure 10.30).
A nose twitch consists of a length of wood (or metal or rubber, which are usually much safer) with a rope attached at one end in a loop. Commercial twitches are also available. It must be placed carefully to prevent injury to the horse and the handler, and must not be left in place for more than 5 minutes.
10.30 Skintwitch.
How to apply a nose twitch
A handler is required to stand at the side of the horse, and on the same side as the person applying the twitch in order to prevent the horse from jumping on to them.
1.Place one hand on the pole and your second hand through the rope, which should then be placed on the horse’s upper lip.
2.Slide the rope over the hand on to the lip and then twist it until it grips a irm amount of skin.
3.Twist the
WARNING
A twitch should never be used on an ear, as this can cause permanent damage and may also cause the animal to become head shy.
It is essential to monitor a horse`s behaviour very carefully when it is ’twitched’, as of all the restraint techniques em- ployed it is the one most commonly associated with injury to personnel. Some horses will suddenly react or strike out when ’twitched’, but usually they will give signs such as closing their eyes before this happens. Under such circumstances, the twitch should be removed immediately.
Transporting horses
Legislation
Defra has speciic guidelines on the transport of horses, which state that within the United Kingdom transporting a horse in a way that is detrimental to its welfare would be a breach of the Animal Welfare Act 2006. The Act states that a person commits an offence if they are responsible for an animal, either permanently or temporarily, and either cause the ani- mal to suffer or fail to ensure its need are met.
Other legislation controlling the transport of horses includes:
•The Horses (Sea Transport) Order 1952 – amended 1958
•The Transit of Animals (Road and Rail) Order 1975
– amended 1979 and 1988
•The Welfare of Animals (Transit) Order 1997.
The Horserace Betting Levy Board also provides addi- tional guidelines on the transport of racehorses. These give details of the size of carrier transport, the length of time a horse can be transported, periods of rest and the prevention of transporting horses that may be unit for transport due to
242
Chapter 10 Animal handling, restraint and transport
ill health, or transportation of mares in early pregnancy. For all horses, rest periods should be applied every 8 hours and for horses travelling over 24 hours, a
Equine passports
Horse owners are responsible for making sure that they have an
Horse passports are important because they help to:
•Ensure horses that have been treated with certain medicines do not make it into food intended for humans (see Chapter 8)
•Prevent the sale of stolen horses.
The passport will contain details about the horse, including its appearance, which is illustrated in a diagram, microchip details (Chapter 16), age, breed/type and all the medications it has been given (if it has been declared ‘intended for human consumption’). Passports require a signed statement by the owner that it is NOT intended for human consumption, oth- erwise it is presumed that it is intended for human consump- tion; this is important for the administration of medication (see Chapter 8).
Practical considerations
Transporting a horse can be stressful to the animal and this must always be taken into consideration. Horses can become dehydrated, even over a short journey, and regular water should be offered at rest breaks.
Horses should be allowed to spend at least some of the journey with their head in a lowered position, with good ventilation as this will help to decrease the risk of respira- tory complications. Any horse with a
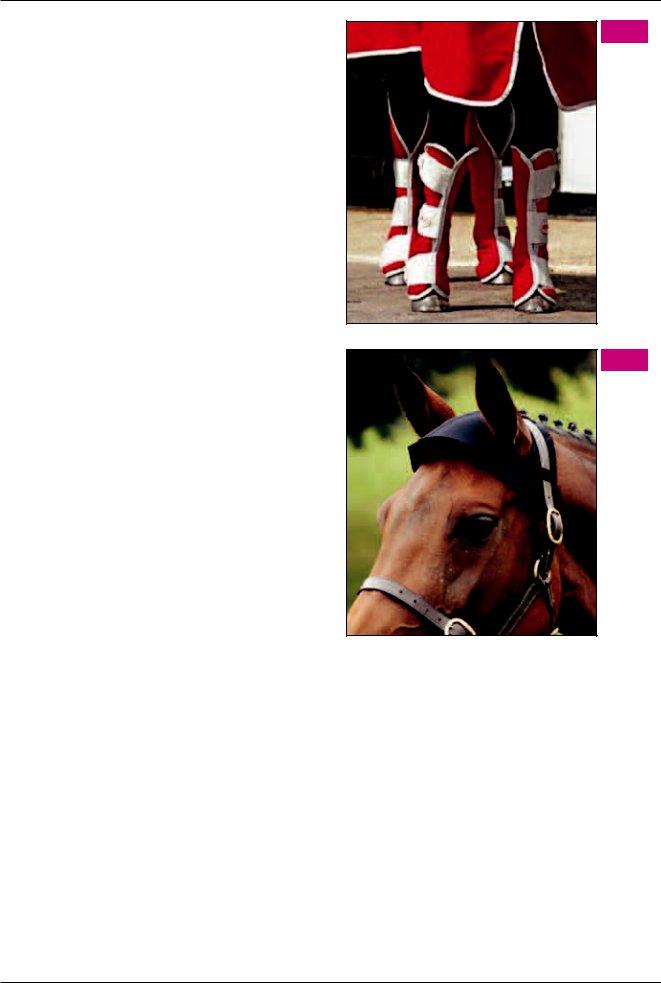
Correct travel clothing should be used for all horses that are travelling. This should include padded bandages that cover the limb from the hoof to above the carpus and tarsus to prevent rubbing and knocks, or commercial travelling boots (Figure 10.31). Poll guards to protect the top of the head in the event of rearing in a conined space (Figure 10.32), and a tail bandage and guard to protect against rubs, are also avail- able. A rug may be necessary, but care should be taken when transporting several horses in a small area, as overheating can worsen dehydration. A sweat rug may be applied at the end of the journey.
10.31
Travelling boots.
10.32
Poll guard.
Transport to the veterinary practice
Not all horses travel regularly and care should be taken not to hurry such patients when travelling to or from the surgery; owners should be advised to give themselves plenty of time to load and unload. Injured or sick horses must travel only on the authorization of a veterinary surgeon. Each case should be given special consideration; horses in splints for suspected fractures should be loaded on a lat surface if pos- sible, with the ramp elevated to help protraction of the leg in the case of a forelimb. Horses with a forelimb fracture should travel facing backwards, whereas those with hindlimb fractures should face forwards. This will allow them to cope if the horse box has to brake suddenly. Any horse with an injury or rhabdomyolysis (tying up) should not be moved more than necessary and the transport should be for as short a distance as possible. Foals should be allowed to travel with the mare without a partition if possible. Personnel should not travel in the back with an animal, unless it is in a spe- cially adapted ambulance.
243
Chapter 10 Animal handling, restraint and transport
Handling and restraint
of exotic pets
Removing patients from travelling boxes
Removing exotic pets from their travelling boxes for examina- tion can be a challenge in itself and depends to a certain extent on the type of carrying box the animal has arrived in and the species. Examples of dealing with different types of pets in differing boxes are given below; however, these should be considered in conjunction with the
In most cases it is best to consider sliding a towel in underneath the lid before the lid is fully opened to ensure that the patient does not suddenly leap out, in the case of a rabbit or ferret, or ly out, in the case of a parrot. The towel may then be al- lowed to cover the animal whilst the lid is carefully opened and the animal scooped out of the carrying box. In the case of ferrets and rabbits that are fractious or nervous it may be advisable to grasp the scruff of the neck with one hand through the towel, whilst reaching underneath and restrain- ing the hindlegs around the hocks. The rabbit or ferret may then be carefully lifted out and placed on to a
For rabbits and other small mammals in this type of box it is preferable to remove the door where possible, as this in- creases the opening available for removal of the patient. A towel may then be introduced and the scruff of the neck grasped, to allow the patient to be moved forward enough
to allow the hindlegs to be grasped and the animal removed as described above.
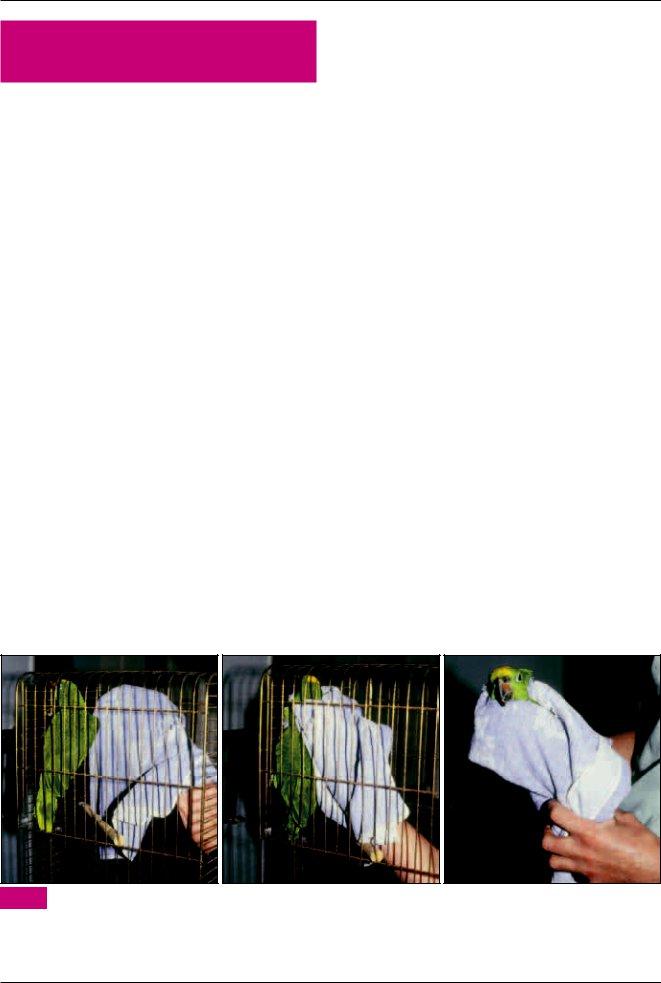
In the case of a parrot or other larger cagebird, a towel should be carefully introduced to prevent escape of the bird past the towel. This should then be draped over the head and body, and the head grasped from behind, transferring the thumb and ingers underneath the lower mandible to control the beak. The rest of the towel is then used to drape over the wings and body and the other hand is used to wrap the bird in the towel to prevent it lapping and hurting itself. The bird may then be removed from the box.
Bird cages
Many smaller cagebirds are transported to the practice in their everyday cage. This can be useful to assess the local environ- ment and the type of droppings the bird has been passing recently, assuming it has not been cleaned out prior to the visit. However, such cages may present a problem in removing the bird safely from the cage as many small cagebirds have plentiful perches, toys (e.g. mirrors, bells) and food items that provide cover to hide behind and that could potentially cause damage. The irst aim is therefore to remove the majority of these obstructions carefully from the cage.
In the case of highly nervous and lighty individuals, it may be sensible to transfer the cage into a darkened room as diur- nal
Rodent cages
As with bird cages there may be a lot of cage furniture inside these enclosures and the majority should be removed to allow free access. Hamsters in modular housing should be encour- aged to move into their sleeping quarters, which may then be detached from the maze of tunnels.
(a)
(b)
(c)
10.33Removing a parrot from its cage. (a) The towel and hand are introduced into the cage. (b) The bird is irmly but gently grasped from the back. The head must be located irst, to allow the thumb and foreingers to be positioned
underneath the lower beak, in order that it can be pushed upwards thus preventing the bird from biting. The rest of the towel is then used to wrap around the bird to gently restrain its wing movement. This will avoid excessive struggling and wing trauma.
(c)The patient may then be cocooned in the towel with the head still held extended from behind through the towel and the rest loosely wrapped around the bird’s body.
244
Chapter 10 Animal handling, restraint and transport
Once the cage is cleared of excess furniture, a light hand towel or paper towel may be introduced and draped over the rodent to initially restrain it. The scruff of the neck may then be irmly grasped, as described below for more active and aggressive animals such as hamsters. Alternatively, the thumb and foreingers may be slid under the forelimbs and the other hand introduced to support the rear end of more doc- ile rodents such as chinchillas and rats.
Handling and restraint of small mammals
Pet mammals come in many different shapes and sizes, and from many different backgrounds – from those more adapt- ed to human
Assessment before handling
1.Is the patient severely debilitated and/or in respiratory distress?
Examples include the pneumonic rabbit, with obvious oculonasal discharge and dyspnoea, or older rats with chronic lung disease. Excessive or rough handling of these patients is contraindicated and the journey into the veterinary practice may already have caused further stress.
2.Is the species a tame one?
Examples of the more unusual small mammals that may be kept include chipmunks, marmosets and other small primates, opossums and raccoons. All of these are potentially hazardous to handlers and themselves, as they will often bolt for freedom when frightened, or turn and ight. Even the more routinely kept small mammals may be aggressive, e.g. hamsters.
3.Is the small mammal suffering from a metabolic bone disease?
This is often seen in small primates, young rabbits and guinea pigs. The diet may have been inadequate with regard to calcium and vitamin D3, and exposure to natural sunlight may be absent. Hence
4.Does the small mammal patient require medication/ physical examination?
If so, handling is often essential.
underneath the rear legs. If the rabbit is not aggressive then one hand may be placed under the thorax, with the thumb and irst two ingers encircling the front limbs, whilst the other is placed under the rear legs to support the back.
When transferring the rabbit from one room to another it must be held close to the handler’s chest.
10.34Carrying a docile rabbit, with its head in the crook of the elbow. Most rabbits ind this
method of restraint settling. (Reproduced from the BSAVA Manual of Rabbit Medicine and Surgery, 2nd edition)
Once caught, the rabbit may be calmed further by wrap- ping it in a towel, similar to the method used for cats, so that just the head protrudes in a ‘bunny burrito’ (Figure 10.35). There are also available speciic rabbit ‘papooses’ that zip up along the rabbit’s dorsum, leaving the head/ears free for blood sampling, but conining the limbs to prevent escape or self- harm. It is important not to allow rabbits to overheat in this position, as they, like a lot of small mammals, do not have signiicant sweat glands and do not actively pant. They can therefore quickly overheat if their environmental temperature exceeds
Covering a rabbit’s eyes will often help to calm it (Figure 10.36).
(a)
Rabbits
The majority of domestic rabbits are docile, but the odd aggressive doe or buck, usually those not used to being handled, does exist. The potential dangers to the veterinary nurse arise from the claws, which can inlict deep scratches rivalling those inlicted by cats, and the incisors, which can produce deep bites. Aggression is frequently worse at the start of the breeding season in March/April. In addition to the damage they may cause the handler, a struggling rabbit may lash out with its powerful hindlimbs and fracture or dislocate its spine. Severe stress can even induce cardiac arrest in some individuals. Rapid and safe restraint is therefore essential.
To this end, if aggressive, the rabbit may be grasped by the scruff with one hand whilst the other hand supports
(b)
10.35The ‘bunny burrito’: restraining a rabbit by wrapping it in a towel. (a) The rabbit is placed on
a towel, facing away from the handler. (b) One side of the towel is wrapped irmly across the dorsum, covering the
forefeet but leaving the head exposed. |
continues |
245
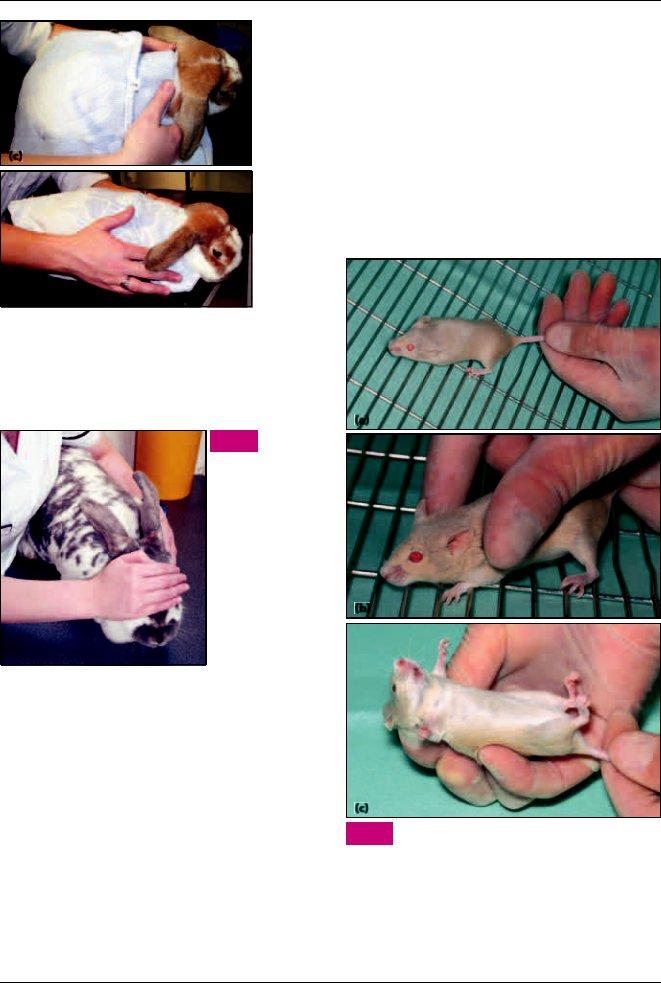
Chapter 10 Animal handling, restraint and transport
(c)
(d) |
|
|
continued The ‘bunny burrito’: restraining a rabbit |
10.35 |
|
|
by wrapping it in a towel. (c) The back of the |
|
towel is folded up over the lumbar region. (d) The remaining side of the towel is wrapped across the dorsum and tucked in ventrally on the opposing side to complete the wrap. (Reproduced from the BSAVA Manual of Rabbit Medicine and Surgery, 2nd edition)
10.36 A hand
over the rabbit’s eyes helps to keep the animal calm. (Courtesy of C Clarke)
Enlisting the help of an assistant, to raise the rabbit’s fore- limbs off the ground, whilst keeping the rabbit’s hindlimbs in contact with a solid surface, allows for ventral examination of rabbits.
Rodents
Mice and rats
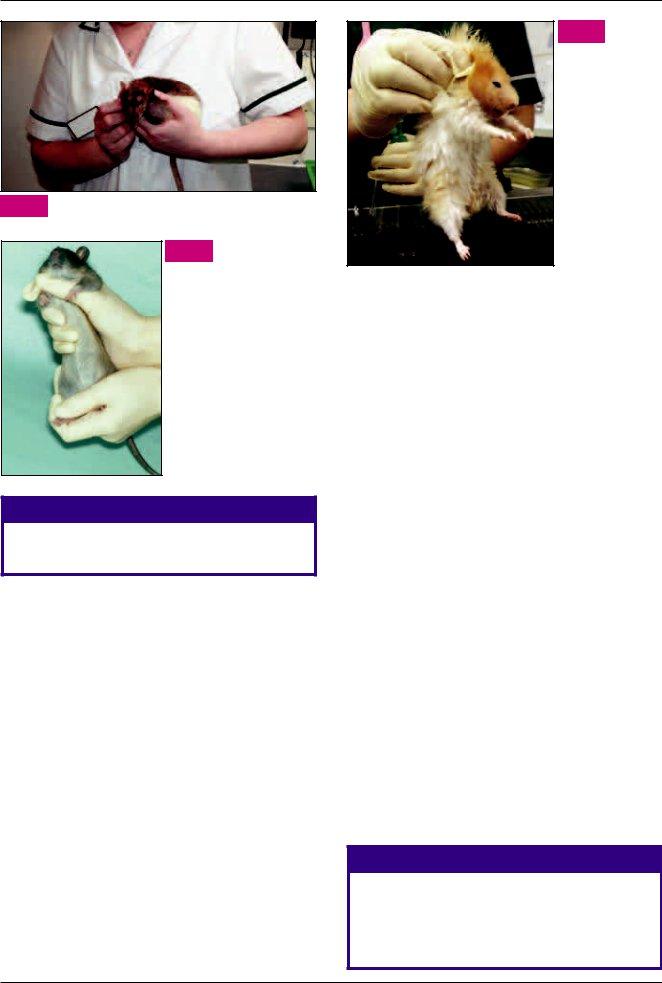
Mice will frequently bite an unfamiliar handler, especially in strange surroundings. It is irst useful to grasp the tail near to the base and then place the mouse on a
(a)
(b)
Trancing and turning
The method of restraint commonly known as ‘trancing’ (more accurately, creating a state of tonic immobility), whereby a rabbit is induced to become immobile after lowering it into a dorsal recumbency, is not recommended. Contrary to popular belief, rabbits in a state of tonic immobility are not relaxed, hypnotized or insensitive to pain. Scientists believe that this is a defence mechanism employed once a rabbit has already been ‘caught’ by a potential predator. By remaining very still the rabbit may appear already dead, thereby causing the attacker to release its grip momentarily and allow the rabbit to escape. Research has shown that in this state rabbits show increased heart and respiratory rates plus elevated plasma corticosterone levels, indicative of
(c)
Handling techniques for mice. (Reproduced from
10.37BSAVA Manual of Exotic Pets, 4th edition)
Rats will rarely bite unless roughly handled (Figure 10.38). They are best picked up by encircling the pectoral girdle, im- mediately behind the front limbs, with the thumb and ingers of one hand whilst bringing the other hand underneath the rear limbs to support the rat’s weight (Figure 10.39). The more fractious rat may be temporarily restrained by grasping the base of the tail before scrufing it with thumb and foreinger.
246
Chapter 10 Animal handling, restraint and transport
10.38Holding a tame rat. (Courtesy of C Clarke)
10.39Restraining a rat. (Reproduced from
BSAVA Manual of Exotic
Pets, 4th edition)
WARNING
Under no circumstances should mice or rats be restrained by the tips of their tails, as
Hamsters and gerbils
Hamsters can be relatively dificult to handle as, being noct- urnal, they are never pleased at being awoken and picked up during daylight hours. If the hamster is relatively tame and used to being handled, simply cupping the hands un- derneath the animal is suficient to transfer it from one cage to another.
Some breeds of hamster are more aggressive than others, with Russian, Djungarian or
Gerbils are relatively docile but can jump extremely well when frightened and may bite if roughly handled. For simple transport they may be moved from one place to another by cupping the hands underneath the gerbil. Small mammals should always be approached from the side and at low levels, as when they are descended upon from a great height, the
10.40
Handling a hamster. (Courtesy of Aiden Raftery)
handler’s hands mimic the swooping action of a bird of prey, startling the rodent.
For more rigorous restraint, the gerbil may be grasped by the scruff between thumb and foreinger of one hand after placing it on to a lat level surface. It is vitally important not to grasp a gerbil by the tail as this will lead to stripping of the tail’s skin leaving denuded coccygeal vertebrae. This will never regrow and the denuded vertebrae will themselves undergo avascular necrosis and drop off later. Jirds and jerboas are related species, and handling techniques are the same.
Guinea pigs, chinchillas and degus
Guinea pigs are rarely aggressive, but they become highly stressed when separated from their companions and normal surroundings. This makes them dificult to catch, as they will move at high speed in their cage. To aid restraint, dimmed lighting can be used and environmental noise restricted to reduce stress levels. Restraint is also easier if the guinea pig is already in a small box or cage, as there is less room for it to escape.
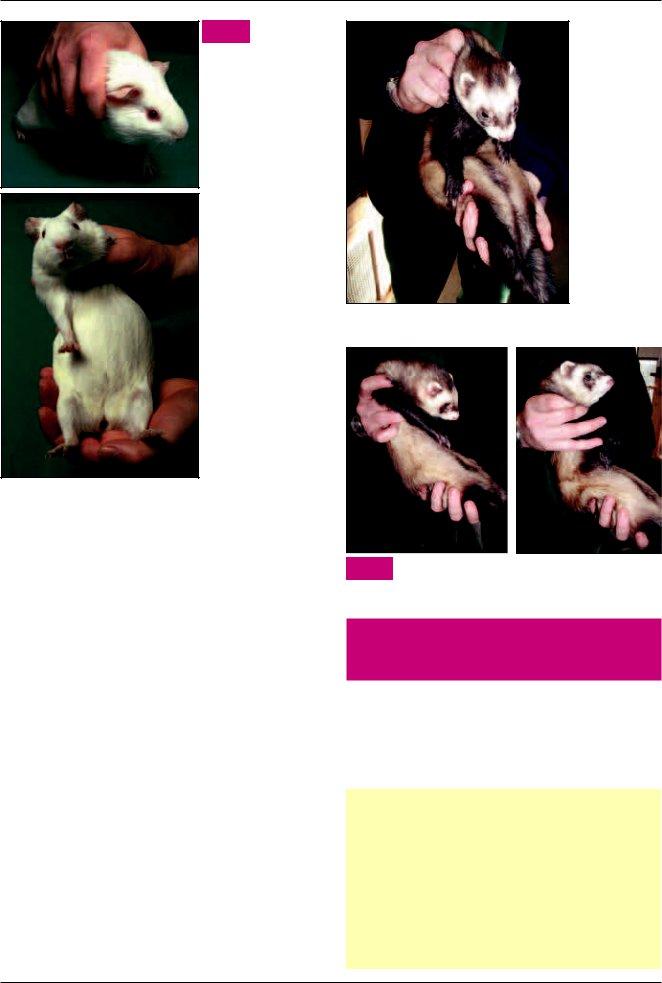
To restrain a guinea pig, it should be grasped behind the front limbs from the dorsal aspect with one hand, whilst the other is placed beneath the rear limbs to support the weight (Figure 10.41). This is particularly important as the guinea pig has a large abdomen, but slender bones and spine that may be easily damaged.
Chinchillas are equally timorous and rarely if ever bite. They too can be easily stressed, and dimming room lighting and reducing noise can be useful during capture.
Some chinchillas when particularly stressed will rear up on their hindlegs and urinate at the handler, with surprising accuracy. It is therefore essential to pick up the chinchilla calmly and quickly with minimal restraint, placing one hand around the pectoral girdle from the dorsal aspect just behind the front legs, with the other hand cupping the hindlegs and supporting the chinchilla’s weight.
Degus may be handled in a similar way to chinchillas.
WARNING
Chinchillas must not be scruffed under any circumstances, as this will result in the loss of fur at the site held. Chinchillas may actually lose some fur due to the stress of the restraint, even if no physical gripping of the skin occurs. This ‘fur slip’ as it is known, will leave a bare patch, which will take many weeks to regrow.
247
Chapter 10 Animal handling, restraint and transport
10.41
Restraining a guinea pig. The animal is irst grasped around its shoulders. It can then be lifted, with the hindquarters supported.
10.42 |
Holding a potentially aggressive ferret, using the |
|
scruff. (Courtesy of S Redrobe) |
|
Chipmunks
There are more than 24 species of chipmunk, with the com- monest seen in the UK currently being the Siberian species, although North American smaller species are also kept. Chip- munks are extremely highly strung and the avoidance of stress is essential to avoid fatalities. Generally, they are very dificult to handle without being bitten, unless
Ferrets
Ferrets can make excellent house pets and many are friendly and
For excitable or aggressive animals, a irm grasp of the scruff, high up at the back of the neck should be made. The ferret may be suspended from this whilst stabilizing the lower body with the other hand around the pelvis (Figure 10.42). In the case of more
(a) |
|
(b) |
|
|
|
10.43Holding a less aggressive ferret. (Courtesy of S Redrobe)
Handling and restraint
of birds
As with small mammals, the veterinary nurse needs to make a decision on whether the bird in question is safe to restrain. This is not only because of the danger to the nurse’s welfare (in the case of an aggressive or potentially dangerous bird of prey) but also because of the medical aspects of the patient’s health.
Assessment before handling
1.Is the bird in respiratory distress, and is the stress of handling therefore going to exacerbate this?
2.Is the bird easily accessible, allowing quick
3.Does the bird require medication via the oral or injectable route, or can it be medicated via nebulization or food or drinking water?
4.Does the bird require an
248
Chapter 10 Animal handling, restraint and transport
It is not always necessary to restrain the bird. It is important to remember that many avian patients are highly stressed individuals, so any restraint that is performed should involve minimal periods of handling and capture.
Initial approach
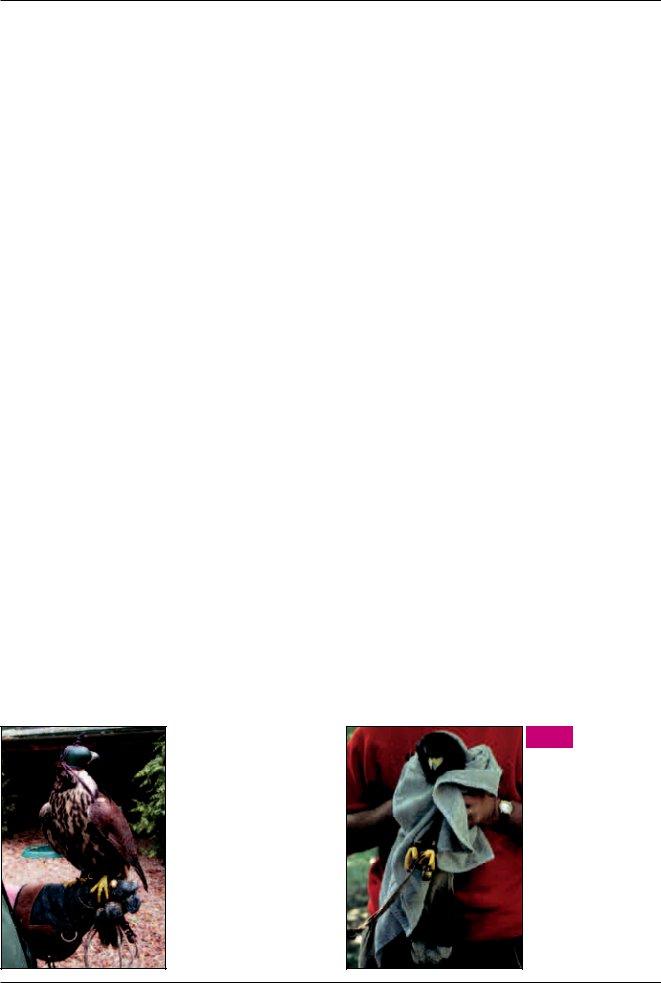
The majority of avian patients seen in practice (with the obvi- ous exception of the owl family) are diurnal (that is active during the daylight hours) and so reduced or dimmed lighting in general has an extremely calming effect. This can be used to the veterinary nurse’s advantage when catching a lighty or stressed bird. In the case of Passeriformes (perching birds such as canaries and inches) and Psittaciformes (members of the parrot family, which includes budgerigars and cockatiels as well as the larger parrots), turning down the room lights or drawing the curtains or blinds is enough. For birds of prey there may well be access to the practice’s or the bird’s own ‘hoods’; these are leather caps that slot over the head, leaving the beak free but completely covering the eyes (Figure 10.44). They are used to calm the bird when on the wrist or during handling or transporting.
It is also advisable to keep the noise levels to a minimum when handling avian patients, as the acuity of their hearing is second only to the acuity of their vision. With these two initial approaches, stress and time for capture can be greatly reduced.
Prior to capture, all obstructing items should be removed from the cage or box – e.g. toys, water bowls, food bowls. This helps to avoid
Birds of prey
There are two main categories of birds of prey commonly seen in practice: Falconiformes (includes falcons, hawks and eagles) and Strigiformes (the owl family). Falconiformes are mainly diurnal (daylight active) and they make up the most commonly seen group of birds of prey in practice. Strigiformes are generally nocturnal (active during the hours of darkness) and so use of hoods and darkening the room will not quieten these birds. However, they generally tend to be relatively docile.
Several pieces of speciic handling equipment are often used for birds of prey. Hoods (Figure 10.44) are used to calm many falcons and hawks, and many of these birds will also
10.44 |
A hood keeps a |
|
raptor calm. |
|
(Courtesy of J Chitty)
have jesses on their legs. These are the leather straps attached to their ‘ankles’ (lower tarsometatarsal area) and they allow the falcon to be restrained whilst on the owner’s ist.
Leather gauntlets (Figure 10.44) should be worn by all handlers for all birds of prey, as their talons and the power of grasp of each foot can be extremely strong. The feet of birds of prey represent the major danger to the handler and not the beak. It is important to note that when the bird of prey is positioned on the gauntleted hand, the wrist of this hand (traditionally the left hand in European falconers) is kept above the height of the elbow. If not, the bird has a ten- dency to walk up the arm of the handler, with serious and painful results. The type of gauntlet should be either a spe- ciic falconer’s gauntlet or one of the heavier duty leather pruning gauntlets available from garden centres.
1.Place the gauntleted hand into the cage or box or beside the bird’s perch.
2.Grasp the jesses with the thumb and foreinger of the gauntleted hand and encourage the bird to step up on to the glove.
3.Once on the hand, retain hold of the jesses and slip the hood over the bird’s head.
The bird of prey may then be safely examined ‘on the hand’ and is frequently docile enough to allow manipulation of wings and beak and for small injections to be administered or for oral dosing to occur.
If the bird of prey does not have jesses on but is trained to perch on the hand it may well step up on to the gauntlet of its own accord. If not, then you need to reduce the room lighting for Falconiformes. A blue or red light source could also be used, allowing the handler to see the bird but prevent- ing the bird of prey from seeing normally. There are then two possible approaches:
•The bird may be grasped from behind in a thick towel, ensuring that you are aware of where the bird’s head is (this is known as casting the bird; Figure 10.45). The bird is restrained across the shoulder area with the thumbs pushing forward underneath the beak to extend the head away from the hands. The hood can then be placed over the bird’s head and the bird placed on to a gauntleted hand. The majority of birds are happier and struggle less when their feet are actually grasping something, rather than being held in a towel with their feet freely hanging.
10.45Casting a Harris’ hawk.
(Reproduced from BSAVA Manual of Exotic Pets, 4th edition)
249
Chapter 10 Animal handling, restraint and transport
•Alternatively, the hooded bird may be held from behind with the middle and fourth inger of each hand grasping the leg on the same side and directing the feet away from the handler. This method of holding the legs prevents the raptor from grasping one foot with the other which will cause severe puncturing of the skin, leading to secondary infections known as ‘bumblefoot’.
For the majority of raptors, if they are loose in their aviary it is best to catch them at night. Owls should be caught during the day. The use of nets and towels is often required.
Finally, it is important to remember that the majority of birds of prey are regularly lown, so it is vital to preserve the integrity of their light and tail feathers. Unfortunately, few falconers will thank you for saving their bird’s life if they then cannot ly that bird until after the feathers have been replaced at the next moult; moulting usually occurs in the autumn.
Parrots and other cagebirds
Parrots are often trained to step up on to the hand. If the owner does not have the bird already trained to do this, he/ she should be encouraged to do so. A tasty treat can be held in front of the bird, with the other hand just in front and above the internal perch. The treat should be at such a distance that the bird must step on to the hand to get the treat. It is impor- tant to be aware that nervous birds especially may reach down to the hand, as it is normal for many parrot species to use the beak as a third limb to help balance. The novice handler may mistake this for an attempt to bite and pull away, making matters worse as the bird is now even less sure about stepping on to the hand and may grab at the hand in a desperate at- tempt to pull itself on to the hand, biting in the process. All of these birds will also beneit from subdued or blue or red light to calm the bird and to allow restraint with minimal fuss.
•In psittacine birds (e.g. African grey parrots, macaws, Amazon parrots and cockatoos) the main weapon is the beak and a powerful bite is possible.
•In passerine birds (e.g. mynah birds, starlings and orioles) the main weapon may again be the beak. Although this is less damaging as a biting weapon, it may still be a sharp stabbing weapon.
Wearing heavy gauntlets is not recommended for restraint of either family group as it will not allow easy judgement of the strength of the handler’s grip on the patient. Instead it is better to use dish or bath towels for the larger species and paper towels for the smaller ones as these provide some protection from being bitten without masking the true strength of the grip. The towel technique is also more ben- eicial than gloves alone because it presents a larger surface area for the bird to try and evade. The bird is then less likely to try and bolt for freedom, whereas a single hand can be a much smaller target and encourages escape attempts. After removal of the bird from its cage (see Figure 10.33), the limbs may then be removed from the towelling one at a time for examination or medication.
WARNING
Birds do not have a diaphragm and so rely solely on the outward movement of their ribcage and keel bone for inspiration. Restriction of this movement with too tight a grip can be fatal.
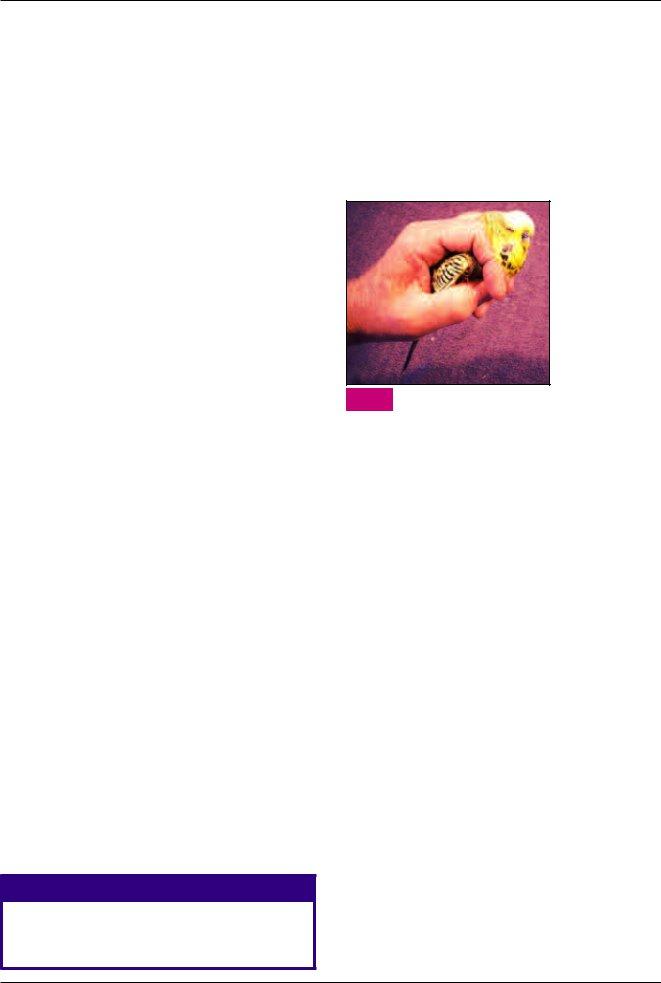
For smaller cagebirds:
1.A piece of paper towel may be used and then the bird transferred to the hand. Latex gloves may be worn.
2.The neck of the bird should be held between the index and middle ingers (Figure 10.46).
3.The thumb and foreinger can then be used to manipulate legs or wings.
4.The rest of the hand should gently cup the bird’s body to resist struggling.
5.Care should be taken not to
Holding a budgerigar for examination.
10.46 (Reproduced from BSAVA Manual of Psittacine Birds, 2nd edition)
In the case of particularly aggressive parrots that are very dificult to handle, leather gauntlets may be employed. Re- member that too strong a grasp around the bird’s body can prove fatal.
Young and
In the case of
a
For fully feathered immature parrots it may still be neces- sary to towel restrain the bird to examine the vent, feet and other sensitive areas without the bird biting or lapping its wings and escaping.
Waterfowl
Ducks, geese and swans are often kept in farm situations, but are also kept by smallholders and so may well be brought in for treatment.
Restraint of these species is relatively straightforward but may become hazardous with the larger swan and goose family.
1.The irst priority is to concentrate on capturing the head. This can be done manually, by grasping the waterfowl around the upper neck from behind.
2.Make sure that your ingers curl around the neck and under the bill whilst the thumb supports the back of the neck and the potentially weak area of the atlanto- occipital joint. Failing this, a swan or shepherd’s crook or other such adapted smooth metal or wooden pole attached hook can be used to catch the neck – again high up under the bill.
250

Chapter 10 Animal handling, restraint and transport
3.Next, it is essential that the often powerful wings are controlled before the bird has a chance to damage itself or you. This can be most easily achieved by using a towel, thrown or draped over the avian patient’s back and loosely wrapped under the sternum. Some practices may have access to more specialized goose or swan cradle bags, which wrap around the body, containing the wings but allowing the feet and head and neck to remain free.
4.The bird may now be safely carried or restrained by tucking its body (contained within the towel or restraint bag) under one arm and holding this close to the torso. With your other hand, the neck can be loosely held from behind just below the bill.
Toucans and hornbills
Another group of birds increasingly kept in private collections are the toucans and hornbills. These have an extremely im- pressive beak, with a serrated edge to the upper bill. Pro- vided the head is initially controlled using the towel technique described above for parrots, an elastic band or tape may be applied around the bill, preventing biting. The handler still needs to be careful of stabbing manoeuvres and it may be a good idea to work with a second handler. Otherwise, restraint is the same as for Passeriformes.
Escaped birds
Where a bird is loose in a room or in an aviary light cage, a number of methods can be applied. Again, darkening the room and reducing its area if possible are both very helpful to calm and conine the bird.
•In the case of larger parrots, throwing a heavy bath towel over the bird can conine them for long enough to allow the handler to restrain the head from behind and then wrap the patient in the towel.
•For very small birds, the investment in a ine aviary or butterly net (preferably made of dark very ine mesh) is extremely useful to catch the bird safely, either in
Handling and restraint
of reptiles
Reptiles tend to be less easily stressed than birds and so re- straint of the debilitated animal may be performed according to the degree of risk. It is still worthwhile considering one or two aspects that may make restraint dangerous to animal and veterinary nurse alike.
Assessment before handling
1.Is the patient in respiratory distress?
Examples include pneumonic cases, where mouth breathing and excessive oral mucus may be present and where excessive manual manipulation can exacerbate the condition.
2.Is the species of reptile a fragile one?
The small day geckos (Phelsuma spp.) for example are extremely delicate and very prone to shedding their tails when handled. Similarly, some species such as green iguanas (Iguana iguana) are prone to conditions such as metabolic bone disease whereby their skeleton becomes fragile and spontaneous fractures are common.
3.Is the species an aggressive one?
Some are naturally so, for example, alligator snapping turtles (Macroclemys temminckii), Tokay geckos (Gekko gecko), and rock pythons (Python sebae).
4.Does the reptile patient require medication/physical examination?
In these cases, restraint is essential.
Reptiles are ectothermic and so rely on their environmen- tal temperature to maintain their body temperature. Handling periods should therefore be minimized as much as possible to prevent undue cooling of the reptile. Most reptiles com- monly seen in veterinary practices require an optimum tem- perature range of
WARNING
It should be borne in mind that many species of reptile have a bacterial lora in their digestive systems that frequently includes Salmonella spp. Personal hygiene is therefore very important when handling these patients, to prevent zoonotic diseases. Disposable gloves may be worn. Hands must always be washed thoroughly after handling.
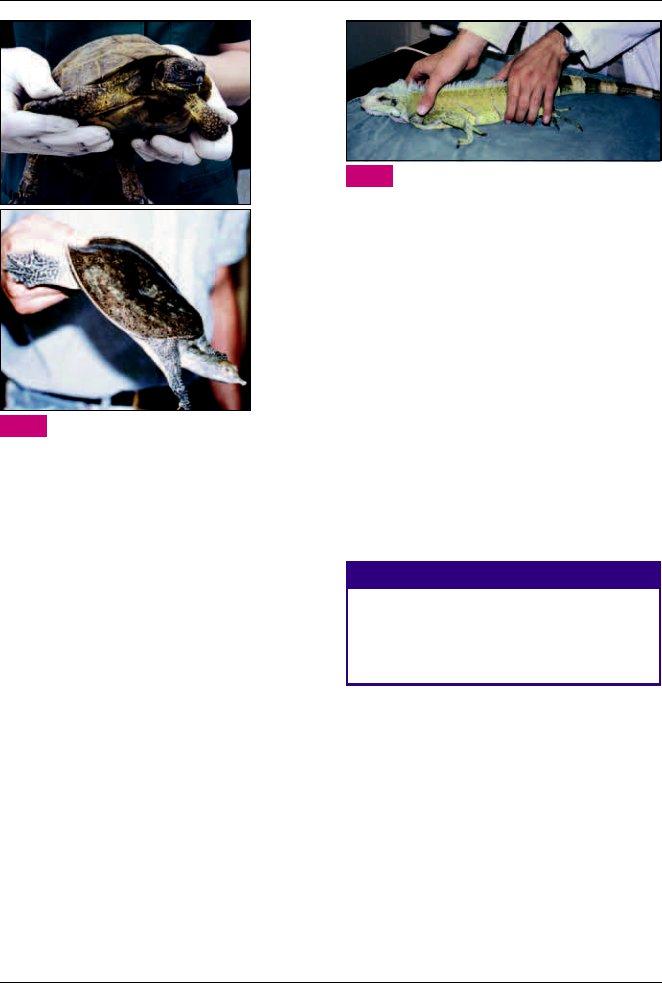
Chelonians
This group includes all land tortoises, terrapins and aquatic turtles. Size differences in this order are not as great as for the other two reptile families, but it is still possible to see chelonians varying from the small Egyptian tortoises (Testudo kleinmanni) weighing a few hundred grams all the way up to adult leopard tortoises (Geochelone pardalis) at 40 kg, and the Galapagos tortoises, which can weigh several hundred kilograms. The majority of chelonians are harmless, although surprisingly strong. The exceptions include the snapping turtle (Chelydra serpentina) and the alligator snapping turtle (Macrochelys temminckii), both of which can give a serious bite. Most of the
For the mild tempered chelonians such as the Mediterra- nean Testudo species, the tortoise may be held with both hands, one on either side of the main part of the shell behind the front legs (Figure 10.47a). For examination, to keep the tortoise still it may be placed on top of a cylinder or stack of tins. This ensures that the legs are raised clear of the table and the tortoise is balancing on the centre of the underside of the shell (plastron).
For aggressive species it is essential that the shell is held on both sides behind and above the rear legs to avoid being bitten (Figure 10.47b). In order to examine the head region in these species it is necessary to chemically restrain them.
For the
251
Chapter 10 Animal handling, restraint and transport
(a)
(b)
10.47Handling chelonians. (a) Lifting a docile species.
(b)Handling an aggressive species by grasping the caudal part of the carapace. (Reproduced from BSAVA Manual of Reptiles, 2nd edition)
Lizards
Lizards come in many different shapes and sizes from the
1.2m long adult green iguana to the
Geckos other than Tokay geckos are generally docile, as are lizards such as bearded dragons (Pogona spp.). Iguanas may be extremely aggressive, particularly sexually mature males. They may also be more aggressive towards female owners and handlers as they are sensitive to human, as well as reptile, pheromones.
Restraint
Restraint is best performed by grasping the pectoral girdle with one hand from the dorsal aspect, so controlling one forelimb with foreinger and thumb and controlling the other forelimb between middle and fourth inger. The other hand is used to grasp the pelvic girdle from the dorsal aspect (Figure 10.48), controlling one limb with the thumb and fore- inger, and the other limb between middle and fourth inger. The lizard may then be held in a vertical manner with the head uppermost and the tail out of harm’s way underneath the handler’s arm. When holding a lizard in this manner, the handler should allow some lexibility as the lizard may wriggle, and if the restraint is overly rigid the spine can be damaged. It is then possible to present the head and feet of the lizard away from the handler to avoid injury.
10.48Holding the forelimbs and hindlimbs against the
thorax and tailbase, respectively, restrains medium to large lizards such as this iguana. (Courtesy of S Redrobe)
Some of the more aggressive iguanas may need to be pinned down, prior to this method of handling. Here, as with avian patients, the use of a thick towel to control the tail and claws is often very useful. In some instances gauntlets are necessary for particularly aggressive large lizards, and for those which may have a poisonous bite, such as the Gila monster (Heloderma suspectum) and the beaded lizard (H. horribilis). It is important not to use too much force when restraining the lizard, as those with skeletal problems such as metabolic bone disease, may be seriously injured. In addition, lizards, like other reptiles, do not have a diaphragm and so
Geckos can be extremely fragile and the day geckos for example are best examined in a clear plastic container rather than physically restraining them. Other gecko species have skin that is easily damaged and so latex gloves and soft cloths should be used and the gecko cupped in the hand rather than restraining it physically.
Small lizards may have their heads controlled between the index inger and thumb to prevent biting.
WARNING
It is important that lizards are never restrained by their
tails. Many will shed their tails at this time, but not all of them will regrow (show autotomy). Green iguanas, for example, will only regrow their tails as juveniles (under
There is a procedure that may be used to place members of the lizard family into a
The ‘trancing’ of rabbits (see above) has recently been reviewed on welfare grounds, based upon recent scientiic research. Such scientiic evidence is not currently available for
252
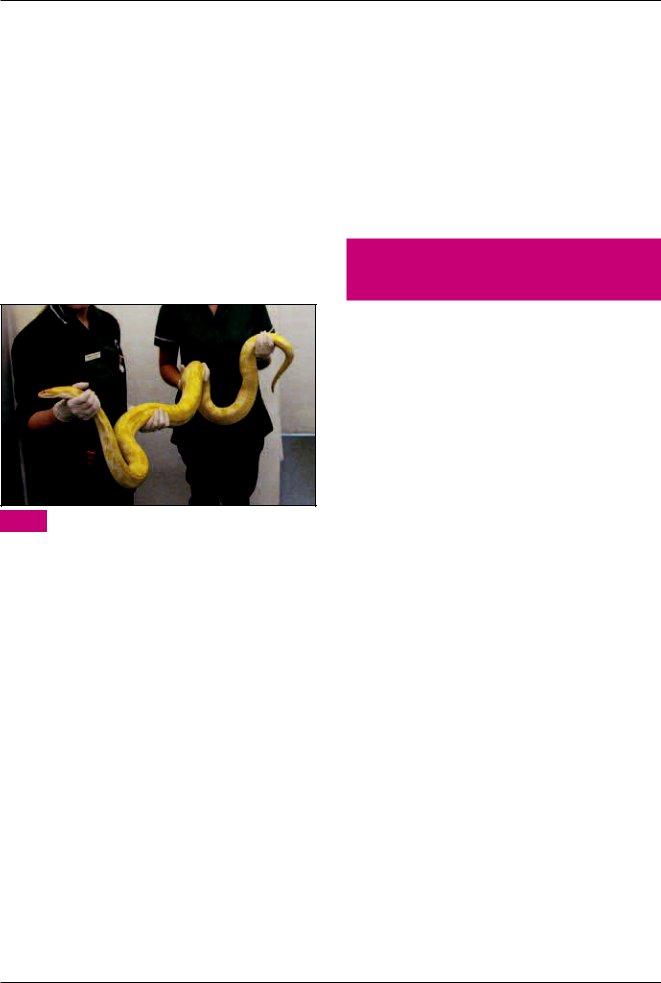
Chapter 10 Animal handling, restraint and transport
lizards. It is not yet known whether the physiological response of the lizard differs from that of a tranced rabbit or if the same welfare concerns arise. The procedure in lizards should therefore currently be viewed with an open mind.
Snakes
There is a wide range of sizes, from the enormous anacondas (Eunectes murinus) and Burmese pythons (Python molurus bivittatus) (Figure 10.49), which may achieve lengths of up to 10 m or more, down to the thread snake family (Leptotyphylid), which may be a few tens of centimetres long. They are all characterized by their elongated form with an absence of limbs. The potential danger to the veterinary nurse is from the teeth (and in the case of the more poisonous species, such as the viper family, the fang teeth) or, in the case of the constrictor and python family, the ability to asphyxiate the prey by wind- ing themselves around the victim’s chest or neck. With this in mind, the following restraint techniques may be employed.
10.49Carrying a large snake requires support from more than one handler. (Reproduced from
BSAVA Manual of Reptiles, 2nd edition)
In the larger species (those longer than 3 m) it is necessary to support the body length at regular intervals (see Figure 10.49). Indeed, it is vital to adopt a safe operating practice with the larger constricting species of snake. For this reason a ‘buddy system’, as with scuba diving, should be operated whereby any snake longer than
Venomous and aggressive snakes
Venomous snakes (such as vipers and rattlesnakes) and very aggressive species (such as the green anaconda (Eunectes
murinus), reticulated python (Python reticulatus) and rock python (P. sebae)) may be restrained initially using snake hooks. These are
Handling and restraint
of amphibians
Examination of the amphibian patient should be performed at the species’ optimum body temperature. A rough guide is between 21 and 24°C, which is lower than the more usual
The examination table should be covered with paper tow- els (unbleached) soaked in dechlorinated, preferably puriied, water. Additional puriied water should be on standby to be applied to the amphibian patient to prevent dehydration during the examination.
Initially it is useful not to restrain the patient until the extent of any problem is assessed, as many have severe skin lesions that are extremely fragile.
Once an initial assessment has been made, the patient may be restrained manually. It is advisable to use a pair of
When handling the amphibian patient, the method of restraint will obviously depend on the animal’s body shape.
•The elongated form of salamanders and newts will require similar restraint to that of a lizard: one hand grasps the pectoral girdle from the dorsal aspect, with the index inger and thumb encircling one forelimb and the second and third ingers the other, while the opposite hand grasps the pelvic girdle, again from the dorsal aspect in a similar manner. Some salamanders will shed their tails if roughly handled and so care should be taken with these species.
•Large anurans (members of the frog and toad family) can be restrained by cupping one hand around the pectoral girdle immediately behind the front limbs, with the other hand positioned beneath the hindlimbs (Figure 10.50). Care should be taken with some species that have poison glands in their skin as mentioned above. Care should also be taken with species such as the Argentinian horned frog (Ceratophrys ornata) as these can bite.
253
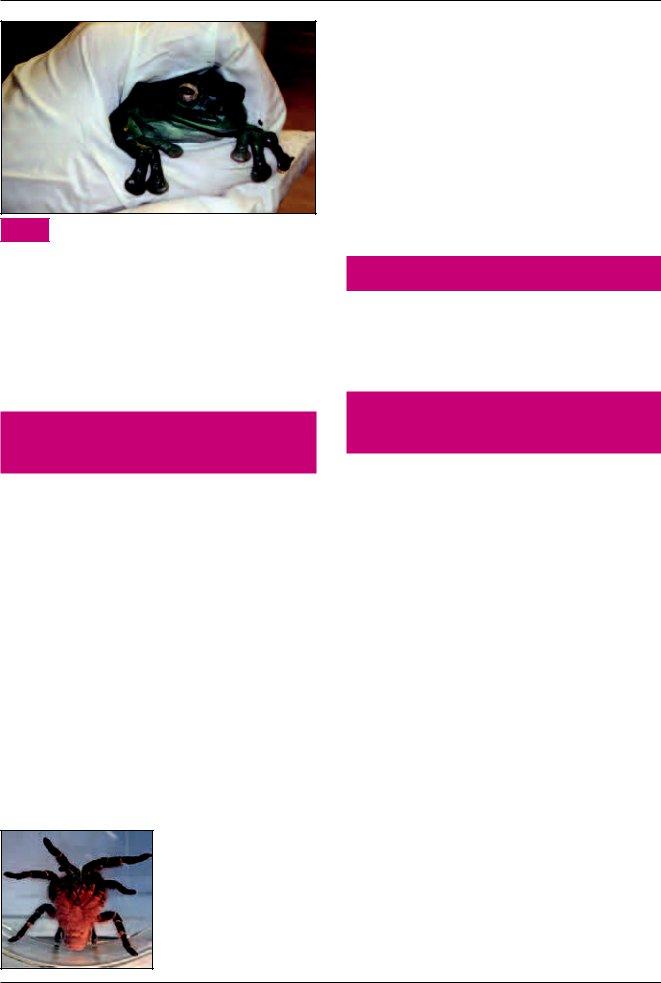
Chapter 10 Animal handling, restraint and transport
10.50Handling a frog. (Courtesy of Gidona Goodman)
•Aquatic urodeles should be examined only in water, as removal from the water results in skin damage. Some of the larger urodeles, such as the hellbender species (Cryptobranchus spp.), can also inlict unpleasant bite wounds on handlers.
Smaller species and aquatic species may be best examined
in small plastic or glass jars.
Scorpions present a similar problem, with the tail sting being the most obvious danger. The majority of scorpions kept in captivity such as the imperial scorpion, are not seriously dangerous, although the sting may be likened to a wasp or bee sting. To restrain these species safely, they may be transferred into a Perspex, plastic or glass container, or alternatively a sheet of clear plastic may be gently but irmly laid over the top of the scorpion to conine it for examination or to allow a better grasp. They may also be lifted gently by the tip of the tail using atraumatic forceps, with a sheet of card or plastic supporting the body from underneath.
Aquatic invertebrates should be examined and moved in water, using either their own tank or a clean plastic, Perspex or glass container.
Acknowledgements
Jane Devaney would like to acknowledge the assistance of the following people for the equine content of the chapter: Derek Knottenbelt; Claire Magee; and Rosie Owen. Thanks also go to the family of Max Hoare, for the use of their photographs.
Handling and restraint
of invertebrates
The species involved will naturally determine the methods by which the patient can be safely, for handler and invertebrate alike, restrained.
Many invertebrates present no direct threat to the han- dler. Examples include giant land snails, stick insects and cockroaches. These may be gently picked up and cupped in the hand, or allowed to walk on to a towel or similar non- slip surface.
Other species, such as those in the mygalomorph spider family, may present multiple hazards. These may lick setae (the small hairs that cover their abdomens) at the handler if stressed or if they feel threatened. These setae are highly ir- ritant on the skin and are particularly dangerous if they come into contact with the conjunctiva. In addition, many of these spiders have a nasty bite. The bites are rarely fatal but still cause pain and potential harm, similar to the pain associated with a bee or wasp sting. These species should be transferred into a Perspex, glass or plastic container (Figure 10.51), and only ever handled with latex gloves. If it is necessary to pick up such a spider, it may be either cupped in paired hands or grasped with atraumatic forceps or ingers, immediately behind the cephalo- thorax, around its ‘waist’. Protective goggles should be worn if the spider is to be removed from its container.
10.51 |
Placing a spider in |
|
a transparent |
|
container allows it to be examined easily. (Courtesy of E Morgan)
References and
further reading
Atkinson T and Riccomini F (2008) Behaviour. In: BSAVA Manual of Canine and Feline Advanced Veterinary Nursing, 2nd edn, ed. A
Bradshaw JWS (1992) The Behaviour of the Domestic Cat. CAB
International, Wallingford
Fowler ME and Ames L (1995) Restraint and Handling of Wild and Domestic Animals, 2nd edn. Iowa State Press, Ames
Fraser M and Girling S (2009) Rabbit Medicine and Surgery for Veterinary Nurses.
Girling SJ (2003) Veterinary Nursing of Exotic Pets. Blackwell
Publishing, Oxford
Horwitz D (2009) An update on canine
Horwitz D and Mills D (2009) BSAVA Manual of Canine and Feline Behavioural Medicine, 2nd edn. BSAVA Publications,
Gloucester
McBride A, Day S, McAdie T et al. (2007) Hypnosis: a state of fear or pleasure? Proceedings of CABTSG Study Day 2007 ‘Emotional Homoeostasis, Stress, the Environment and Behaviour’,
McClean A and McClean M (2008) Academic horse training. Equitation Science in Practice. AEBC, Victoria
Meredith A and
Meredith A, Redrobe S and Mullineaux E (2007) General care and management of other pets and wildlife. In: BSAVA Manual of Practical Animal Care, ed. P Hotston Moore and A Hughes, pp.
Svendsen E (2008) The Professional Handbook of the Donkey, 4th
edn. The Donkey Sanctuary, Sidmouth
Useful websites
254

Chapter 10 Animal handling, restraint and transport
1.What are the four main aims of the veterinary nurse when restraining an animal?
2.What are the signs that could indicate that a dog or cat may be fearful and/or potentially aggressive?
3.What actions should and should not be taken when initially approaching and handling a dog or cat?
4.What are the important DOs and DON’Ts when a dog growls?
5.How is a tape muzzle applied and when should one be used?
6.What are the typical signs displayed by an aggressive horse?
7.Which position should a horse not be approached from?
8.Which direction should you face to pick up a horse’s foot?
9.How often should a horse’s feet be checked for problems?
10.What is the maximum length of time for a twitch to be in place on a horse?
11.What is the maximum length of time that a horse should travel without water/food?
12.How is it best to handle an aggressive male rabbit?
13.Which species of rodent should not be routinely grasped by the scruff of the neck to restrain them?
14.What type of bird will not be quietened by moving it into a darkened room?
15.When restraining a bird, what should the handler be careful not to do too irmly?
16.What important zoonotic bacteria may be carried by reptiles?
17.What defence mechanism might mygalomorph spiders employ to avoid being handled?
255