In order to file a workers' compensation claim, you will need to submit evidence of your injury. This Evidence Submission Form can help you organize and submit the necessary information. The form asks for specific details about your injury, including the date, time, and location of the accident, as well as how the injury occurred. Be sure to include any medical records or other documentation that supports your claim. If you have any questions about what information to include, be sure to speak with an attorney or workers' compensation representative.
| Question | Answer |
|---|---|
| Form Name | Evidence Submission Form |
| Form Length | 76 pages |
| Fillable? | No |
| Fillable fields | 0 |
| Avg. time to fill out | 19 min |
| Other names | fdle evidence submission manual, fdle evidence kit paperwork, evidence submission, fdle evidence submission |

CRIME
LABORATORY
EVIDENCE
SUBMISSION
MANUAL
Florida Department of Law Enforcement
Gerald M. Bailey, Commissioner
2013
COPYRIGHT © 2013 by
Florida Department of Law Enforcement

CRIME LABORATORY EVIDENCE
SUBMISSION MANUAL
The Florida Department of Law Enforcement Crime Laboratory System has developed this manual for the criminal justice community to provide useful information for submitting evidence to any of the
This publication is intended to provide instructions for special handling and submission of exhibits to a crime laboratory.
You may encounter unusual types of evidence not covered in this manual. Please consult your FDLE regional laboratory for assistance.
In the event of a request that is outside of the case acceptance policy, it is essential to make contact and receive approval via phone or
It is recommended that the submitting agency contact their FDLE regional laboratory to triage evidence on complex cases.
Page 2 of 76

“Wherever he steps, whatever he
touches, whatever he leaves, even unconsciously, will serve as silent evidence against him. Not only his fingerprints or his footprints, but also his hair,
the fibers from his clothes,
the glass he breaks,
the tool marks he leaves,
the paint he scratches, the blood
or semen that he deposits or
Only human failure to find it, study and understand it, can diminish its value.”
From Kirk, Paul L.
Crime Investigation.
New York: Interscience
Publishers, 1953
Page 3 of 76

CONTENTS |
|
I. FDLE FORENSIC SCIENCE SERVICES LOCATIONS……………………………. |
5 |
II. CRIME LABORATORY SERVICES………………………………………………... |
6 |
III. CRIME SCENE: HOW TO COLLECT EVIDENCE………………………………… |
7 |
IV. SAFETY CONSIDERATIONS………………………………………………………. |
10 |
V. HOW TO SUBMIT EVIDENCE……………………………………………………... |
12 |
VI. PHYSICAL EVIDENCE EXAMINATIONS………………………………………… |
16 |
A.Arson……………………………………………………………………………........................ 16
B.Biology…………………………………………………………………………………………. 17 Screening
Blood Semen Saliva Hair
Touch Evidence
DNA
C.ControlledSubstances……………………………………………………….............................. 25
D.Clandestine Laboratory Evidence ……………………………………………………………… 27
E.Digital and Multimedia Evidence………………………………………………………………. 29 Computer Evidence
Video Evidence
F.DNA Database Overview………………………………………………………………………. 33
G.Firearms and Toolmarks………………………………………………………………………. 37 Firearms
Serial Number Restoration
NIBIN Toolmarks
H.Latent Prints…………………………………………………………………………………….. 45
Latents
Footwear, Tire and Miscellaneous Impressions
I.Questioned Documents………………………………………………………………………… 54
J.Skeletal Remains………………………………………………………………………………... 58
K.Toxicology……………………………………………………………………………………… 60
L.Trace Analysis…………………………………………………………………………………. 63 Fabric, Fabric Marks and Fibers
Fractured Materials Glass
Gunshot Residue Light Filaments Paint
Plastics and Adhesives
VII. USING THE LABORATORY IN THE JUDICIAL PROCESS……………..……………… 76
Page 4 of 76
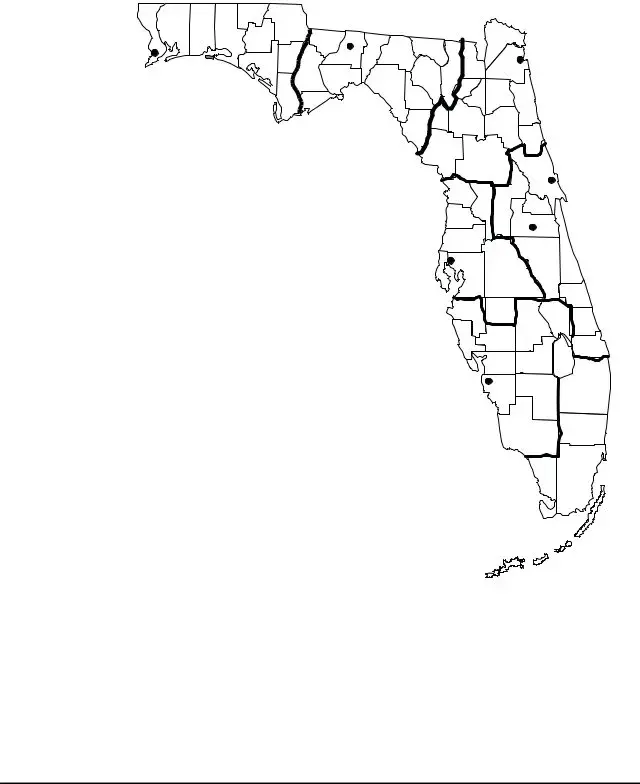
I.FDLE FORENSIC SCIENCE SERVICES LOCATIONS
Pensacola
Region
Tallahasse
Pensacola
Tallahassee
Region
Jacksonville
Jacksonville
Region
Daytona
FDLE Pensacola
Regional Operations Center 1301 North Palafox Street Pensacola, Florida
FDLE Tallahassee Regional Operations Center 2331 Phillips Road Tallahassee, Florida 32308 (850)
Tampa Bay Region
Tampa
Ft. Myers Region
Orlando
Orlando
Orlando Region
FDLE Jacksonville Regional Operations Center
921 North Davis Street, Building E Jacksonville, Florida
FDLE Daytona Beach
Crime Laboratory
810 Fentress Court, Suite 110 Daytona Beach, Florida 32117 (386)
FDLE Orlando
Regional Operations Center 500 West Robinson Street Orlando, FL
Ft. Myers
FDLE Tampa
Regional Operations Center 4211 North Lois Avenue Tampa, Florida 33614 (813)
FDLE Fort Myers Regional Operations Center 4700 Terminal Drive, Suite 1 Fort Myers, Florida 33907 (239)
Miami Region
Page 5 of 76

II. CRIME LABORATORY SERVICES
The Florida Department of Law Enforcement provides crime laboratory services to all local and state law enforcement agencies in Florida for the purpose of providing assistance in criminal investigations and judicial proceedings, including
FDLE Crime Laboratories provide the following forensic services; call the crime laboratory in your service area to learn which services are provided:
Biology/DNA |
Latent Print Analysis |
Controlled Substances |
Digital and Multimedia Analysis |
Firearms |
Questioned Documents |
Clandestine Lab Evidence |
Footwear and Tire Impression Analysis |
Toolmarks |
Toxicology |
Crime Scene |
Trace Analysis (Glass, Paint, Polymer, Fiber, |
|
Gunshot Residue) |
NOTE: FDLE will discontinue acceptance of GSR kits for analysis on March 1, 2013.
A.Cases Handled
All submissions of exhibits should be in connection with criminal investigations. No examinations will be conducted for private individuals or corporations.
B.Cost of Services
Normally all laboratory examinations, court appearances, and travel expenses are available without charge. The only exception is a criminal case in which the court orders laboratory services upon the defendant showing cause, as described in F.S. § 943.33.
C.Functions of the Laboratories
1.To identify, compare, and interpret physical evidence.
2.To furnish expert testimony before the court concerning examinations conducted on evidence or related matters. Make an official request for testimony with a subpoena.
3.To furnish crime scene processing advice and/or assistance in major criminal cases. The head of an agency or the supervising employee responsible for the conduct of the investigation should make the request. The official requesting this service should inform the laboratory of the type of crime, the basic circumstances surrounding the case, and the specific type of assistance required.
4.To render aid to court officials in connection with the preparation of scientific and technical phases of certain cases for trial.
5.To furnish instruction concerning physical evidence at law enforcement training schools and to officers of any law enforcement agency.
Page 6 of 76

III.CRIME SCENE: HOW TO COLLECT EVIDENCE
Crime scene analysts respond to requests by local law enforcement agencies for the examination of major crime scenes. The crime scene section was created to provide assistance to Law Enforcement Agencies who lack the resources necessary to process and examine major crime scenes. The FDLE Crime Scene Section enables local law enforcement the ability to utilize experts trained in the recognition, collection and preservation of evidence. This evidence is later analyzed at the crime laboratory. Analysts utilize a wide variety of equipment and instruments to process and document the scene. In addition to the primary goal of preservation and collection of evidence the analysts are able to provide other more advanced crime scene services. Analysts provide training to local law enforcement agencies covering the overall functions of the crime laboratory and the proper procedures for documenting, preserving, collecting, and submitting physical evidence to the laboratory.
The collection process includes the following recommendations:
1.Incorporate sufficient space within the boundaries of the crime scene to extend beyond where the last item of evidence was located. It is always easier to shrink your boundaries rather than enlarge them.
2.Clear all nonessential persons from the crime scene including officers not collecting evidence. The more people present, the greater chance there is for damage, loss, or movement of evidence.
3. Take care when entering and exiting a scene to ensure that the path utilized is one that was least likely to have been used by a subject (s). This is in order to protect evidence that may be easily destroyed or moved.
4.A list of all persons entering the crime scene must be maintained so that elimination standards such as DNA, fingerprints or footwear may be obtained if necessary.
5.All persons entering a scene where blood and body fluids are present should wear personal protection equipment such as gloves, shoe covers, disposable jumpsuits, etc. to prevent exposure to possible biohazards and contamination of the scene. Additionally, the scene should be marked as a biohazard area through the use of barrier tape and signs.
6.Designate one or two persons to collect all evidence or designate a primary evidence custodian to keep track of all evidence collected. This places the responsibility on specific individuals and avoids confusion if questions arise later as to where the items were found and who found them.
7.Document the scene as it appears upon arrival, prior to the addition or subtraction of any items or persons. This can be done through the use of photography, video tape
Page 7 of 76

recording, measuring, and sketching the location of all the evidentiary items. Ensure that this documentation occurs prior to the movement of any items within the scene. Document in written notes what the items are that are depicted in the photographs and sketches, noting the condition, location, date and time of collection and who collected each item.
8.Use a systematic approach when searching for evidence. Study the whole scene first because the relationship of different items and their location may be important. Search the crime scene area so that hidden evidence is not overlooked. Consider what significance the items may have and what examinations the laboratory conducts with regards to the items collected. Remember that the items collected should be probative, relevant and material to the investigation.
9.Evidence of a fragile nature should be collected prior to evidence that is less likely to be destroyed or contaminated.
10.Keep the chain of custody short because each person having an item in his or her possession may be required to testify in court.
11.Place each item collected into a separate container. Items that are similar, but are collected from separate locations, should also be packaged separately. This prevents damage through contact and eliminates cross contamination. Refer to the appropriate physical examination section for details on packaging.
12.Store evidence in a safe, evidence vault, or locker where others do not have access.
CONTAINERS
Instructions regarding containers used for specific types of evidence are found in the various sections of this manual. Always use clean, new containers to prevent contamination. (FIGURE 1).
Paper envelopes and paper bags are suitable for enclosing paper items and apothecary folds containing small, dry, or powdery material. (FIGURE 2). Vials, pill boxes, or match boxes are suitable for most small items.
Bags or paper can be sealed around the end or over areas of large items, such as tools, safes, and vehicle bumpers to prevent loss of adhering evidence. Plastic zipper bags are suitable for small, dry objects not requiring serological, DNA, or microanalysis examination. Do not put damp or biological items in plastic bags as bacteria or fungus may grow.
Seal containers with frangible evidence tape to prevent loss, contamination, or access by unauthorized persons.
Avoid staples as they may tear gloves or puncture the skin.
Page 8 of 76

Figure
Use care in the selection of containers for items of physical evidence. Particular requirements of a specific type of evidence are found in the appropriate section of this manual.
Figure
Pharmaceutical/Apothecary packets are useful for collecting most types of trace evidence such as paint, glass, soil, hair, fibers, and other debris. Gently place or move the evidence to the center, then fold the paper so that no edges are left open. Tape the small packet securely and label appropriately.
Page 9 of 76

IV. SAFETY CONSIDERATIONS
Much of the evidence collected by law enforcement agencies is potentially hazardous. The hazards relate to the types of exposure individuals have with the items of evidence. Four common methods of exposure are inhalation, absorption, ingestion, and injection. The risk of exposure can be reduced by the selection of appropriate packaging materials and the placement of hazard warnings on the exterior of the evidence containers.
1.Packaging of Liquid Body Fluid Samples
A.Liquid blood and urine must be packaged in a
B.Label with the international biohazard symbol and warning label so that it is readily visible to all who handle the package.
C.For transport information, see Mailing/Commercial Carriers information on page 11.
2.Labeling of Biohazard Evidence
Mark all exterior packages with the international biohazard symbol and label if the package contains liquid or dried blood,
3.Packaging of Sharps
A.A sharp is any object or device capable of puncturing the skin. Injection of a bloodborne pathogen such as HIV (AIDS virus), HBV (hepatitis virus), and others can occur by the accidental exposure to blood or
B.Blood or
1.Because of the possibility of an accidental needle puncture, hypodermic syringes continue to pose a health and safety threat both to contributors and to laboratory personnel. The laboratory will not accept hypodermic syringes as evidence.
2.Package in rigid,
3.Use the international biohazard symbol and label with the words, WARNING:
CONTAINS SHARPS.
4.For examples of packaging using the biohazard symbol, see page 15.
C.Sharps not contaminated with blood or body fluids
1.Package glass to prevent breakage; secure knives, razor blades, etc., within cardboard or similar support or in boxes.
2.Label with the words, WARNING: CONTAINS SHARPS.
Page 10 of 76