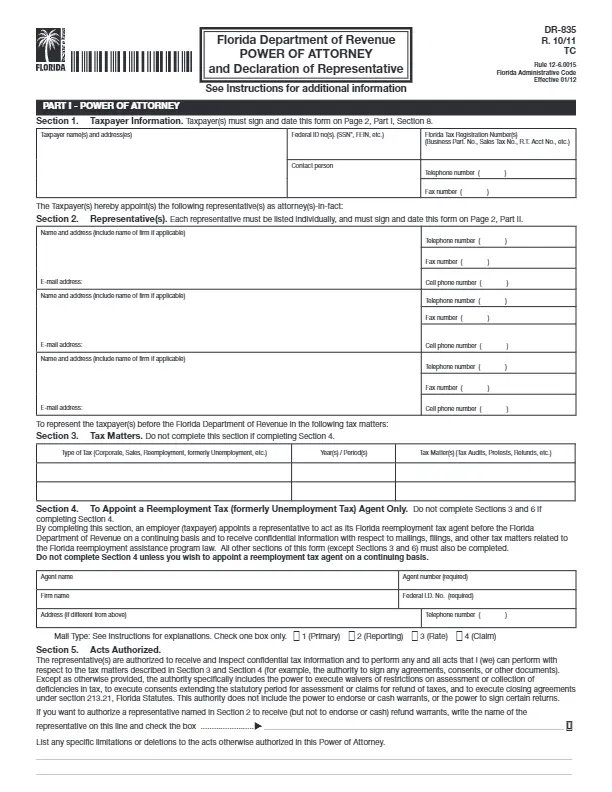
If an individual in Florida wants to delegate dealing with taxes to someone else, they should create and sign a Florida tax power of attorney (or POA) form. It will appoint another person to be responsible for the taxes. The tax POA in Florida is also referred to as the DR-835 form.
A person who creates such a fillable power of attorney form in the US is referred to as “principal.” By this form, a specially hired agent or accountant may access the principal’s data and conduct various actions. Usually, a tax POA form includes specific information, including:
- Principal’s Details
- Attorney’s Details
- Tax Matters for the attorney.
A tax POA in Florida allows a person to choose more than one representative to deal with taxes. Sometimes POA forms should be notarized. However, in this state, the principal’s and the attorney’s signatures are sufficient. In Florida, the laws that describe powers of attorney, in general, are prescribed in Chapter 709 of the Florida Statutes.
See all the Florida POA documents you can fill out by clicking on this link to our article.
Florida Tax Power of Attorney Form Details
| Document Name | Florida Tax Power of Attorney Form |
| State Form Name | Florida Form DR-835 |
| Relevant Link | Florida Department of Revenue |
| Where to File? | If for a reemployment tax matter and the taxpayer has completed Section 4: To the Florida Department of Revenue, P.O. Box 6510, Tallahassee FL 32314-6510 |
| Avg. Time to Fill Out | 15 minutes |
| # of Fillable Fields | 75 |
| Available Formats | Adobe PDF |
Filling Out Florida Tax POA
It is vital to complete the Florida tax power of attorney form correctly. A template in this state is brief and straightforward. We have prepared a list of steps that you should complete to get the best results.
1. Download the Template of the Form
Usually, a POA form completion in Florida begins with looking for a template and downloading it. To ensure the successful creation of the document, use our form-building software.
2. Add the Principal’s Details
The first section of the tax POA in Florida reveals information about the principal signing the form. Here, you have to include the name and exact address on the left-hand side and the federal ID number on the other side. This can be, for example, the Social Security Number (SSN) or the Federal Employer Identification Number (FEIN).
In the relevant blank field, add an individual who may act as your “contact person.” This section should also reveal the Florida Tax Registration Number (or numbers) of the principal and the valid telephone number. If you, as the principal, have fax, write its number as well.

3. Indicate the Attorney (or Attorneys)
As said above, the tax POA in Florida allows more than one attorney (or a representative) in the document. For all of them, you should insert the names and addresses along with the contact details: email address, fax, and phone number(s).

4. Delegate Matters
Below the attorney’s details, you will see the section for the tax matters you want to delegate, or Section 3. The principal should specify the type of tax, the period, and the exact issues.
Please note that completing Section 4 below this one leads to the non-completion of Section 3. Section 4 is required if you are hiring an agent to deal with your taxes continuously. In Section 4, you should add the agent’s name, name of the entity where they work, federal ID number, and address. Also, write the agent number and a telephone number. Choose the degree of communication between you and the agent.

5. Limit the Agent’s Powers
In Section 5 of the form, you may limit the powers of your attorney, if needed. Write this information in the relevant blank lines.

6. Indicate Who Gets Notifications
Section 6 lets you choose people that will receive notifications regarding the tax matters. If you have already filled out Section 4, skip Section 6.

7. Annul the Previous POA Form (If Needed)
When you create a new tax POA form in Florida, the documents you signed before will not be canceled automatically. If you, as the principal, wish to annul them, fill out this section.

8. Sign the POA Form
The principal’s signature and the date of signing make a tax POA form valid in Florida. Apart from signing and inserting the date, the principal must include their name and title (if applicable).

9. Ask the Representatives to Sign
With this document, you have chosen a representative (or representatives). Once you have signed the form, they should append their signatures, too. Before signing, they should read a short text, accept it, and choose one option. Besides the signature and the signing date, a representative must insert their Jurisdiction (State) and Enrollment Card Number (if there is any).

