Navigating the intricate world of Linux administration can be a journey filled with discoveries, especially for those embarking on this path for the first time. The "Administrator Linux Step By Step" form, excerpted from "The Accidental Administrator: Linux Server Step-by-Step Configuration Guide" by Don R. Crawley, serves as a compass in this exploration. It encapsulates the essence of choosing between graphical user interfaces (GUIs) and command-line interfaces (CLIs), a decision that hinges not on a binary preference but on the effectiveness and efficiency brought by each tool in different scenarios. The guide illuminates the structured world of Linux directories or folders, an essential foundation for any administrator, detailing the purpose and significance of each from the root to the more specialized like /etc for configuration files, and /home for user directories. Moreover, the excerpt sheds light on essential administration practices such as customizing the desktop environment, managing system services— or daemons as they are known in the Linux realm, and leveraging Red Hat's system-config as well as system-control utilities for system management. At its core, it introduces the shell, the crucial interface between user commands and the operating system, underscoring its dual role as a command interpreter and a scripting environment. This comprehensive guide, through a blend of detailed explanations and practical insights, essentially prepares one to navigate the Linux server environment with confidence, whether tweaking the system's aesthetic or delving into the command line's potent capabilities.
| Question | Answer |
|---|---|
| Form Name | Administrator Linux Step By Step Form |
| Form Length | 44 pages |
| Fillable? | No |
| Fillable fields | 0 |
| Avg. time to fill out | 11 min |
| Other names | the accidental administrator linux server step by step configuration guide pdf, Washington, Linux, accidental administrator linux server pdf |

Excerpted from:
The Accidental Administrator:
Linux Server
Configuration Guide
First Edition
by Don R. Crawley
Linux+ and CCNA Security
Provided courtesy of
Seattle, Washington
www.soundtraining.net
©2010, Don R. Crawley. All rights reserved.

Chapter Two:
Linux Administration
"If you want to travel around the world and be invited to speak at a lot of different places, just write a Unix operating system."
GUI vs. CLI
Since the first graphical user interface (GUI) was created in the Xerox Palo Alto Research Center in the early 1970s, those of us who work in information systems and technology have debated its merits and liabilities.
The real issue is not whether to use a GUI or a
tool that works for you and helps you work most effectively. For most of us, that means that sometimes we‟ll use a GUI and sometimes we‟ll use a CLI.
I once had a student in a Linux workshop who said his nickname was “No GUI Louie”. While I remember Louie as a very knowledgeable and capable IT pro, I have also had students who avoid the CLI because of its complexity without considering the power it affords an administrator. I think we limit ourselves when we arbitrarily limit the tools at our disposal by eliminating GUI or CLI tools.
In my own work, I find that I use both the CLI and GUI, depending on the task at hand and my personal familiarity with the tools in question. (Okay, I use the
very grateful for the GUI when performing unfamiliar tasks!)
|
GUI Pros |
|
|
GUI Cons |
|
|
|
|
|
||
|
|
|
|
|
|
Faster |
|
|
Farther away from the “road” |
|
|
Fewer typing errors |
|
|
Less control |
|
|
Less minutia |
|
|
Java and other issues might make GUI unavailable |
|
|
Safer (harder to make mistakes) |
|
|
Some of the names and labels it creates are strange |
|
|
Can help teach you CLI commands |
|
|
Some people are more familiar with the CLI |
|
|
|
|
|
|
|
|
Linux Directories
Everything in Linux/UNIX is based on the file system. The file system is comprised of various directories (Windows calls them “folders”.) The root directory (“/”) is at the base of the file system.
Some directories may be on different partitions or drives, but they are still a part of the file system. Some directories may even be on completely different computers, perhaps running a completely different operating system, but they are still part of the file system. What follows is a list of some of the more commonly found directories in the Linux file system (all directories are not included on all systems):
/ is the root directory
/bin/ and /usr/bin/ store user commands.
/boot/ contains files used for system startup including the kernel.
/dev/ contains device files
/etc/ is where configuration files and directories are located.
/home/ is the default location for users‟ home directories.
/initrd/ is used to load required device modules and mount the initrd.img image file during system startup.
/lib/ and /usr/lib/ hold library files used by programs in /bin/ and /sbin/.
/lost+found/ holds orphaned files (files without names) found by fsck
/mnt/ holds the mount points for file systems that were mounted after boot.
/opt/ is used primarily for installation and unintallation of
/proc/ is a virtual directory (not actually stored on the disk) which holds system information required by certain programs.
/root/ is the home directory of the superuser “root”
/sbin/ and /usr/sbin/ store system commands.
/tmp/ is the system temporary directory. All users have read+write access to /tmp/.
/usr/ contains files related to users such as application files and related library files (“usr” is an acronym that stands for UNIX system resources).
/var/ (as in “variable”) holds files and directories that are constantly changing such as printer spools and log files.
The above is a brief overview of Linux/UNIX directories. For a more complete discussion of
Linux/UNIX directory structures, search on “Filesystem Hierarchy Standard” at
www.wikipedia.com.
Soundthinking point: Customizing the Desktop Background
Customize the Gnome or KDE background by
Starting and Stopping Services
In Linux, the various services that together make up the entire operating system are called daemons
(pronounced
likely looking at a daemon name. Most of the daemons can be controlled through scripts located at
/etc/init.d/. For example, to start the Web server from a terminal window, you would execute the command “/etc/init.d/httpd start”. To stop it, you would execute the command “/etc/init.d/httpd stop”.
Different Linux distros might place the scripts in slightly different locations. Later in the book, you‟ll learn how to use the find command to locate such scripts as well as other files and directories.
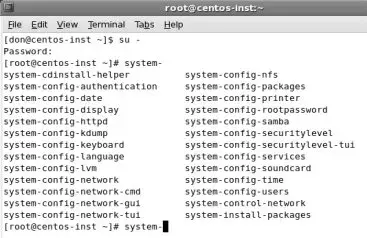
The Red Hat
Red
#system-
Do not hit enter, but instead touch the tab key twice and you‟ll see a listing of options.
Figure 1 The Red Hat system utility
The Shell
The shell is the interface between the user and the operating system. It acts as a keyboard interpreter, taking the keyboard input from the user and delivering it to the operating system. You can think of the shell as being the part of the operating system that allows you to interact with the kernel. The shell is the program that executes Linux or UNIX commands.
There are several shells available for use in the Linux and UNIX. The one most commonly used in Linux is the bash shell (Bourne Again Shell). Other shells include sh (Bourne Shell), csh (CShell), tcsh, csh, and ksh (Korn Shell).
You can change the shell by typing the shell‟s name at a command prompt.
For the purpose of this document, we‟ll focus on the bash shell.
The shell is not only a command interpreter, it is also a scripting language. Experienced Linux administrators often write scripts to automate frequently conducted system tasks.
Linux, like all
configurations and operations. In Linux/UNIX, the administrator account is called “root” (equivalent to “admin”, “administrator”, or “supervisor” in other operating systems). “root” is often referred to as the “superuser” because of the account‟s unrestricted access to every area of the system and every aspect of the system‟s configuration.
When logged on as root using the bash shell, the prompt is a pound sign (#). When logged on as a regular user using the bash shell, the prompt is a dollar sign ($).
Shell commands in the Linux/UNIX world are usually case sensitive.
You can see your default shell with this command:
#echo $SHELL
Linux Profiles
There are two types of Linux profiles:
.bashrc
.bash_profile
.bash_history
There are many others. You can view the hidden files in any directory by using “ls
Administration Tools and Techniques
Working in Terminal
Most Linux systems configured as servers are managed in a

managing a Linux system. The other benefit to working in a CLI is that each Linux distro is much more similar in the CLI than in the GUI. For the purpose of this workshop, you will do most of your configurations in the CLI, thus allowing you to make smoother and simpler transitions from Debian to other distros such as SuSE, Ubuntu, RedHat, Slackware, or even traditional UNIX systems.
soundthinking Point: Desktop Environments
The default desktop environment in CentOS 5.x, Debian 4.0r5, and many other Linux distros is Gnome. The desktop environment is what provides the buttons, backgrounds, effects, and applications. Desktop environments will be covered later in the workshop, but for now understand that different desktop environments may have slightly different to significantly different menu locations than those described here.
Student Exercise 2.1:
When you first logon to a Linux system, you may be in a GUI or in a
placed in your home directory (/home/[username]). You can navigate to other directories by using the “cd” command, followed by the path to the desired destination.
1.If you are not already using the root account, use the su (switch user) command with the
$su -
Password: p@ss5678
2.#cd changes the working directory. Enter the following command (bearing in mind that the “#” represents your prompt:
#cd /home
Notice that the prompt changes to display the current directory (home).
3.To return to your own home directory, type the following command:
#cd ~
You can also type “cd” to return to your home directory, but you should know that the tilde (~) represents your home directory. The tilde is often used in path statements to represent your home directory.
4.Now, enter the “pwd” command to print your working directory to your screen (output directed to the screen is known as standard output or stdout):

#pwd
5.You can go up one level in the directory hierarchy by using the command:
#cd ..
The “..” indicates the parent directory. All directories except for the root (/) directory have a parent.
6.Once again, enter the “pwd” command to print your working directory:
#pwd
7.Once again, return to your own home directory. This time, simply enter “cd” with no tilde:
#cd
8.Now issue an “ls” command to see the contents of the current directory. “ls” lists the contents of a directory.
#ls
There are a variety of switches available for use with “ls”:
|
|
|
|
|
|
|
Some commonly used options |
|
|
|
|
|
|
|
Results |
|
|
|
with “ls” |
|
|
|
|
|
|
|
|
|
|
|
|
|
|
|
|
|
ls |
|
|
Lists all files including hidden files |
|
|
|
|
|
|
|
|
ls |
|
|
Long listing, includes permissions, owners, |
|
|
|
|
groups, etc. |
||
|
|
|
|
||
|
|
|
|
|
|
|
ls |
|
|
Lists |
|
|
|
|
|
|
|
|
ls |
|
|
Shows file size (s) in |
|
|
|
|
format (h) |
||
|
|
|
|
||
|
|
|
|
|
|
|
ls |
|
|
Displays one file per line |
|
|
|
|
|
|
|
|
ls |
|
|
Tells “ls” to list directory names, but not |
|
|
|
|
their contents |
||
|
|
|
|
||
|
|
|
|
|
|

You can also use common shell metacharacters with “ls”:
* is the string wildcard
? is the character wildcard
[] encloses a character set
{} is a string set
When you issue the “cd” command with no parameters, you will be returned to your home directory.
#mkdir creates directories.
Student Exercise 2.2: Creating Directories and Files
In this exercise, you will create a working directory which you will use for upcoming exercises. You will work with several commands to become familiar with some of the important tools related to directory and file management.
Student Exercise 2.2.1: Working with Directories
1.Log on to your system as the regular user you created during the installation process.
2.Click on the Applications menu, move your mouse over Accessories, and on the submenu that appears, click on Terminal.
3.In the terminal window, enter the following commands (remember that the “$” and the “#” are prompts and you should not type them at the beginning of the command):
$su –
Password: P@SS5678
#mkdir /demo
You have just created a directory called “demo” which is a subdirectory under the root directory (/).
Note: You can create multiple directories at the same time simply by separating their names with a space.
4.Display the contents of your working directory with the following command:

#ls
Notice that /demo is not displayed. The reason is that /demo is a subdirectory of the room directory. You are presently in a different directory.
5.Print your working directory to stdout (your screen) with the following command:
#pwd
Notice that you‟re in the super user root‟s home directory which is not where you created /demo.
6.Display the contents of the root directory with the following command:
#ls /
Notice that you now see the demo directory, along with several other directories that are all child directories under the parent /.
7.Enter the following command to change your working directory to /demo:
#cd /demo
#pwd You should now see that /demo is your working directory.
8.Enter the following commands:
#mkdir demo1 demo2 demo3 You have just created three
9.Now, list the contents of /demo with the following command:
#ls
You should now see the three subdirectories you just created.
To remove a directory, use the command “rmdir”:
10.While still in /demo, remove the three directories you just created with the following command:
#rmdir demo1 demo2 demo3
11.Use the “ls” command again to confirm that the three directories are removed:
#ls
The /demo directory should be empty.
12.You can also use wildcards to simplify file and directory management. Touch the
up arrow on your keyboard several times. Notice that it repeats the last several commands. Stop when you see the command “mkdir demo1 demo2 demo3”.