Part 1: Jumping into C++ |
2 |
Chapter 1: |
Introduction and Developer Environment Setup |
4 |
Chapter 2: |
The Basics of C++ |
35 |
Chapter 3: |
User Interaction and Saving Information with Variables |
43 |
Chapter 4: |
If Statements |
55 |
Chapter 5: |
Loops |
65 |
Chapter 6: |
Functions |
76 |
Chapter 7: |
What If You Can’t Figure Out What to Do? |
86 |
Chapter 8: |
Switch Case and Enums |
93 |
Chapter 9: |
Randomizing Your Programs |
100 |
Part 2: Working with Data |
105 |
Chapter 10: |
Arrays |
106 |
Chapter 11: |
Structures |
118 |
Chapter 12: |
Introduction to Pointers |
124 |
Chapter 13: |
Using Pointers |
131 |
Chapter 14: |
Dynamic Memory Allocation |
142 |
Chapter 15: Introduction to Data Structures with Linked Lists |
153 |
Chapter 16: |
Recursion |
165 |
Chapter 17: |
Binary Trees |
179 |
Chapter 18: The Standard Template Library |
198 |
Chapter 19: More about Strings |
208 |
Chapter 20: Debugging with Code::Blocks |
217 |
Part 3: Writing Larger Programs |
235 |
Chapter 21: Breaking Programs Up Into Smaller Pieces |
236 |
Chapter 22: |
Introduction to Program Design |
249 |
Chapter 23: |
Hiding the Representation of Structured Data |
254 |
Chapter 24: |
The Class |
259 |
Chapter 25: |
The Lifecycle of a Class |
264 |
Chapter 26: |
Inheritance and Polymorphism |
283 |
Chapter 27: |
Namespaces |
300 |
Chapter 28: |
File I/O |
304 |
Chapter 29: Templates in C++ |
325 |
Part 4: Miscellaneous Topics |
337 |
Chapter 30: Formatting Output Using Iomanip |
338 |
Chapter 31: Exceptions and Error Reporting |
344 |
Chapter 32: |
Final Thoughts |
352 |
© Alex Allain (http://www.cprogramming.com) |
1 |

Let’s get ready to program! Programming, like other art forms, allows you to create—but in programming, your power is multiplied by the speed and capabilities of the computer. You can create engaging games like World of Warcraft, Bioshock, Gears of War and Mass Effect. You can create or detailed and immersive simulations like The Sims. You can write programs that connect people together: web browsers like Chrome, email editors or chat clients, or websites like Facebook or Amazon.com. You can build apps that delight your users, taking advantage of new devices like iPhones or Android phones. Those things, of course, take time to become skilled enough to create. But even in the beginning you can write interesting software—programs that solve your math homework for you, simple games like Tetris that you can show your friends, tools to automate tedious chores or complex calculations that would otherwise take days or weeks by hand. Once you understand the basics of programming a computer— which this book will teach you—you'll have the ability to pick up the graphics or networking libraries you need to in order to write the kinds of programs that interest you, whether they're games, scientific simulations or something in between.
C++ is a powerful programming language that will give you a strong grounding in modern programming techniques. In fact, C++ shares concepts with many other languages, so much of what you learn with transfer to other languages that you pick up later (almost no programmer works with a single language exclusively).
C++ programmers have a flexible skill set, with the ability to work on many different projects. Most of the applications and programs you use every day were written in C++. Incredibly, every one of these applications I listed earlier was either written entirely in C++ or has significant components written in C++.1
In fact, interest in C++ continues to grow even as new programming languages such as Java and C# gain popularity. I've seen a marked increase in traffic to my site, Cprogramming.com, over the last few years. C++ continues to be the language of choice for high performance applications, creating programs that run extremely fast, often faster than Java or similar languages. C++ continues to grow as a language, with a new language specification, C++11, adding new features that make it easier and faster to use as a developer while maintaining its high-performance roots.2 A strong knowledge of C++ is also valuable on the job market, and jobs that require C++ skill are often both challenging and high paying.
Are you ready to get started? Part 1 is all about getting you set up to start writing programs and getting you using the basic building blocks of C++. Once you’re done with this section, you’ll be able to write real programs that you can show your friends (your close and nice friends, anyway) and you’ll understand how to think like a programmer. You won’t be a C++ master, but you’ll be well prepared to learn the remaining language features that you’ll need to make really useful and powerful programs.
1You can find these applications, and many more uses of C++ at
http://www2.research.att.com/~bs/applications.html
2 This specification was ratified as this book neared completion, so I have not included any material from the new standard. You can find a series of articles introducing C++11 at http://www.cprogramming.com/c++11/what-is- c++0x.html
© Alex Allain (http://www.cprogramming.com) |
2 |
I’ll also give you just enough background and terminology to stay afloat, putting off the more complicated explanations for certain things until you’ve got the basics.
The other parts of this book will introduce you to increasingly advanced concepts. You'll learn how to write programs that work with large amounts of data, including taking input from files and learning how to process that data easy and efficiently (and learn numerous shortcuts along the way). You'll learn how to write larger, more complex programs without getting lost under a wave of complexity. You'll also learn about the tools that are used by professional programmers.
By the end of this book, you should be able to read and write real computer programs that do useful, interesting things. If you're interested in game programming, you'll be ready to take up the challenges specific to game programming. If you're taking, or preparing to take, a class on C++, you should have the information you need to survive and thrive. If you're a self-learner, you should have enough information to write just about any program you're interested in writing, having nearly all of the tools provided by C++ at the ready.
© Alex Allain (http://www.cprogramming.com) |
3 |
Chapter 1: Introduction and Developer Environment Setup
What is a programming language?
When you want to control your computer, you need a way to speak to it. Unlike your dog or your cat, which have their own inscrutable languages, computers have programming languages created by people. A computer program is a piece of text—like a book, or an essay—but with its own particular structure. The language, while comprehensible to humans, is more strictly structured than a normal language, and the vocabulary is much smaller. C++ is one of these languages, and a popular one at that.
Once you have written a computer program, you need a way for the computer to run it—to interpret what you’ve written. This is usually called executing your program. The way you do this will depend on your programming language and environment—we’ll talk more about how to execute your program soon.
There are many programming languages, each with their own different structure and vocabulary, but they are in many ways very similar. Once you have learned one, learning the next will be easier.
I've heard of a language called C, what’s the difference between C and C++?
C is a programming language originally developed for developing the Unix operating system. It is a low- level and powerful language, but it lacks many modern and useful constructs. C++ is a newer language, based on C, which adds many more modern programming language features that make it easier to program than C.
C++ maintains all the power of the C language, while providing new features to programmers that make it easier to write useful and sophisticated programs.
For example, C++ makes it easier to manage memory and adds several features to allow "object- oriented" programming and "generic" programming. We’ll talk about what that really means later. For now, just know that C++ makes it easier for programmers to stop thinking about the nitty-gritty details of how the machine works and think about the problems they are trying to solve.
If you're trying to decide between learning C and C++, I strongly suggest starting with C++.
Do I need to know C to learn C++?
No. C++ is a superset of C; anything you can do in C, you can do in C++. If you already know C, you will easily adapt to the object-oriented features of C++. If you don't know C, that's OK—there's no real advantage to learning C before C++, and you will be able to immediately take advantage of powerful C++-only features (the first among many being easier input and output).
Do I need to know math to be a programmer?
If I had a nickel for every time someone asked me this, I’d need a calculator to count my small fortune. Fortunately, the answer is, emphatically, No! Most of programming is about design and logical reasoning, not about being able to quickly perform arithmetic, or deeply understanding algebra or calculus. The overlaps between math and programming are primarily around logical reasoning and precise thinking. Only if you want to program advanced 3D graphics engines, write programs to perform statistical analysis or do other specialized numerical programming will you need mathematical skill.
© Alex Allain (http://www.cprogramming.com) |
4 |
Terminology
Throughout the book, I’ll be defining new terms, but let’s get started with some very basic concepts that you’ll need to get started.
Programming
Programming is the act of writing instructions in a way that allows a computer to understand and execute those instructions. The instructions themselves are called source code. That's what you'll be writing. We'll see some source code for the very first time in a few pages.
Executable
The end result of programming is that you have an executable file. An executable is a file that your computer can run—if you’re on Windows, you’ll know these files as EXEs. A computer program like Microsoft Word is an executable. Some programs have additional files (graphics files, music files, etc.) but every program requires an executable file. To make an executable, you need a compiler, which is a program that turns source code into an executable. Without a compiler, you won’t be able to do anything except look at your source code. Since that gets boring quickly, the very next thing we will do is set you up with a compiler.
Editing and compiling source files
The rest of this chapter is devoted to getting you set up with a simple, easy-to-use development environment. I'll get you set up with two specific tools, a compiler and an editor. You've already learned why you need a compiler—to make the program do stuff. The editor is less obvious, but equally important: an editor makes it possible for you to create source code in the right format.
Source code must be written in a plain text format. Plain text files contain nothing but the text of the file; there is no additional information about how to format or display the content. In contrast, a file you produce using Microsoft Word (or similar products) is not a plain text file because it contains information about the fonts used, the size of the text, and how you’ve formatted the text. You don’t see this information when you open the file in Word, but it’s all there. Plain text files have just the raw text, and you can create them using the tools we're about to discuss.
The editor will also give you two other nice features, syntax highlighting and auto-indentation. Syntax highlighting just means it adds color coding so that you can easily tell apart different elements of a program. Auto-indentation means that it will help you format your code in a readable way.
If you're using Windows or a Mac, I'll get you set you up with a sophisticated editor, known as an integrated development environment (IDE) that combines an editor with a compiler. If you're using Linux, we'll use an easy-to-use editor known as nano. I'll explain everything you need in order to get set up and working!
A note about sample source code
This book includes extensive sample source code, all of which is made available for you to use, without restriction but also without warranty, for your own programs. The sample code is included in sample_code.zip, which came with this book. All sample source code files are stored in a separate folder named after the chapter in which that source file appears (e.g. files from this chapter appear in the folder ch1). Each source code listing in this book that has an associated file has the name (but not the chapter) of the file as a caption.
© Alex Allain (http://www.cprogramming.com) |
5 |
Windows
We’ll set up a tool called Code::Blocks, a free development environment for C++.
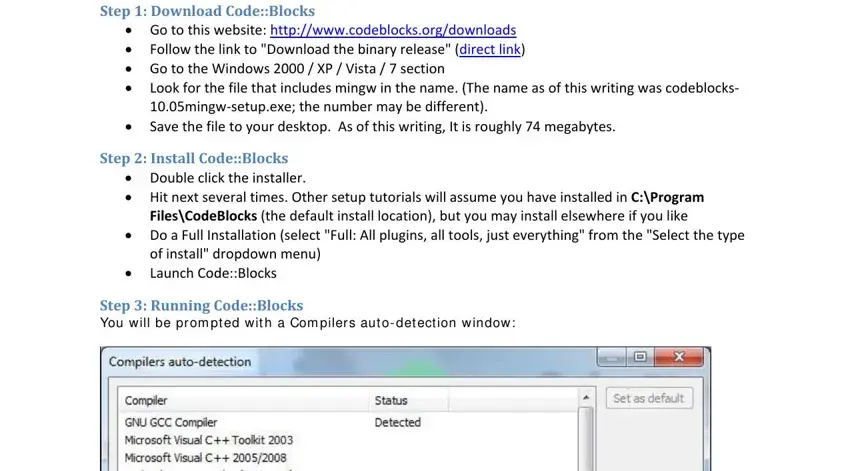
Step 1: Download Code::Blocks
•Go to this website: http://www.codeblocks.org/downloads
•Follow the link to "Download the binary release" (direct link)
•Go to the Windows 2000 / XP / Vista / 7 section
•Look for the file that includes mingw in the name. (The name as of this writing was codeblocks- 10.05mingw-setup.exe; the number may be different).
•Save the file to your desktop. As of this writing, It is roughly 74 megabytes.
Step 2: Install Code::Blocks
•Double click the installer.
•Hit next several times. Other setup tutorials will assume you have installed in C:\Program Files\CodeBlocks (the default install location), but you may install elsewhere if you like
•Do a Full Installation (select "Full: All plugins, all tools, just everything" from the "Select the type of install" dropdown menu)
•Launch Code::Blocks
Step 3: Running Code::Blocks
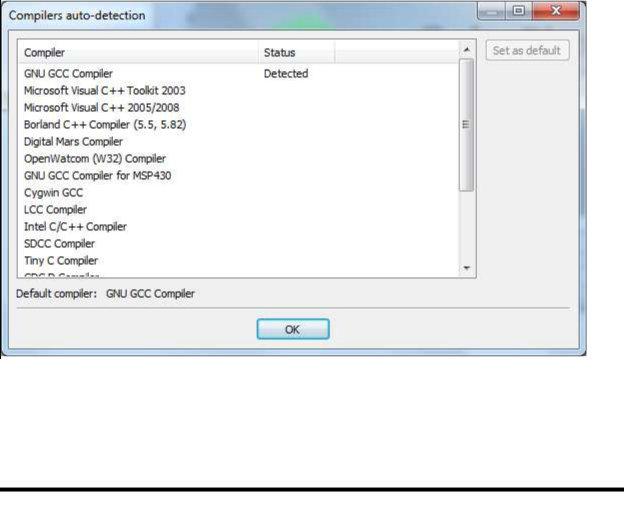
You w ill be pr om pt ed w it h a Com piler s aut o- det ect ion w in dow :
When you get the compiler auto-detection window, just hit OK. Code::Blocks may ask if you want to associate it as the default viewer for C/C++ files—I suggest you do. Click on the File menu, and under "New", select "Project..."
© Alex Allain (http://www.cprogramming.com) |
6 |
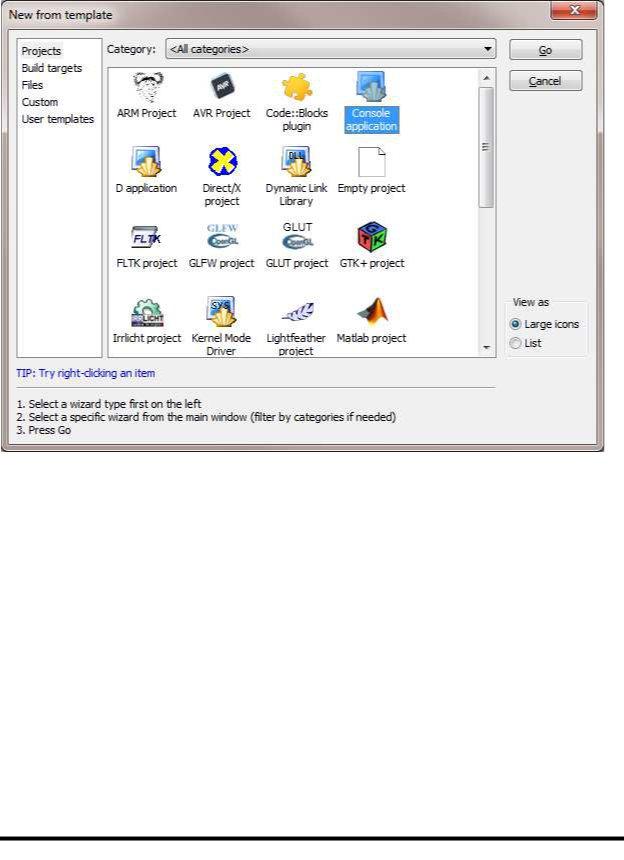
The following window will come up:
Click on "Console Application" and hit the "Go" button. All sample code from this book can be run as a console application.
© Alex Allain (http://www.cprogramming.com) |
7 |
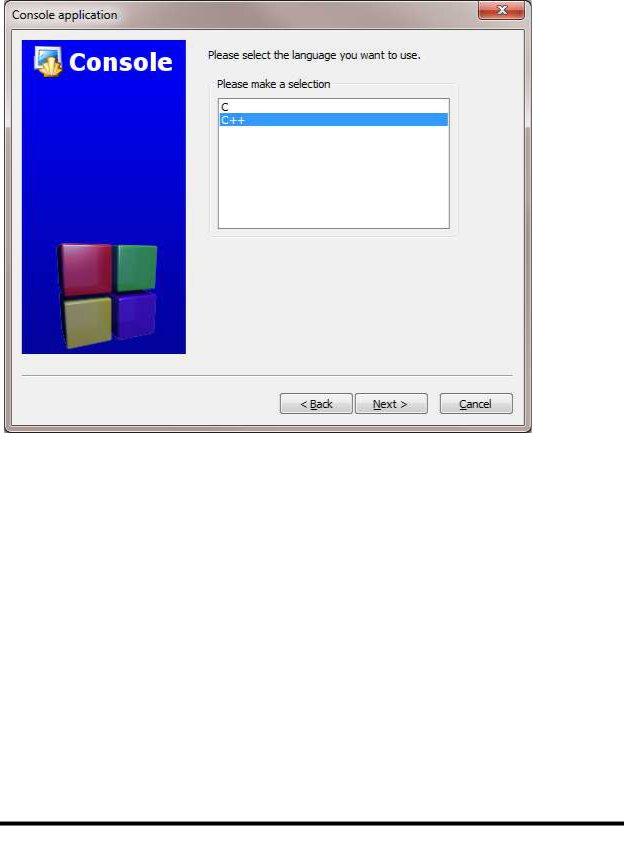
Click next until you get to the Language Selection Dialog:
You'll be asked to choose whether you want to use C or C++. Since we’re learning C++, pick C++.
© Alex Allain (http://www.cprogramming.com) |
8 |
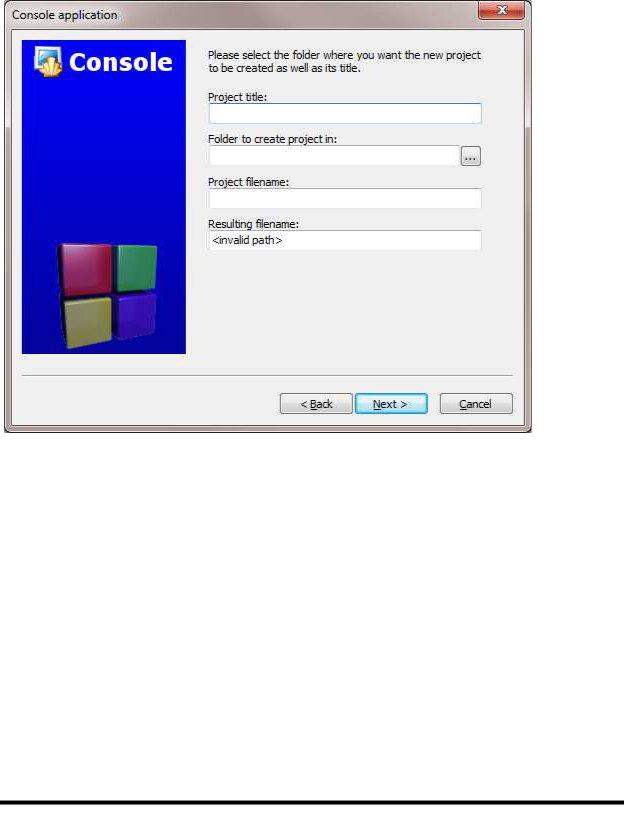
After clicking "Next", Code::Blocks will then prompt you with where you'd like to save the console application:
I'd recommend you put it in its own folder, as it may create several files (this is especially true if you create other types of projects). You will need to give your project a name; anything will be fine.
© Alex Allain (http://www.cprogramming.com) |
9 |
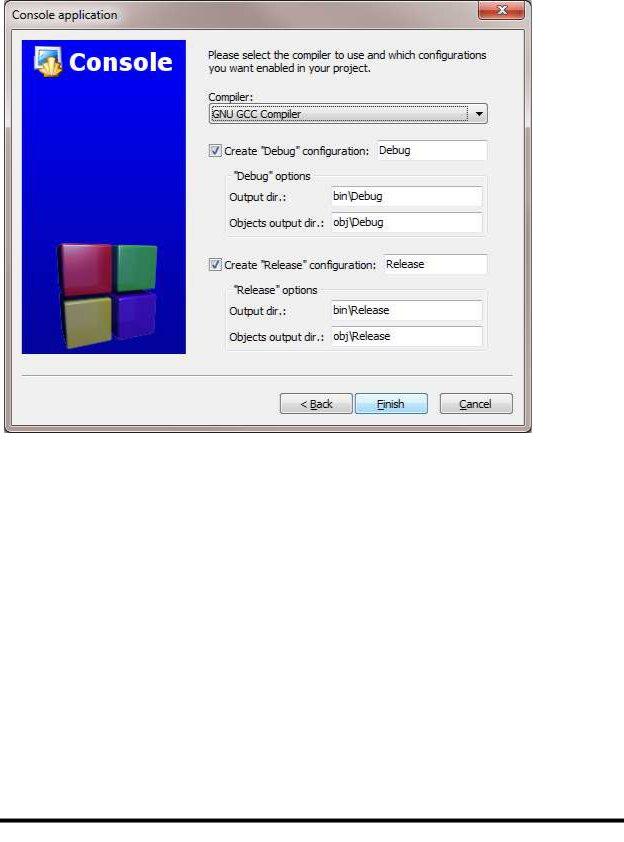
Clicking "Next" again will prompt you to set up your compiler:
You don't need to do anything here. Just accept the defaults by hitting "Finish".
© Alex Allain (http://www.cprogramming.com) |
10 |
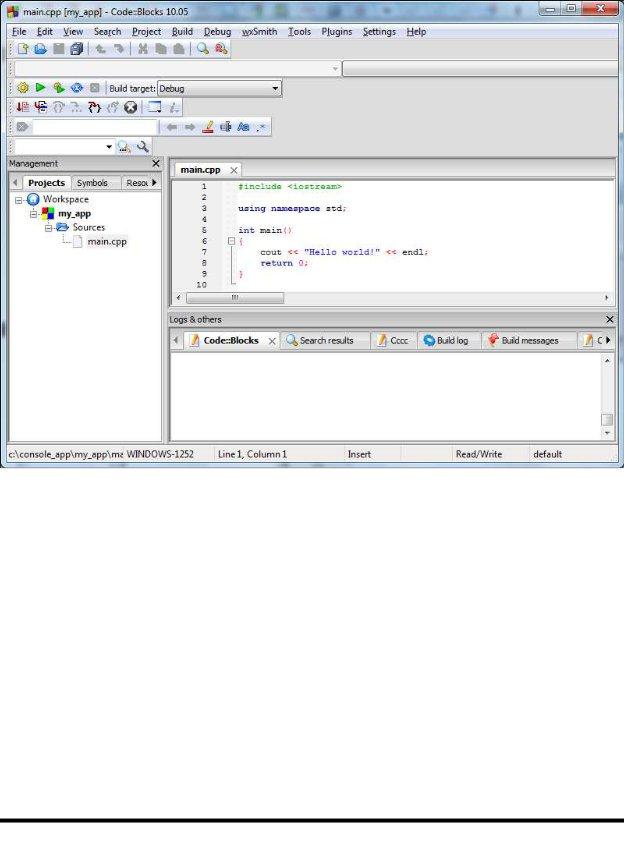
You can now open the main.cpp file on the left:
(You may need to expand the contents of the "Sources" folder if you don't see main.cpp.)
At this point, you will have your main.cpp file, which you can modify if you like. Notice the file extension:
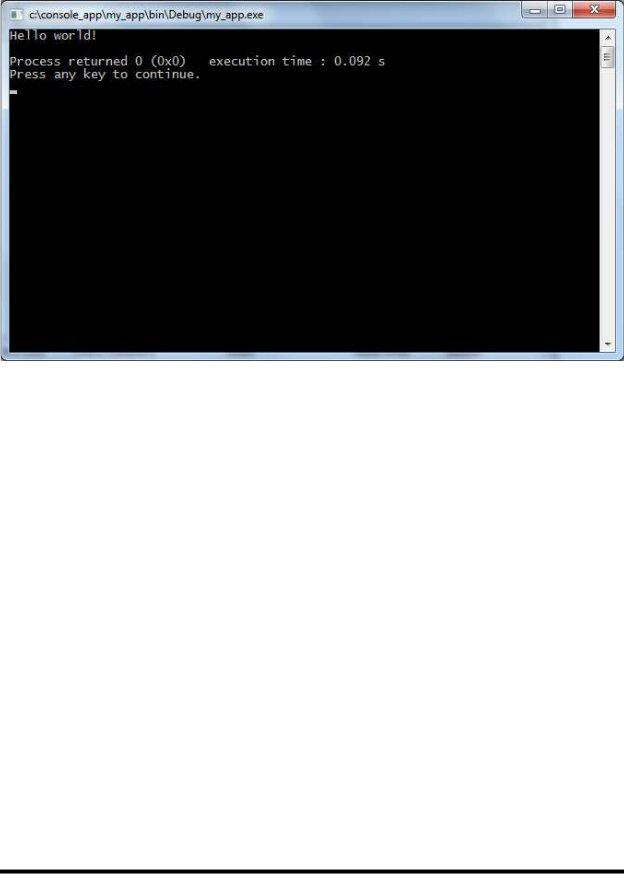
.cpp is the standard extension for C++ source files—not .txt—even though cpp files are plain text. For now, it just says "Hello World!", so we can run it as is. Hit F9, which will first compile it and then run it. (You can also go to the Build|Build and Run menu option.)
© Alex Allain (http://www.cprogramming.com) |
11 |
You now have a running program! You can simply edit main.cpp and then hit F9 to compile it and run it again.
Troubleshooting
If for some reason you don't get a running program, it probably means that there were compiler errors or that the environment wasn’t set up correctly.
Environment Setup
The most common error people see if things don't work is a message like "CB01 - Debug" uses an invalid compiler. Probably the toolchain path within the compiler options is not setup correctly?! Skipping..."
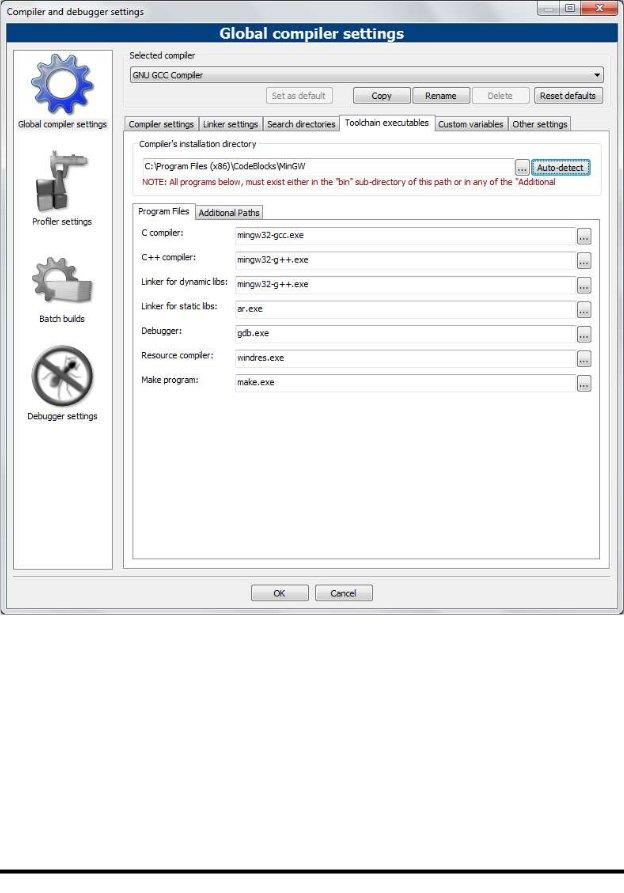
First, make sure that you downloaded the right version of Code::Blocks, the one that included MinGW. If that doesn't solve the problem, it is likely a problem with compiler auto-detection. To check your current "auto-detected" state, go to "Settings|Compiler and Debugger...". Then on the left, choose "Global Compiler Settings" (it has a gear icon) and on the right, select the "Toolchain executables" tab. This tab has a "Auto-detect" button that you can use. That might fix the problem—if it doesn't, you can manually fill out the form. Here's a screenshot demonstrating what things look like on my system. Change the path marked "Compiler's installation directory" if you installed to a different location, and make sure everything else is filled in as shown.
© Alex Allain (http://www.cprogramming.com) |
12 |
Once y ou'v e done t h at , t r y pr essing F9 again t o see if y ou get a r unning pr ogr am .
Compiler Errors
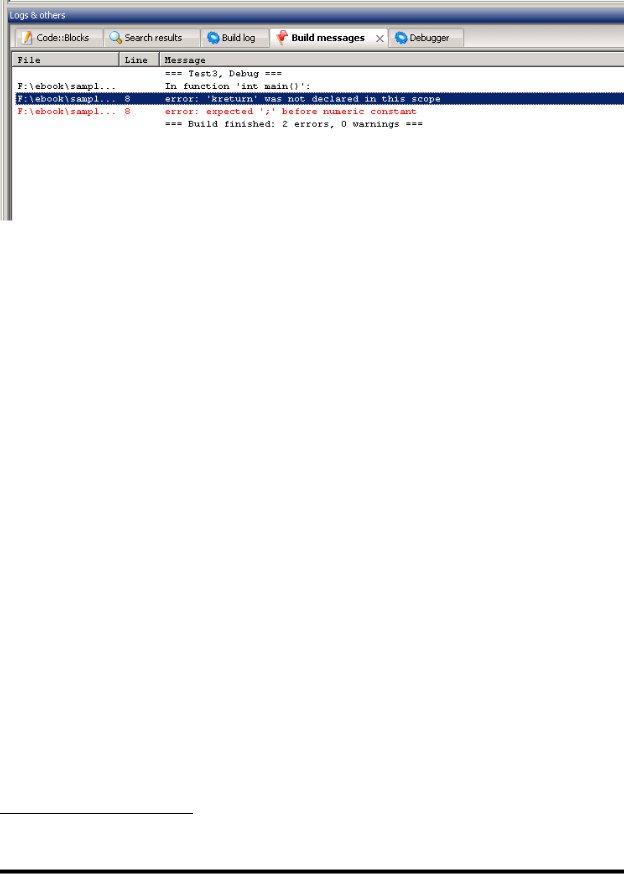
Compiler errors could happen if you've modified the main.cpp file in a way that confuses the compiler. To figure out what is wrong, take a look at the "Build messages" or "Build log" windows. The "Build messages" window will show you just compiler errors, the "Build log" will show you other issues too. Here's what it will look like if you have an error:
© Alex Allain (http://www.cprogramming.com) |
13 |
In this case, it shows you the name of the file, the line number, and then a brief string of text explaining the error. Here, I changed the line return 0; to be kreturn 0; and that is not valid C++, so I got an error.
Whenever you are programming, you will find it useful to check this window when your program doesn't compile in order to figure out what happened.
Throughout this book, you will see lots of sample code. For each one, you can either create a new console application or you can modify the source file of your original program. I'd recommend making new applications for each tutorial so that you can make changes to the sample code and save it for later review.
What exactly is Code::Blocks?
Earlier, I introduced the idea of an integrated development environment. Code::Blocks is an integrated development environment because it makes it easy to write source code and build your program from the same application. One thing you should be aware of is that Code::Blocks itself is not a compiler.
When you downloaded Code::Blocks, the installation package you chose also included a compiler, in this case GCC from MinGW, which is a free compiler for Windows. Code::Blocks handles all the messy details of setting up and calling the compiler, which is doing the real work.
Macintosh
This section covers only setting up development on an OS X system.3
OS X already comes with a powerful Unix-based shell environment that you can use, so many of the tools that are covered in the Linux section of this book are available to you. However, you may also want to try out Apple's XCode development environment. Regardless of whether you choose to use the XCode environment itself, installing XCode is a prerequisite to using the standard Linux tools as well.
While using the XCode environment itself is not required for developing C++ programs on the Mac, if you want to venture into Mac UI programming, then you should learn to use XCode.
3If you're using Mac OS 9 or earlier, and are unable to upgrade, you can try the Macintosh Programmer's Workshop, available directly from Apple: http://developer.apple.com/tools/mpw-tools/ Since OS 9 is so old, I cannot walk you through the setup.
© Alex Allain (http://www.cprogramming.com) |
14 |
XCode
XCode comes for free as part of Mac OS X, but by default, XCode is not actually installed. You can either find XCode on your Mac OS X DVD, or you can download the latest version. The download that includes documentation is very large, so you should try to find XCode on your Mac OS X CD if you have a slow network connection. Note that even the basic compilers, such as gcc and g++, which you normally have installed by default on a Linux environment, are not installed by default on Mac OS X; to get them, you must download the XCode Developer Tools.
Note: As of this writing, there are now two versions of XCode that you may be interested in: XCode 3 and the newer XCode 4. XCode 3 is free to download, whereas XCode 4 costs a small amount of money ($4.99). I’ve included setup instructions for both XCode 3 and XCode 4.
Installing XCode 3
To download XCode 3:
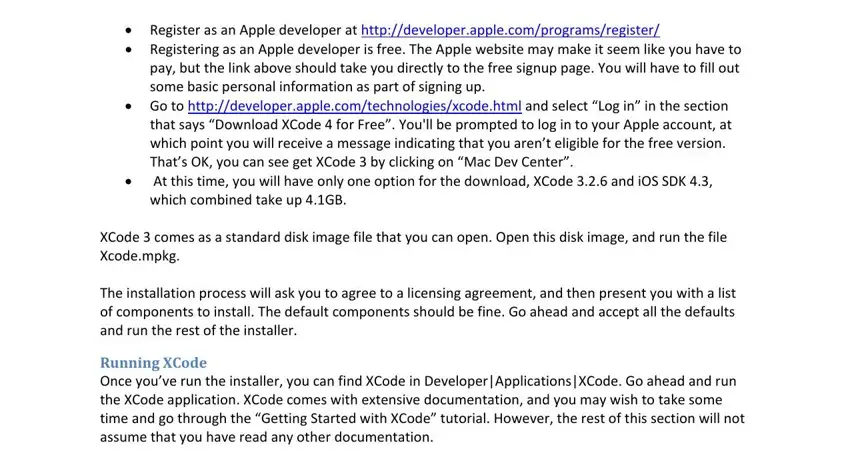
•Register as an Apple developer at http://developer.apple.com/programs/register/
•Registering as an Apple developer is free. The Apple website may make it seem like you have to pay, but the link above should take you directly to the free signup page. You will have to fill out some basic personal information as part of signing up.
•Go to http://developer.apple.com/technologies/xcode.html and select “Log in” in the section that says “Download XCode 4 for Free”. You'll be prompted to log in to your Apple account, at which point you will receive a message indicating that you aren’t eligible for the free version. That’s OK, you can see get XCode 3 by clicking on “Mac Dev Center”.
•At this time, you will have only one option for the download, XCode 3.2.6 and iOS SDK 4.3, which combined take up 4.1GB.
XCode 3 comes as a standard disk image file that you can open. Open this disk image, and run the file Xcode.mpkg.
The installation process will ask you to agree to a licensing agreement, and then present you with a list of components to install. The default components should be fine. Go ahead and accept all the defaults and run the rest of the installer.
Running XCode
Once you’ve run the installer, you can find XCode in Developer|Applications|XCode. Go ahead and run the XCode application. XCode comes with extensive documentation, and you may wish to take some time and go through the “Getting Started with XCode” tutorial. However, the rest of this section will not assume that you have read any other documentation.
Creating your first C++ program in XCode
So let’s get started—from the main XCode window that comes up when you start XCode, choose “Create a new XCode project”. (You can also go to “File|New Project…” or press Shift-⌘-N).
© Alex Allain (http://www.cprogramming.com) |
15 |
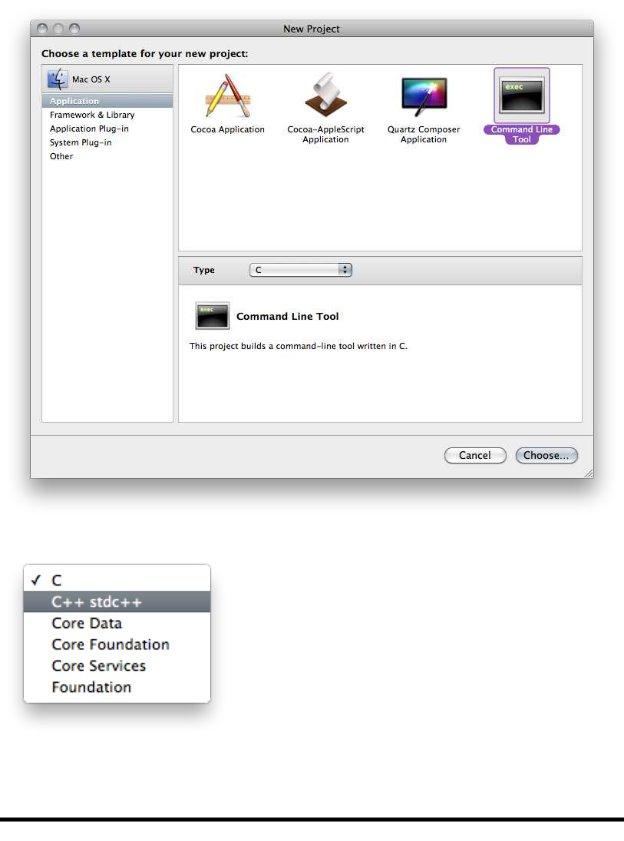
Choose “Application” from the left sidebar under “Mac OS X”, and then choose “Command Line Tool”. (You may also see “Application” under iOS—you don’t want that right now.)
You will also need to change the “Type” of the project from C to C++ stdc++.
Once you’ve done that, press “Choose…” and select a name and a location for your new project. This will create a new directory under the location that you choose, with the same name as the name of your project. For this sample program, I will use the project name HelloWord.
© Alex Allain (http://www.cprogramming.com) |
16 |
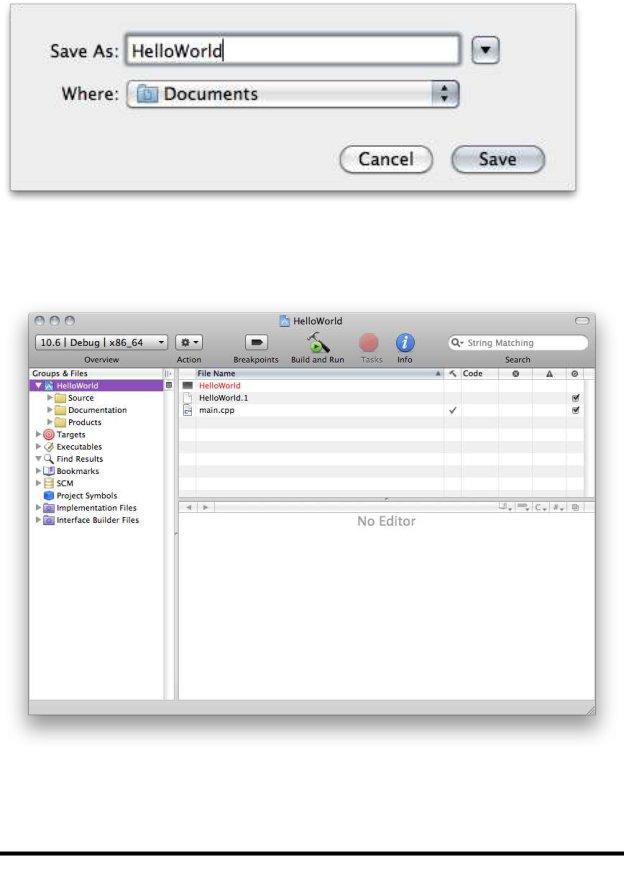
Then press Save.
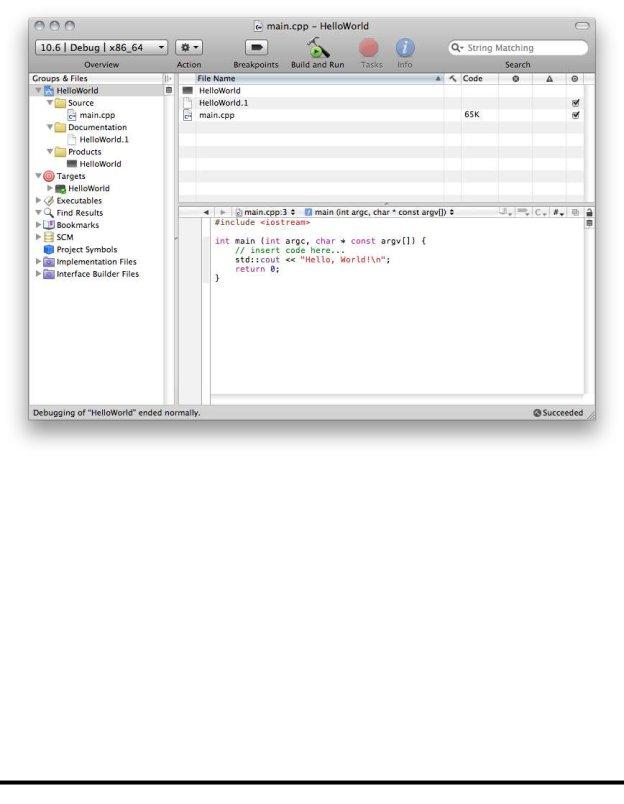
After pressing save, a new window will come up that looks like this:
This view shows you quite a few things. The right sidebar gives you access to Source, Documentation and Products. The “Source” folder contains the actual C++ files associated with your project, the “Documentation” folder contains any documentation you have—usually the source for a “man page”. You can ignore it for now. The “Products” folder stores the result of compiling your program. You can
© Alex Allain (http://www.cprogramming.com) |
17 |
also see the contents of these folders displayed in the top middle window.
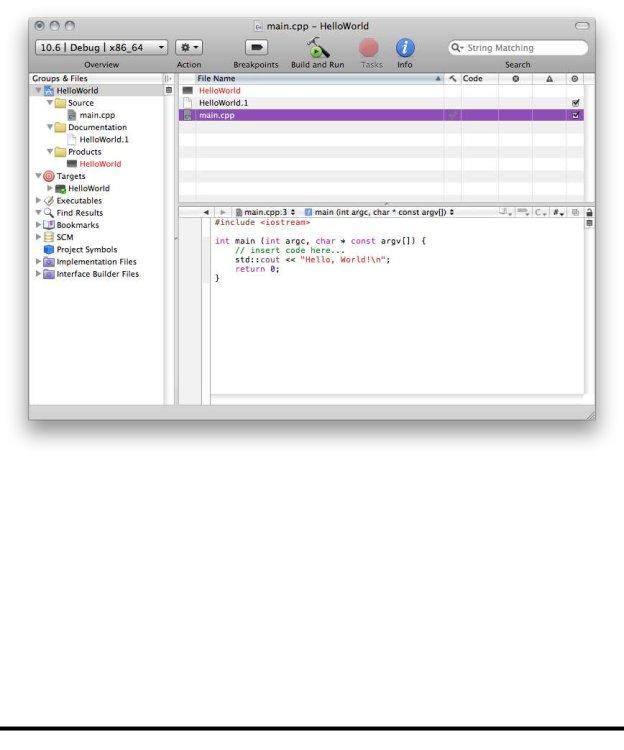
For now, let’s work on the source file itself. Go ahead and select “main.cpp” either from the top middle window or from the Source folder on the left. (Notice the file extension: .cpp is the standard extension for C++ source files—not .txt—even though cpp files are plain text.) If you single-click you will bring up the source in the window that currently reads “No Editor”. You can then start typing directly into the file.
You can also double-click on the file in order to bring up a larger editor window, if you want more space.
By default XCode provides a small sample program that you can start with. Let’s compile and then run this sample program. First click on the “Build and Run” button on the toolbar.
© Alex Allain (http://www.cprogramming.com) |
18 |
When you press this button, the program will compile, meaning that the executable file will be created. In XCode 3, you won’t actually see anything run. In order to do that, you need to double-click on the “HelloWorld” executable. You’ll notice that it used to be colored red, but after doing the build it should be colored black:
Go ahead and double click it to run your first program!
© Alex Allain (http://www.cprogramming.com) |
19 |
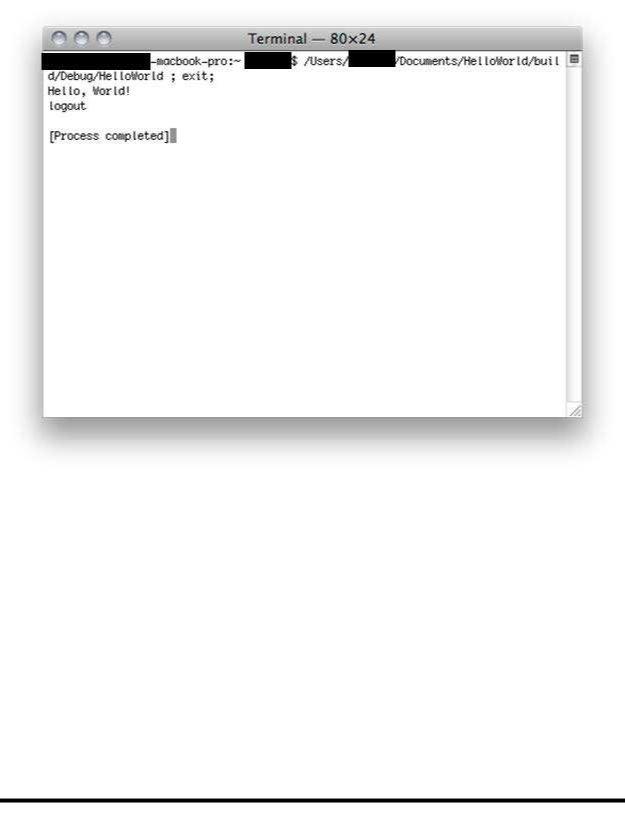
You should see some output that looks something like this (I’ve covered the username for the privacy of the person who lent me their Macintosh for this screenshot):
And there you go—you’ve run your first program!
Installing XCode 4
To download XCode 4, you can simply search for it in the Mac App Store and install it. It is about 4.5 GB. The download from the Mac App Store will put an “Install XCode” icon into your Dock. Run this to start the install process.
The installation process will ask you to agree to a licensing agreement, and then present you with a list of components to install. The default components should be fine. Go ahead and accept all the defaults and run the rest of the installer.
Running XCode
Once you’ve run the installer, you can find XCode in Developer|Applications|XCode. Go ahead and run the XCode application. XCode comes with extensive documentation, and you may wish to take some time and go through the “XCode Quick Start Guide”, which you can reach from the “Learn about using XCode” link on the startup screen. However, the rest of this section will not assume that you have read any other documentation.
© Alex Allain (http://www.cprogramming.com) |
20 |
Creating your first C++ program in XCode
So let’s get started—from the main XCode window that comes up when you start XCode, choose “Create a new XCode project”. (You can also go to “File|New|New Project…” or press Shift-⌘-N). This will bring up a screen that looks like this.
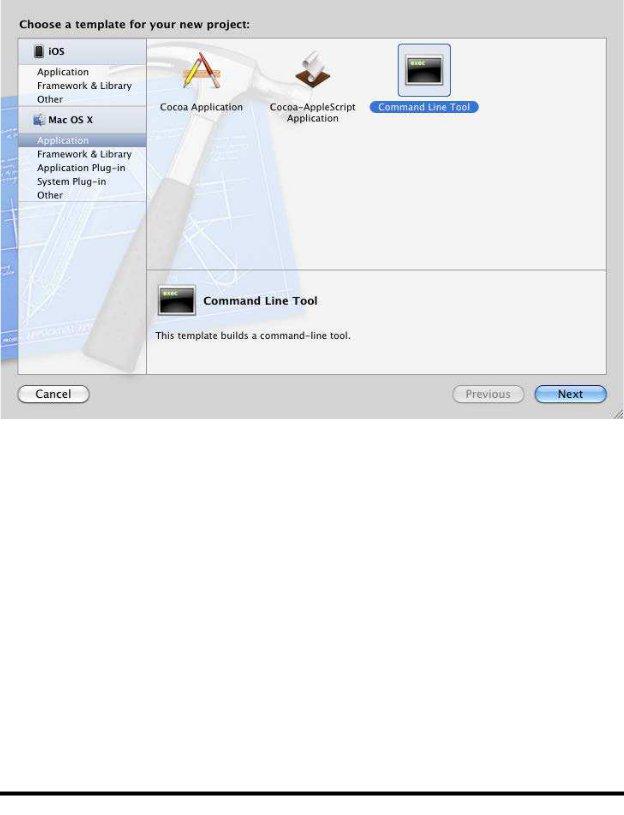
Choose “Application” from the left sidebar under “Mac OS X”, and then choose “Command Line Tool”. (You may also see “Application” under iOS—you don’t want that right now.) Then press “Next”.
© Alex Allain (http://www.cprogramming.com) |
21 |
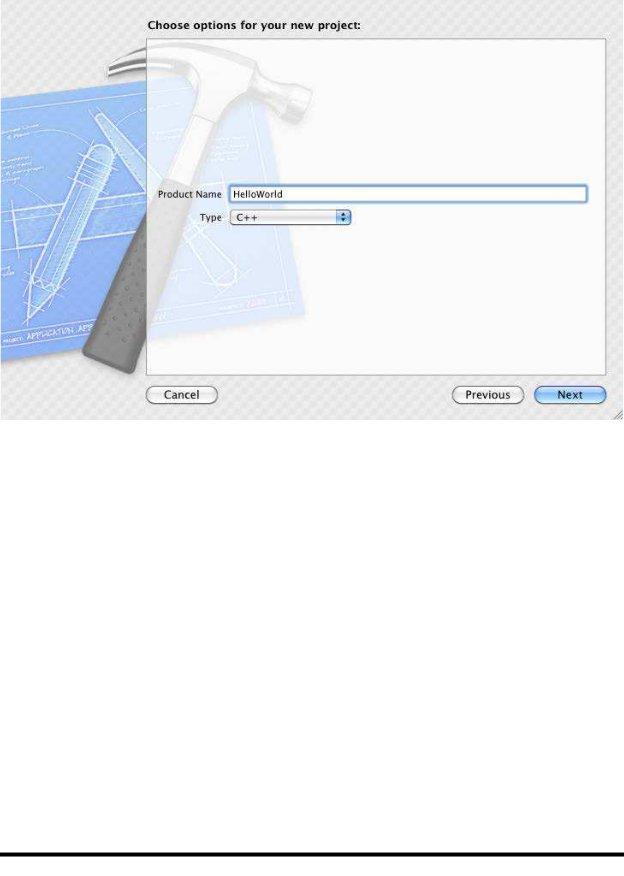
After pressing “Next”, you will see this screen:
I’ve already filled it out with a product name, “HelloWorld”, and I’ve chosen the Type to be C++ (it defaults to C). Do that, and then press “Next” again.
© Alex Allain (http://www.cprogramming.com) |
22 |
After pressing “Next”, you’ll be brought to this screen:
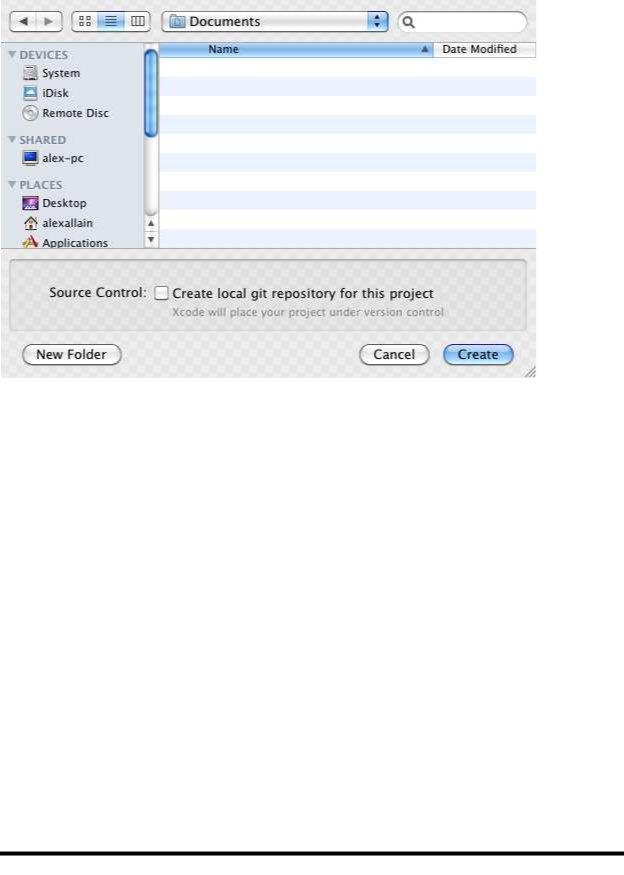
If “Create local git repository for this project” is checked, you can uncheck it. Git is a “source control” system that allows you to keep multiple versions of your project, but git is outside the scope of this book. You should also choose a location for your project—I put this one in Documents. Once you’ve made these choices, press “Create”.
© Alex Allain (http://www.cprogramming.com) |
23 |
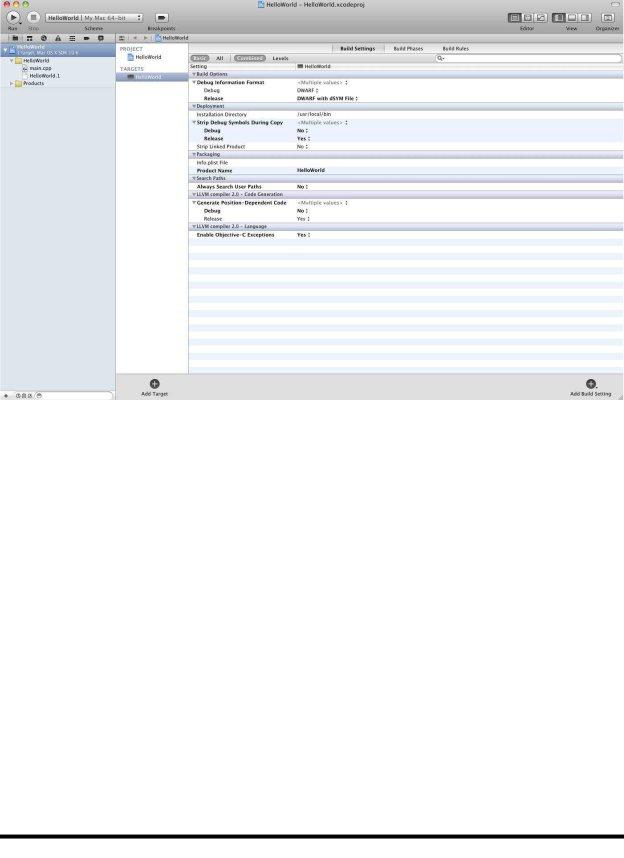
After pressing “Create”, a new window will come up that looks like this:
This view shows you quite a few things. The right sidebar gives you access source code and Products. The source code is under the directory named after your project, in this case “HelloWorld”. Most of the rest of this screen is displaying compiler configuration, which we don’t need to do anything with right now.
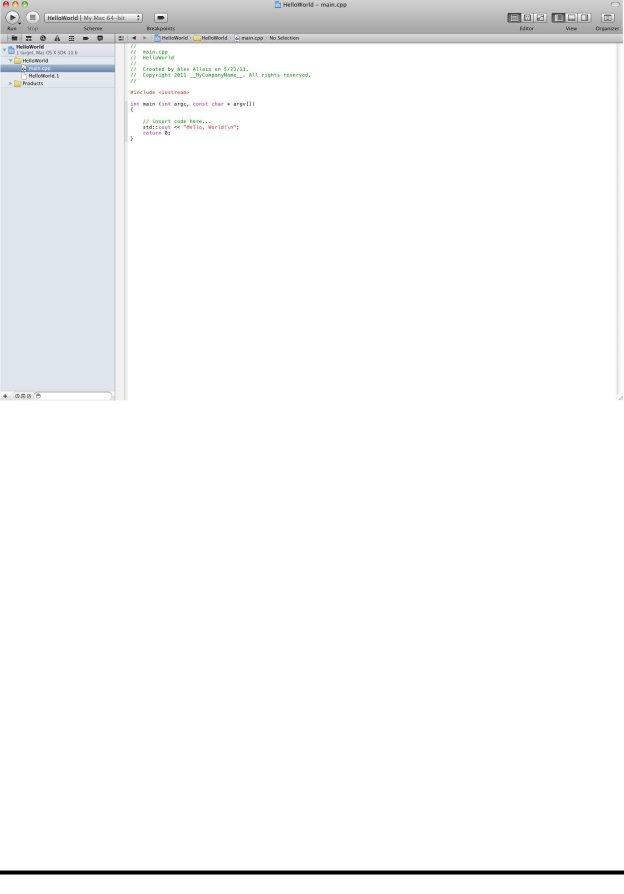
Let’s work on the source file itself. Go ahead and select “main.cpp” in the folder on the left sidebar. (Notice the file extension: .cpp is the standard extension for C++ source files—not .txt—even though cpp files are plain text.) If you single-click you will bring up the source in the main window. You can then start typing directly into the file.
© Alex Allain (http://www.cprogramming.com) |
24 |
You can also double-click on the file in order to bring up an editor window that can be moved around.
© Alex Allain (http://www.cprogramming.com) |
25 |
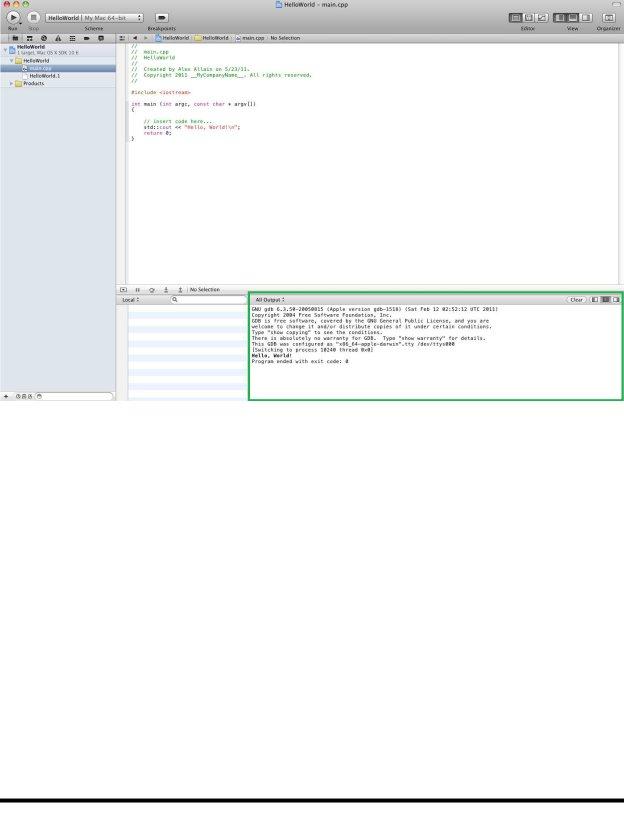
By default XCode provides a small sample program that you can start with. Let’s compile and then run this sample program. All you need to do is click the “Run” button on the toolbar! The output will be displayed in the area that I’ve highlighted in green in this screenshot:
And there you go—you’ve run your first program!
From here on out, whenever you have a sample program you want to run, you can either use the project we just created, or you can create a new project for it. In either case, when you want to add your own code, you can start by modifying the sample program that XCode creates in main.cpp.
Troubleshooting
[This section uses screenshots from XCode 3. I have noted where XCode 3 and XCode 4 are different.]
It's possible that your program will fail to compile for some reason, usually because of a compiler error (for example, perhaps a typo in the sample program or a real error in your own program). If this happens, then the compiler will display one or more compile error messages.
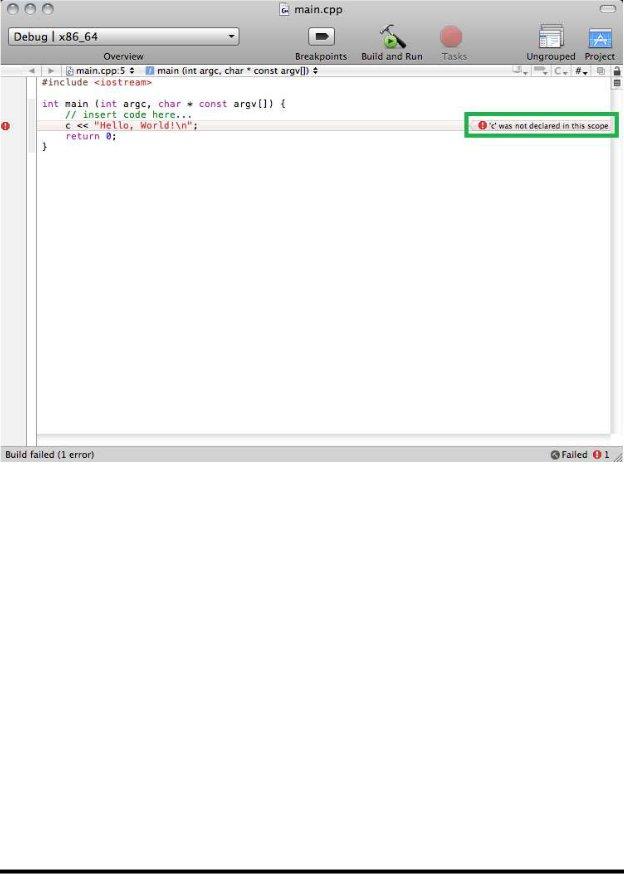
XCode displays compiler error messages directly along the source code, at the line where the error occurred. In the below example, I modified the original program so that instead of std::cout, it has simply c.
© Alex Allain (http://www.cprogramming.com) |
26 |
In the green rectangle, you can see the compiler error—that XCode doesn't know what 'c' is. You can also see a message that the build failed, in the lower left corner, and again in the lower right corner, along with a count of the number of errors (1, in this case). (In XCode 4, the icon is similar, but it appears in the upper-right corner.)
© Alex Allain (http://www.cprogramming.com) |
27 |
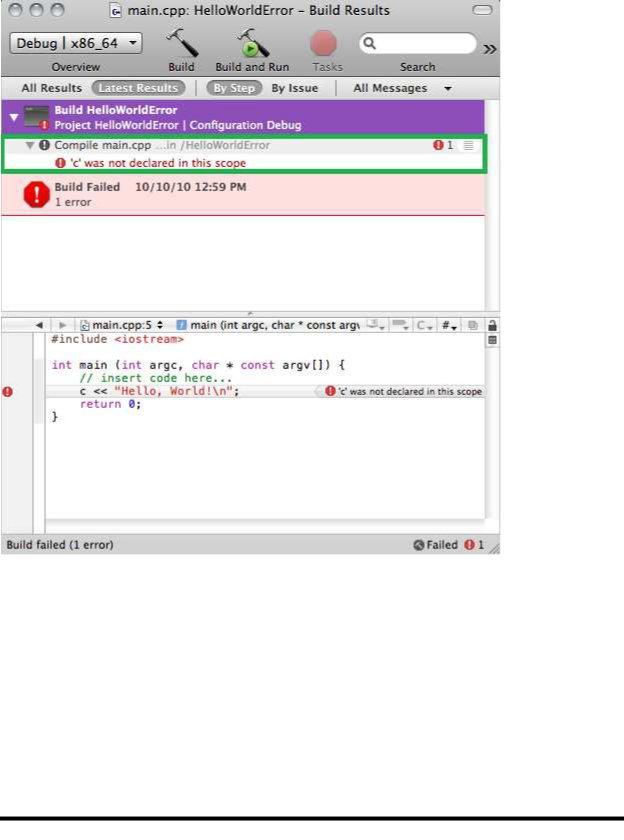
If you want to see a full list of errors, in XCode 3 you can click on the hammer icon in the lower-right corner and bring up a dialog box that shows all errors the compiler discovered, as a list:
Again I've highlighted the place where you can see the actual error, and if you click on it, it will show a small editor window where you can see the error in the code itself.
In XCode 4, the right-hand panel where the source files were located is replaced with compiler errors if the build fails.
Once you fix the error, you can simply press the "Build and Run" button again to try again.
Linux
If you are running on Linux, you almost certainly already have a C++ compiler installed. Typically, Linux users use the C++ compiler g++, which is part of the GNU Compiler Collection (GCC).
© Alex Allain (http://www.cprogramming.com) |
28 |
Step 1: Installing g++
To check if you have g++ installed, bring up a terminal window. Type in g++ and hit enter. If you have your compiler already installed, you should see:
g++: no input files
If you see a phrase like this one:
command not found
then you will probably need to install g++. Installing g++ will depend on your particular Linux distribution's package management software. If you are running Ubuntu, for example, you may need to simply type:
aptitude install g++
Other Linux distributions may have similarly easy package management or may require additional steps. Read the documentation from your Linux distro for more.
Step 2: Running g++
Running g++ is relatively easy. Let's create your very first program right now. Create a simple file with a
.cpp extension that contains exactly this text:
#include <iostream>
int main ()
{
std::cout << "Hello, world" << std::endl;
}
Sample Code 1: hello.cpp
Save this file as hello.cpp, and remember the directory where you put it. (Notice the file extension:
.cpp is the standard extension for C++ source files—not .txt—even though cpp files are plain text.)
Go back to the terminal window, and change to the directory where you saved the file.
Type:
g++ hello.cpp -o hello
Then hit enter.
The –o option to g++ provides a name for the output file. If you don't use it, the name defaults to a.out.
Step 3: Running your program
In this case, we gave the file the name hello, so you can now run your new program by typing
./hello
And you should see the output
© Alex Allain (http://www.cprogramming.com) |
29 |
Hello, world
And there is your first program, saying hi to the brave new world.
Troubleshooting
It's possible that your program may fail to compile for some reason, usually because of a compiler error (for example, if you entered the sample program with a typo). If this happens, then the compiler will display one or more compile error messages.
For example, if you put an x before cout in the sample program, the compiler would come back with these errors:
gcc_ex2.cc: In function 'int main ()':
gcc_ex2.cc:5: error: 'xcout' is not a member of 'std'
Each error shows you the file name, a line number, and an error message. Here, the issue is that the compiler doesn't know anything about xcout since it should just be cout.
Step 4: Setting up a text editor
If you're using Linux, you will also want to find a good text editor to use. Linux has some very high end text editors available, such as Vim and Emacs (I use Vim when I'm working on Linux). But they are relatively difficult to learn, and require a real time investment. In the long run, it's worth it, but you may not want to take the time when you're also starting to learn to program.
In that case, you may want to try a text editor like nano. Nano is a comparatively simple text editor, but it does have certain valuable features like syntax highlighting and automatic indentation (so that you don't have to keep pressing tab all the time when you go to a new line in your program—sounds trivial, but you really do want it). Nano is based on an editor called pico, which is a very simple editor to learn to use but that lacks many features needed for programming. You may even have used pico if you've used the mail program pine. If not, that's OK, no prior experience is necessary to start working with nano.
You may already have nano—to find out, type nano in a terminal window. It may launch automatically. If not, and you get variant of
command not found
then you will need to install nano—you should follow the instructions for getting nano using your Linux distribution's package manager. I've written this section with version 2.2.4 of nano in mind, but later versions should be fine.
Configuring Nano
In order to take advantage of some features of nano, you will need to set up a nano configuration file. The configuration file for nano is called .nanorsc and like most Linux configuration files, your user- specific configuration resides in your home directory (~/.nanorc).
If this file already exists, you can simply edit it—otherwise, you should create it. (If you have no experience at all using text editors on Linux, you can use nano to do this configuration—read below if
© Alex Allain (http://www.cprogramming.com) |
30 |
you need help with the basics of nano!)
To configure nano properly, use the sample .nanorc file that comes with this book. It will provide you will nice syntax highlighting and auto-indentation, which will make editing source code much easier.
Using Nano
You can run nano without providing an argument if you wish to create a new file, or you can specify a filename at the command line to start editing that file:
nano hello.cpp
If the file doesn't exist, nano will start editing a new buffer associated with the file. It will not, however, create the file on disk until you actually save your changes.
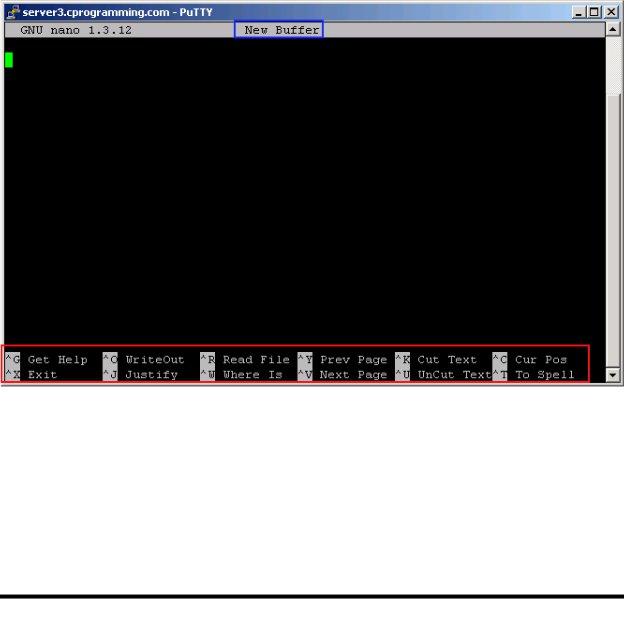
Here's an example of what nano should look like when you run it.
In the blue rectangle is the title of the current file being edited or "New Buffer" if you ran nano without providing a file.
In the red rectangle are a bunch of keyboard commands. Any time you see the ^ character in front of a letter, that means you need to press the Control key on your keyboard in combination which the letter—for example, exit is shown as ^X, so to exit you press Ctrl-X. The capitalization is not important.
If you're coming from a Windows world, you may not be familiar with some of the terminology used by nano, so let's look at some basic nano operations.
© Alex Allain (http://www.cprogramming.com) |
31 |
Editing text
When you launch nano, you can either bring up a new file or open an existing file. At this point, you can simply begin typing into the file—in this respect nano is very similar to Notepad on Windows. If you want to use copy and paste, though, the terms are different—Cut Text (Ctrl-K) and UnCut Text (Ctrl-U). These commands default to cutting a single line of text if you haven't selected any text.
You can also search for text in a file using "Where Is" by pressing Ctrl-W. This brings up a new set of options, but the simplest of them is to simply type in the string you're looking for and hit enter.
You can navigate a page at a time using Prev Page (Ctrl-Y) and Next Page (Ctrl-V). Notice that the keyboard shortcuts have little in common with Windows.
The only major feature that nano lacks, that most other text editors have, is that nano currently (in version 2.2) has only experimental support for undo/redo functionality. All undo/redo functionality is disabled by default.
You can use nano to do a file wide search/replace by pressing Alt-R—you'll first be prompted with text to find, and then the text to replace it with.
Saving files
Saving a file is called, in nano parlance, WriteOut (Ctrl-O).
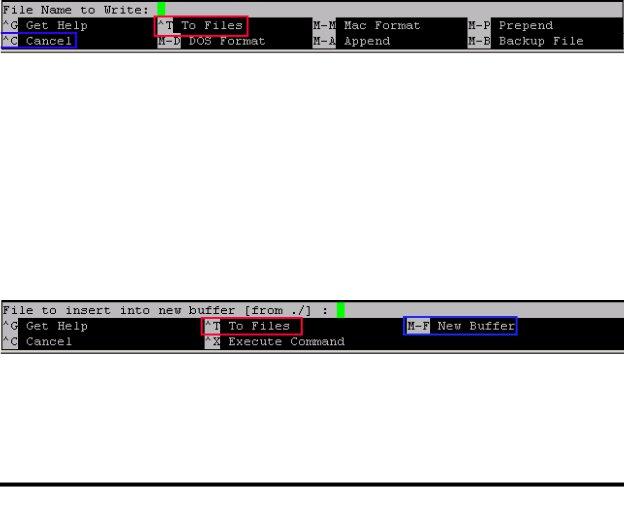
When you invoke WriteOut, you will always be prompted for the name of the file to write to, even if you have a file already open. If you are already editing a file, the name of the file will be shown by default, so you can just hit Enter and it will save the file. If you want to save to a new location, can type in the name of the file to save, or you can use the To Files menu option (Ctrl-T), in red, to select a file to write to. The blue menu option, Cancel (Ctrl-C), speaks for itself—most commands will have the option of cancelling them—but unlike a Windows machine, the default cancel button is Ctrl-C rather than Escape. Don't worry about the other options that are available for now—you shouldn't need to use them most of the time.
Opening files
If you want to actually open a file for editing, you use Read File (Ctrl-R). Read File brings up a new set of menu options.
If you want to open the file, rather than insert the text directly into the file you're currently editing, choose New Buffer at this menu, before selecting a file. The shortcut for New Buffer is M-F. The M
© Alex Allain (http://www.cprogramming.com) |
32 |
stands for meta key—in this case, you'd normally use the Alt key on your keyboard: Alt-F.4 This tells nano that you are going to open the file. Once you've done that, you can either type in the name to a file, or you can use Ctrl-T to bring up a file list that will let you select the file you want to edit. As usual, you can use Ctrl-C to cancel the operation.
Looking at a source file
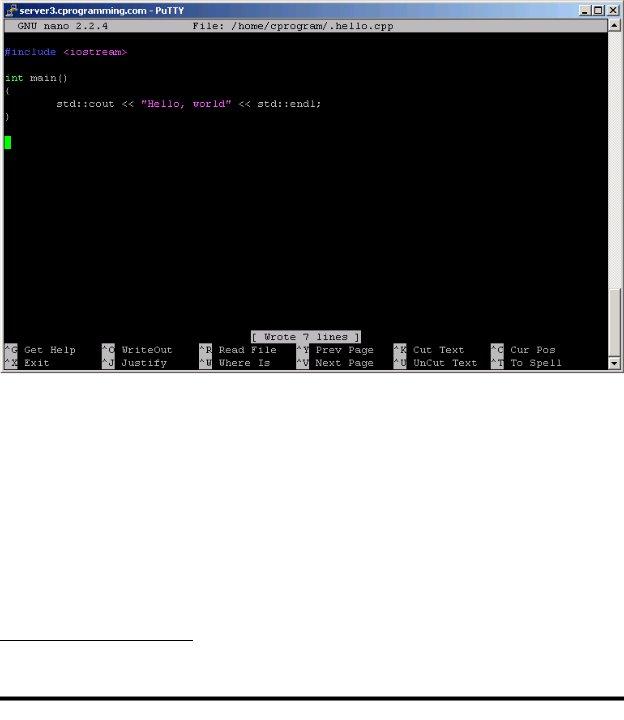
Now that you've learned a bit about editing in nano, you should be able to open a source file and start working on it. If you've got your .nanorc file configured properly, when you open a source file that has some text in it, it should look something like this:
Syntax highlighting is file extension based, so until you save the file as a source file (.cpp), it won't have highlighting.
Learning more
You should now be able to edit basic files in nano, but if you want to learn more, the built-in help is simply a Ctrl-G away. I also found this website to be particularly useful for explaining more advanced nano features: http://freethegnu.wordpress.com/2007/06/23/nano-shortcuts-syntax-highlight-and-nanorc-config-file- pt1/
4Some folks may have trouble using the Alt key for the meta key; if you find that using the Alt key doesn't work for you, you can always press and release Esc before pressing the letter—for example Esc F is the same as pressing Alt- F.
© Alex Allain (http://www.cprogramming.com) |
33 |
Ready to buy?
If you liked what you’ve read so far, you can purchase the full title, over 350 pages of C++ knowledge, tips and practice problems: Buy Jumping into C++
By the way…
When you purchase Jumping into C++, not only will you be able to download the entire ebook instantly, but if you are not satisfied with Jumping into C++ after 60 days, just let me know and I’ll refund your money – that’s how confident I am that you’ll learn C++ from my book.
Buy Jumping into C++ Today!
