Understanding the Military Pay Stub form can seem daunting for first-timers, yet it stands as a critical tool for managing one's earnings and benefits effectively. Before diving into the online system, gathering a previous payroll stub is essential—it holds key information needed for the self-registration process. First-time users must navigate through various steps starting from the initial log-in to registering an account by providing specific details such as employee identification number, birth date, and parts of their social security number. The registration process is designed to be secure, requiring information that verifies the identity of the user, and also requesting a strong password for account safety. Additionally, the system accommodates features like direct deposit pay stubs viewing, email address updating, and password changes, aiming to simplify payroll management for military personnel. Should users encounter any issues, troubleshooting tips and a sign-out option ensure a smooth user experience. The design of the Military Pay Stub online system prioritizes ease of use, security, and accessibility, making it a valuable resource for efficient payroll management.
| Question | Answer |
|---|---|
| Form Name | Military Pay Stub Form |
| Form Length | 12 pages |
| Fillable? | No |
| Fillable fields | 0 |
| Avg. time to fill out | 3 min |
| Other names | paystub blank, military les template, les template, stub pay military |

Pay Stub
I.Before Logging on II. To Register
III. Log In
IV. Forgot Password
V. Direct Deposit Pay Stubs VI. Change Email Address VII. Change Password VIII.Troubleshooting
IX. Sign Out
Systems Utilization
San Diego County Office of Education
1
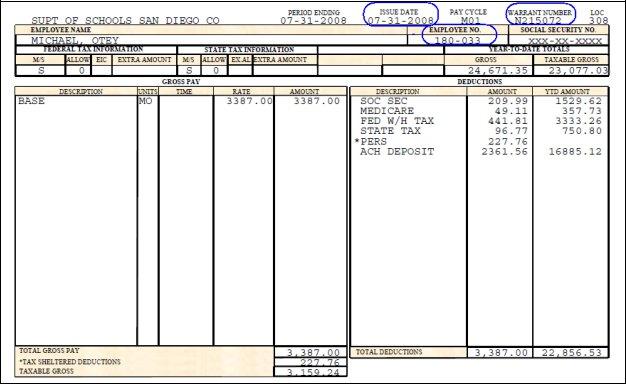
I. BEFORE LOGGING ON
Payroll Stub:- Before logging onto the Pay Stub
Navigation Tip: For ease of use and to simplify screen navigation, we recommend that you maximize your window screen size when using the Pay Stub
Help Hyperlinks: Help information specific to each screen is always available by clicking on the HELP hyperlinks located in the upper right hand corner of each screen.
Time Out: As a security feature, the Pay Stub
2
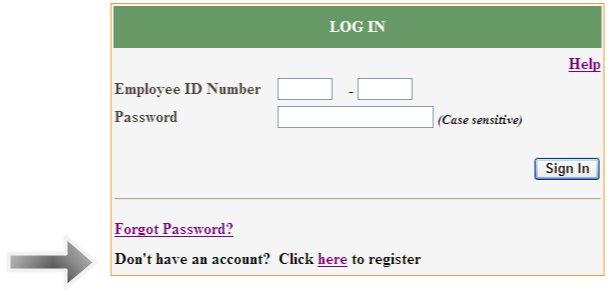
II. TO REGISTER
The LOG IN screen is the first screen to display when accessing the Pay Stub On- Line System. As a first time user, direct your attention to the last line, which asks, “Don’t have an account? Click here to register”. The word here is a hyperlink.
Click on the hyperlink, and the EMPLOYEE
PAYSTUBS screen will display.
3
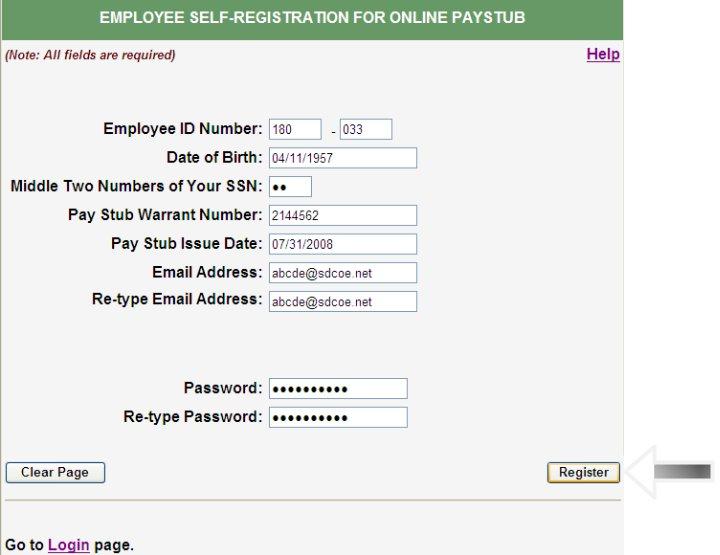
Use the Employee
To register enter:
1.Your
2.Your date of birth, used for security verification purposes.
4
3.The middle
4.The pay stub warrant number, which can be found on your payroll stub. It is the
5.The pay stub Issue date, found on your payroll stub. It is located at the top, center of your payroll stub.
6.Your email address. Your email address will be used to send you a temporary password, in the event you forget your password.
7.
8.Your password. Your password may be from one to eighteen characters in length. We suggest that you use a password of at least six characters in length and a combination of alpha, numeric and symbol characters to create a secure password.
9.
10.Click on the Register tab, located at the bottom right hand corner of the screen, to complete the
If desired you may click on the Clear Page tab, located at the bottom left hand corner of the screen, to remove all information from the form and begin again.
After submitting your registration, you will receive the message “Your login
account has been created. You can login the system and view your paystubs.”
If required information is missing, red asterisks will appear next to the blank field. If the information provided cannot be verified and your login is not accepted, you will receive the message “The System was unable to create your login account.” You may verify your information and reattempt to register.
After successfully registering, direct your attention to the bottom of the screen, you will note the message, “Go to Login Page”. The word Login is a hyperlink, click on the hyperlink and the LOG IN screen will display.
5
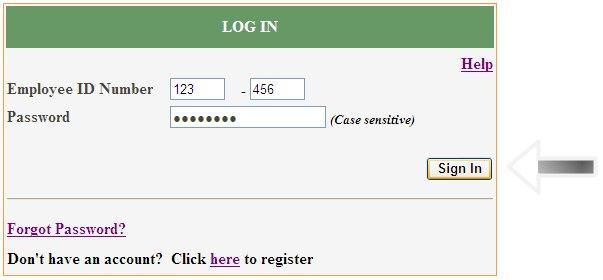
III. LOG IN
The LOG IN screen is the first screen to display each time you access the Pay Stub
To Log in:
1.Enter your
2.Enter your Password.
3.Click on the Sign In tab, located at the bottom right hand corner of the screen.
The DIRECT DEPOSIT PAY STUBS screen will display.
If your login is not accepted, you will receive the message “Unable to look up
your account information. Please make sure your login ID and/or password are
correct.” If you are a first time user, you must complete a
If you have forgotten your password, click on the Forgot Password? Hyperlink in the bottom left hand corner of the screen and request a new temporary password.
You may make five attempts to enter the correct password. After five attempts, you will receive the message, “You have reached the maximum number of login
attempts, please go to the FORGOT PASSWORD page, and request a temporary password”.
6
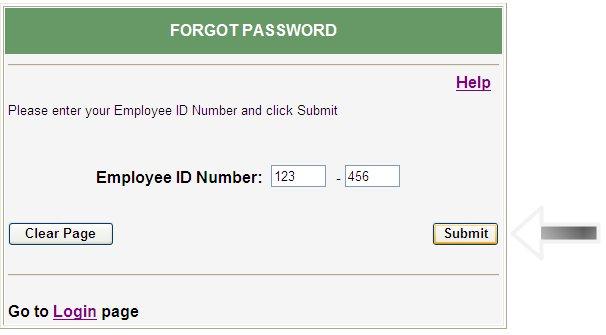
IV. FORGOT PASSWORD
If you have forgotten your password, you may request a temporary password from the FORGOT PASSWORD screen.
To obtain a new temporary password:
1.Enter your
2.Click on the Submit tab, located at the bottom right hand corner of the screen. The system will send a new temporary password to your email address on record, and provide the message, “Your login information has been sent to this email address:”
If an invalid Employee ID number is entered, you will receive the message “The system was unable to find your registration record. Please register and try again”.
When signing on with a temporary password, the system will immediately prompt you for a new password.
7
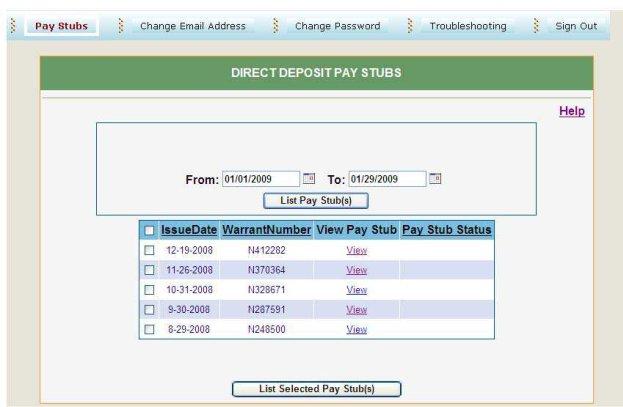
V. DIRECT DEPOSIT PAY STUBS
The Direct Deposit Pay Stubs screen will display a listing of your current calendar
1.To view an individual paystub click on the VIEW hyperlink. Pay stubs are listed in issue date order beginning with the most current date. By clicking on the headers, the list can be sorted by issue date, warrant number, or pay stub status, in either ascending or descending order.
To request paystubs for specific time periods you may enter dates in the FROM and TO date fields, and click on the List Pay Stubs tab. A listing of all paystubs within the date range will display. Paystubs prior to 2009 are not available on line. Canceled warrants are listed and identified as canceled, but cannot be viewed. If you work multiple school districts, a dropdown box will appear and allow you to select the desired district.
2.To view multiple paystubs, select multiple checkboxes or select all paystubs, then click on the LIST SELECTED PAY STUBS tab at the bottom of the screen. All paystubs selected will display in one file, you may scroll down to view each pay stub.
8
3.Paystubs may be printed or saved as a document file. Paystubs are viewed as an Adobe PDF Document. Using the Adobe Reader toolbar, the document may be printed or saved. Close the Adobe Reader to return to the Pay Stub
9
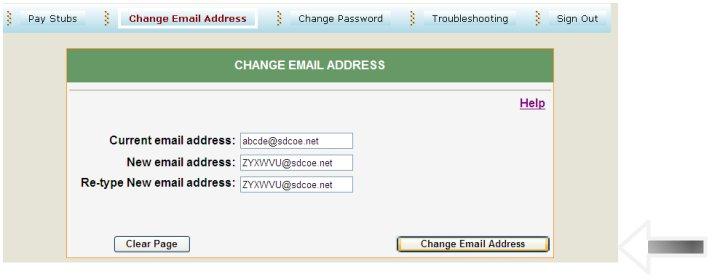
VI. CHANGE EMAIL ADDRESS
To change your email address:
1.Enter your current email address.
2.Enter your new email address.
3.
4.Click on the Change Email Address tab on the lower
If the Current email address entered cannot be verified with the email address on record, you will receive the message: “The current email address you entered doesn’t match with the email address you used to register”.
The Clear Page tab on the lower
10
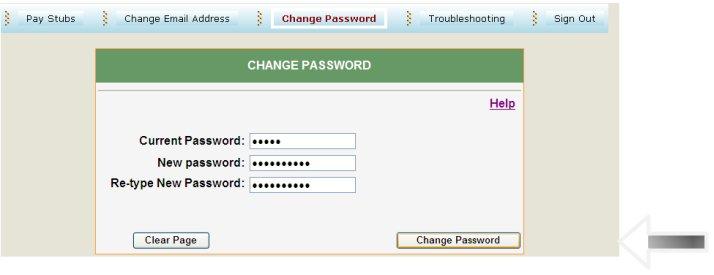
VII. CHANGE PASSWORD
To change your password:
1.Enter your current password.
2.Enter your new password. Your password may contain up to eighteen characters. We suggest that you use a password at least six characters in length and a combination of alpha, numeric, and symbol characters to create a secure password.
3.
4.Click on the Change Password tab on the lower
When the password is successfully changed, you will receive the message, “Your
password has been changed.”
If the current password entered cannot be verified with the password on record you will receive the message: “The system cannot change your password.
Please try again or contact your district administration office.”
The Clear Page tab on the lower
11
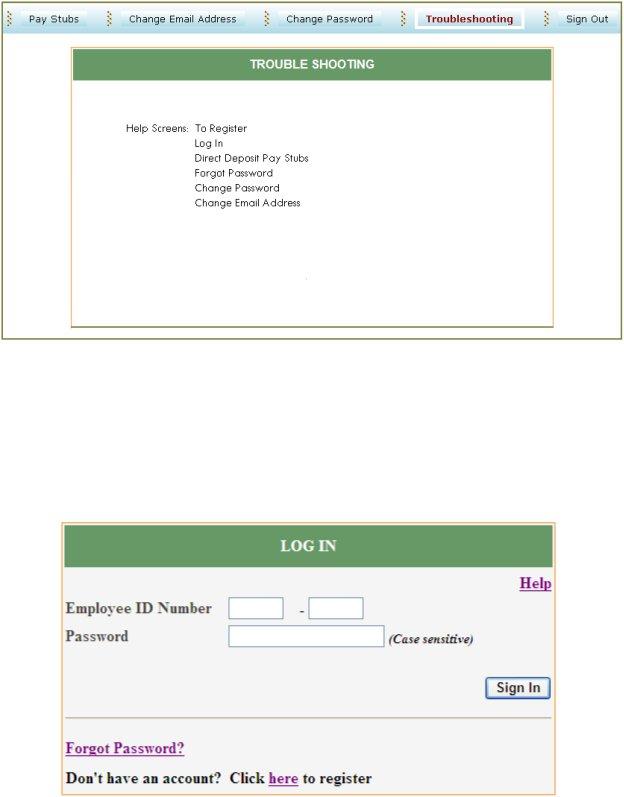
VIII. TROUBLESHOOTING
Click on the Troubleshooting tab to display the help information, also available from the individual HELP hyperlinks on each screen.
IX. SIGN OUT
Click on the Sign Out tab to log off the system and return to the initial LOG IN screen.
12