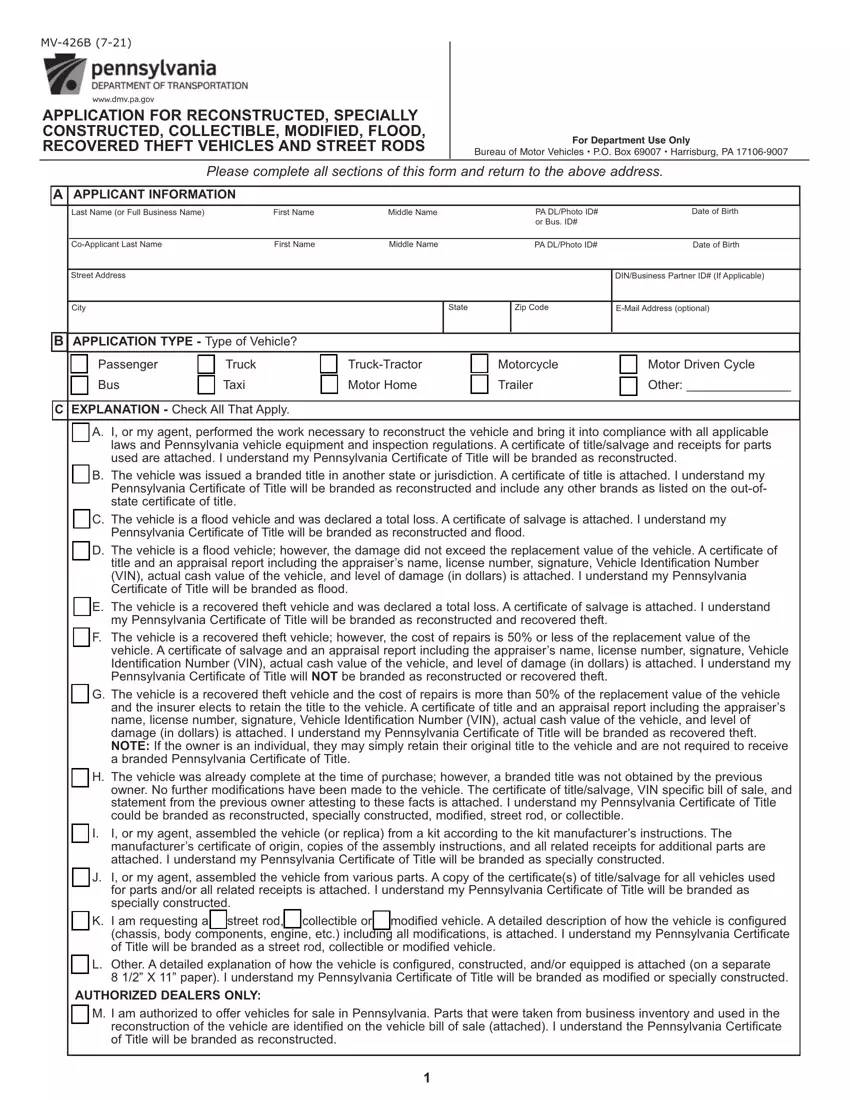
Please complete all sections of this form and return to the above address.
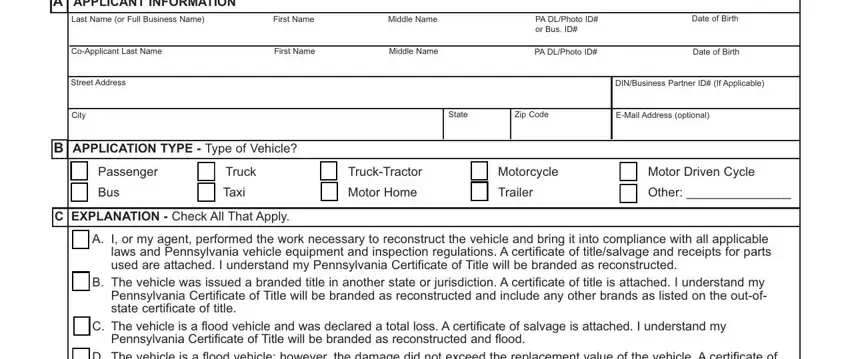
A |
APPLICANT INFORMATION |
|
|
|
|
|
|
|
|
|
|
|
|
|
|
|
|
|
|
Last Name (or Full Business Name) |
First Name |
|
Middle Name |
|
|
PA DL/Photo ID# |
|
Date of Birth |
|
|
|
|
|
|
|
|
|
or Bus. ID# |
|
|
|
|
|
|
|
|
|
|
|
|
|
|
Co-Applicant Last Name |
|
First Name |
|
Middle Name |
|
|
PA DL/Photo ID# |
|
Date of Birth |
|
|
|
|
|
|
|
|
|
|
|
Street Address |
|
|
|
|
|
|
|
DIN/Business Partner ID# (If Applicable) |
|
|
|
|
|
|
|
|
|
|
|
|
City |
|
|
|
|
|
State |
|
Zip Code |
E-Mail Address (optional) |
|
|
|
|
|
|
|
|
|
B |
APPLICATION TYPE - Type of Vehicle? |
|
|
|
|
|
|
|
|
|
|
|
|
|
|
|
|
|
|
|
|
r |
Passenger |
r |
Truck |
r |
Truck-Tractor |
r |
Motorcycle |
r |
Motor Driven Cycle |
|
r |
Bus |
r |
Taxi |
r |
Motor Home |
r |
Trailer |
r |
Other: _______________ |
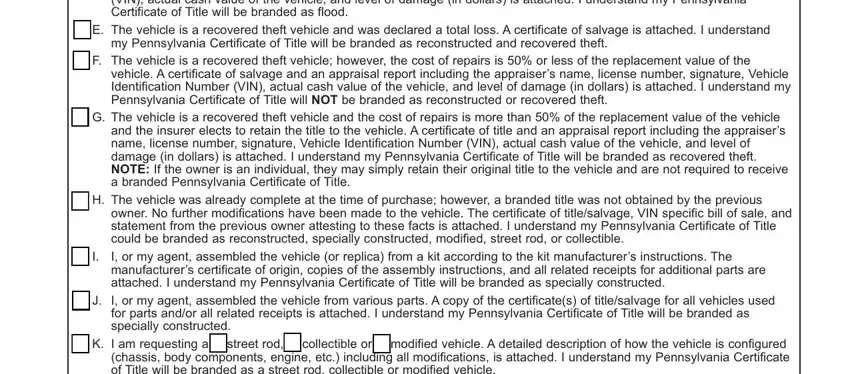
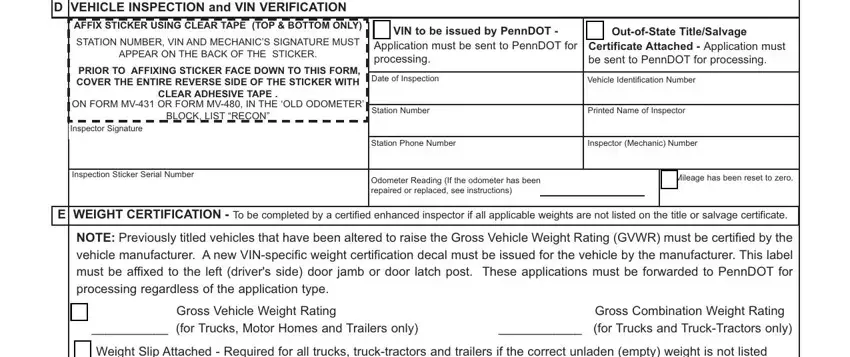
CEXPLANATION - Check All That Apply.
rA. I, or my agent, performed the work necessary to reconstruct the vehicle and bring it into compliance with all applicable laws and Pennsylvania vehicle equipment and inspection regulations. A certificate of title/salvage and receipts for parts used are attached. I understand my Pennsylvania Certificate of Title will be branded as reconstructed.
rB. The vehicle was issued a branded title in another state or jurisdiction. A certificate of title is attached. I understand my Pennsylvania Certificate of Title will be branded as reconstructed and include any other brands as listed on the out-of- state certificate of title.
rC. The vehicle is a flood vehicle and was declared a total loss. A certificate of salvage is attached. I understand my Pennsylvania Certificate of Title will be branded as reconstructed and flood.
rD. The vehicle is a flood vehicle; however, the damage did not exceed the replacement value of the vehicle. A certificate of
title and an appraisal report including the appraiser’s name, license number, signature, Vehicle Identification Number (VIN), actual cash value of the vehicle, and level of damage (in dollars) is attached. I understand my Pennsylvania Certificate of Title will be branded as flood.
rE. The vehicle is a recovered theft vehicle and was declared a total loss. A certificate of salvage is attached. I understand my Pennsylvania Certificate of Title will be branded as reconstructed and recovered theft.
rF. The vehicle is a recovered theft vehicle; however, the cost of repairs is 50% or less of the replacement value of the vehicle. A certificate of salvage and an appraisal report including the appraiser’s name, license number, signature, Vehicle Identification Number (VIN), actual cash value of the vehicle, and level of damage (in dollars) is attached. I understand my Pennsylvania Certificate of Title will NOT be branded as reconstructed or recovered theft.
rG. The vehicle is a recovered theft vehicle and the cost of repairs is more than 50% of the replacement value of the vehicle and the insurer elects to retain the title to the vehicle. A certificate of title and an appraisal report including the appraiser’s name, license number, signature, Vehicle Identification Number (VIN), actual cash value of the vehicle, and level of damage (in dollars) is attached. I understand my Pennsylvania Certificate of Title will be branded as recovered theft. NOTE: If the owner is an individual, they may simply retain their original title to the vehicle and are not required to receive a branded Pennsylvania Certificate of Title.
rH. The vehicle was already complete at the time of purchase; however, a branded title was not obtained by the previous owner. No further modifications have been made to the vehicle. The certificate of title/salvage, VIN specific bill of sale, and statement from the previous owner attesting to these facts is attached. I understand my Pennsylvania Certificate of Title could be branded as reconstructed, specially constructed, modified, street rod, or collectible.
rI. I, or my agent, assembled the vehicle (or replica) from a kit according to the kit manufacturer’s instructions. The manufacturer’s certificate of origin, copies of the assembly instructions, and all related receipts for additional parts are attached. I understand my Pennsylvania Certificate of Title will be branded as specially constructed.
rJ. I, or my agent, assembled the vehicle from various parts. A copy of the certificate(s) of title/salvage for all vehicles used for parts and/or all related receipts is attached. I understand my Pennsylvania Certificate of Title will be branded as specially constructed.
rK. I am requesting a r street rod, r collectible or r modified vehicle. A detailed description of how the vehicle is configured (chassis, body components, engine, etc.) including all modifications, is attached. I understand my Pennsylvania Certificate of Title will be branded as a street rod, collectible or modified vehicle.
rL. Other. A detailed explanation of how the vehicle is configured, constructed, and/or equipped is attached (on a separate
8 1/2” X 11” paper). I understand my Pennsylvania Certificate of Title will be branded as modified or specially constructed.
AUTHORIZED DEALERS ONLY:
rM. I am authorized to offer vehicles for sale in Pennsylvania. Parts that were taken from business inventory and used in the reconstruction of the vehicle are identified on the vehicle bill of sale (attached). I understand the Pennsylvania Certificate of Title will be branded as reconstructed.