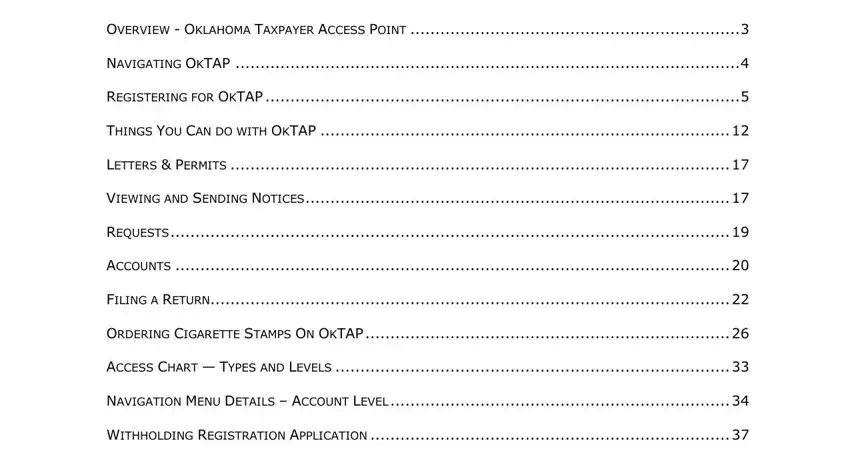
TABLE OF CONTENTS |
|
OVERVIEW - OKLAHOMA TAXPAYER ACCESS POINT |
..................................................................3 |
NAVIGATING OKTAP |
4 |
REGISTERING FOR OKTAP |
5 |
THINGS YOU CAN DO WITH OKTAP |
12 |
LETTERS & PERMITS |
17 |
VIEWING AND SENDING NOTICES |
17 |
REQUESTS |
19 |
ACCOUNTS |
20 |
FILING A RETURN |
22 |
ORDERING CIGARETTE STAMPS ON OKTAP |
26 |
ACCESS CHART — TYPES AND LEVELS |
33 |
NAVIGATION MENU DETAILS – ACCOUNT LEVEL |
34 |
WITHHOLDING REGISTRATION APPLICATION |
37 |
To link directly to a topic: hover over the Table of Contents section title, and click.
NOTE:
All account numbers, company names, and graphic examples are fictitious. Any resemblance to an actual company or taxpayer is completely coincidental.

OVERVIEW - OKLAHOMA TAXPAYER ACCESS POINT
Oklahoma Taxpayer Access Point (OkTAP) is an additional way to access your tax information. Taxpayers who choose to register for OkTAP will have the ability to manage and monitor their tax accounts via the internet anytime, anywhere.
Online messaging is also available and provides a secure connection for the taxpayer and/or their agent to submit a message to an Oklahoma Tax Commission (OTC) representative.
TAX TYPES CURRENTLY SUPPORTED IN OKTAP
Currently, there are three tax types supported in OkTAP: Alcohol, Cigarette, and Tobacco. Over the next few years additional tax types will become available for access through OkTAP.
Tax Type Supported |
Account Balance |
|
View and Print OTC |
File or Amend |
|
On-Line |
|
|
and Activity |
|
Correspondence |
Returns |
|
Messaging |
|
Alcohol |
|
|
|
|
|
|
|
Cigarette |
|
|
|
|
|
|
|
Tobacco |
|
|
|
|
|
|
|
FILERS WHO USE THE OTC ONLINE FILING
User IDs and passwords used on QuickTax, the Business Tax Filing System, will not work with OkTAP. The taxpayer must register to use OkTAP.
FREQUENTLY ASKED QUESTIONS
Users who have questions while using OkTAP should navigate to the blue FAQs link located at the left side of every screen.
When users log out of OKTAP they should always close the web browser to ensure that none of their personal data remains in the computer’s cache
memory.
NAVIGATING OKTAP
OkTAP uses a number of pop-ups to provide options throughout the interface. Therefore, it is recommended you disable the Pop-up Blocker Settings and allow pop-ups from the OkTAP website.
OkTAP will automatically log off after 15 minutes of inactivity.
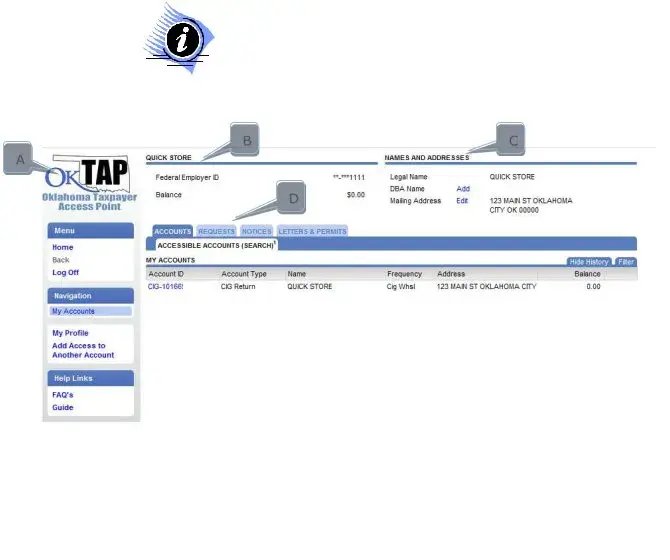
Navigation in OkTAP is done by using the on-screen navigation hyperlinks described below. The bar along the left side of the window will be available from every screen.
BC
A
D
A.The sidebar on the left of the window contains four key elements:
1.The OkTAP icon will take you to the Oklahoma Tax Commission website.
2.The Menu section contains options for Home, Back, and Log Off. Back will become active once you have moved beyond the Home screen.
3.The Navigation section provides links to:
a.My Accounts – these are the accounts that have been registered for access through your OkTAP login.
**The next group of options will change depending on where you are within your OkTAP account(s).**
4.Help Links section provides links to the Frequently Asked
Questions (FAQ’s) and an electronic copy of this guide.
B.This section displays basic organization information; name, Federal Employer ID or Social Security Number, and overall balance for all accounts that are registered for access through OkTAP.
C.In the top right of the screen is the DBA Name and Mailing Address. This will change to account specific name and mailing address when using the Accounts tab.
D.The main portion of the screen is organized into four tabs:
1.Accounts - contains the list of accounts that have been specified as part of this profile with a small summary.
2.Requests – items that have been submitted, such as, a return or change of address.
3.Notices – messages from the OTC or confirmation that a request has been completed.
4.Letters & Permits – Letters or permits that have been printed and sent.
OKTAP COLORS
The fields on the forms are color-coded to help tell you what actions are allowed or needed for each particular item:
Green: enter information (optional)
Yellow: field is required in order to be submitted
Red: field is in error
White: field is automatically calculated and cannot be modified
Click or hover over the red error field for explanation about the error.
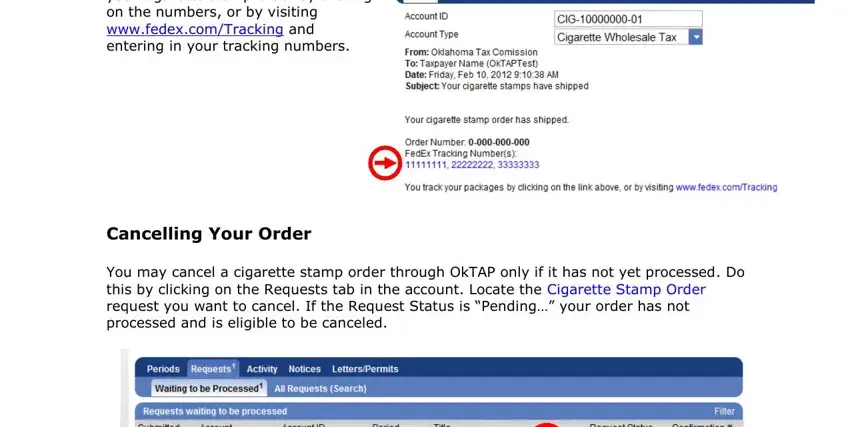
REGISTERING FOR OKTAP
Several tax type accounts are available through OkTAP. (See chart on page 3.) Any taxpayers who have tax accounts available through OkTAP are eligible to register for an OkTAP logon.
The first individual that registers themselves in OkTAP under a company’s FEIN is considered the Master Account Holder. Only the Master Account Holder can manage logons, request to cease an account, and set up Direct Deposit for any tax refunds associated with their account(s). The Master Account Holder will also be alerted by email whenever a subsequent account is accessed under the same FEIN.
It is an easy two-step process to begin using OkTAP to access your tax information:
1.Register to use OkTAP – provide initial information and an Authorization Code will be emailed to you
2.Initial Logon - Authorization Code required
HOW DOES A TAXPAYER REGISTER ON OKTAP?
You will need the following information
Account Number: 13 digit account number; located on all correspondence received from OTC after October 10, 2011 for all participating tax types.
Federal Employer Identification Number (FEIN) for Business Registration
Social Security Number for individuals, Sole Proprietor
Logon ID: You will create a Logon ID
(up to 30 characters; not case sensitive; spaces are allowed)
Password:
Password must be at least 10 characters long and contain the following:
At least 1 upper-case letter
At least 1 lower-case letter
At least 1 number
Valid e-mail address to receive confirmation and Authorization Code messages.
Steps to register for OkTAP:
1. Click the button: Sign Up Now!
2.To begin the registration process click the link, Step 1 of 3: Personal Information a. Complete the required information and click OK:
i.-Your name
ii.-Email address: must be valid to receive confirmation of registration and Authorization Code for the initial login
iii.-Contact Phone: (required for business taxes)
iv.-Alternate Phone: (optional)
Once the first window is completed the information entered will appear on the registration page and the next link will become available.
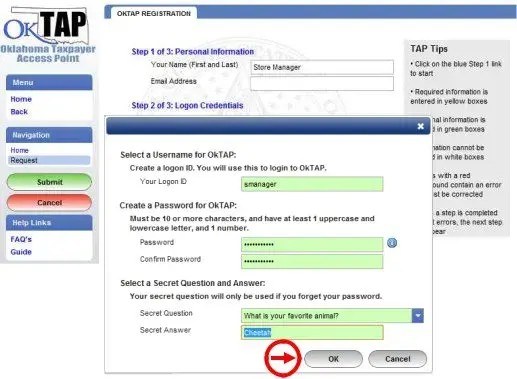
3.Click Step 2 of 3: Create Logon Credentials
Complete the required information and click OK:
-Logon ID: (30 character maximum)
-Password: Passwords must contain 10 or more characters and include:
At least 1 upper-case letter
At least 1 lower-case letter
At least 1 number
-Secret Question and Answer
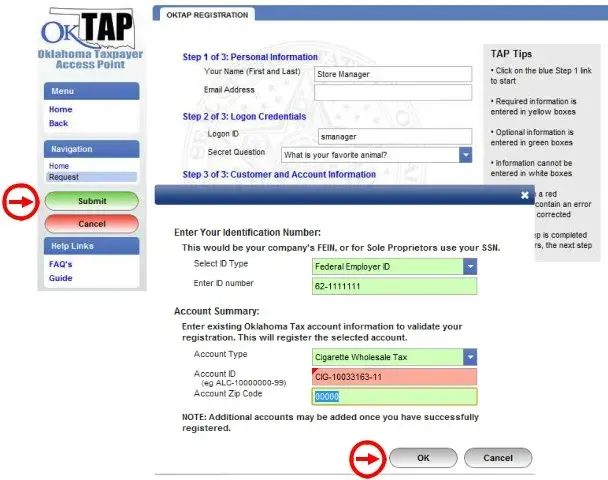
4.Click Step 3 of 3: Customer and Account Information
Complete the required information and click OK:
-Select the ID type (Federal or Social Security ID number) -Enter the ID Number
-Account Type (using the drop down arrows) -Account Number
-Account Zip Code
5. Click the Submit button to complete the registration.
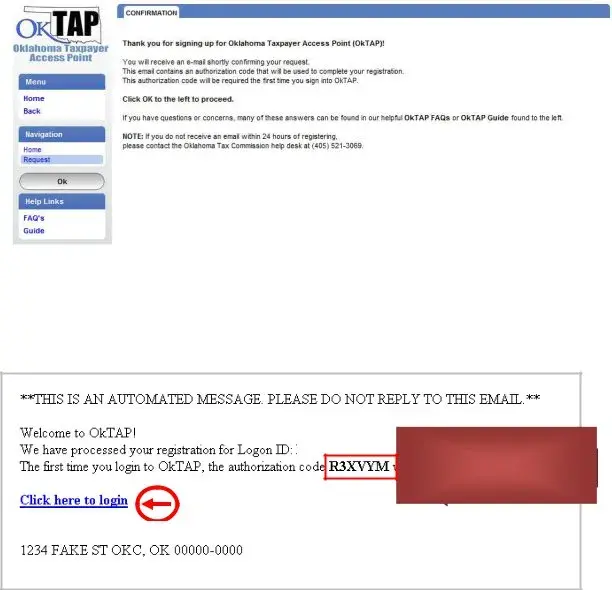
Next, you will receive an OkTAP confirmation screen. The confirmation screen will provide the New Registration request confirmation number.
The OkTAP Registration request will be processed and you will receive your Authorization Code within a few minutes. The Authorization Code is required for your initial login and will be sent to the e-mail account specified during the registration process.
Below is an example of the Authorization Code e-mail:
SMANAGER
Authorization Code
STORE MANAGER
LOGGING ON FOR THE FIRST TIME
Once registration is complete, your Authorization Code will be sent to the specified e- mail address. The Authorization Code must be used to logon for the first time.
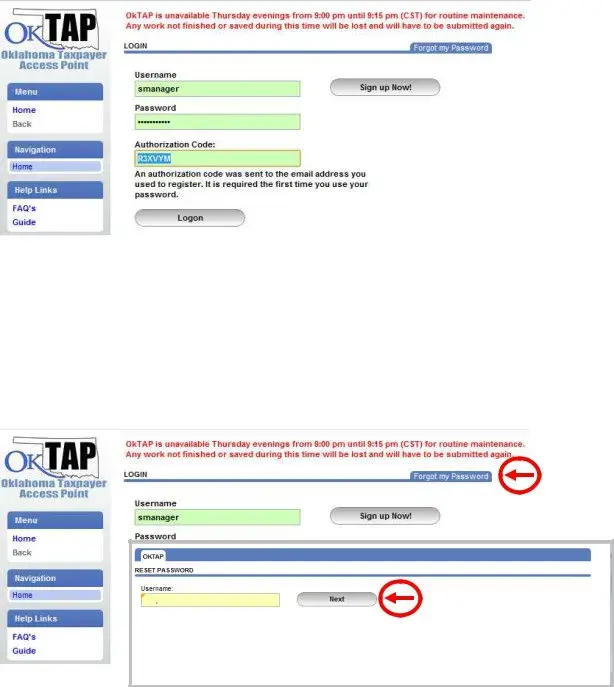
WHAT IF I FORGET MY PASSWORD?
If you forget your OkTAP password, you can reset your password yourself.
Click the tab: Forgot my Password on the main Logon screen.
Initially, only the first two items will be displayed in the window. Enter in your Logon ID, and then click the Next button.