Are you looking for a reliable and secure way to store and share important documents? Sec Electronics Slovenia has developed an innovative PDF Form that meets the needs of both individuals and businesses. This blog post will explain how this form works, its key features, as well as how it can help make document sharing easier, faster and more secure than ever before. By the end of this post, you should have a better understanding of the benefits of using Sec Electronics Slovenia's PDF Form for your document management needs.
| Question | Answer |
|---|---|
| Form Name | Sec Electronics Slovenia Pdf Form |
| Form Length | 93 pages |
| Fillable? | No |
| Fillable fields | 0 |
| Avg. time to fill out | 23 min 15 sec |
| Other names | sec electronics e type emergency, sec electronics e type 14 fault, sec electronics manoeuvre e type, sec electronics e type board fault 14 |

E – TYPE
lift control system
SPECIFICATION AND INSTALLATION MANUAL
Manual ver. 2.0
Program ver. 2.06
SEC ELECTRONI CS |
Neverke 30 6256 Košana, SLOVENI A |
tel: + + 386 5 753 2006 |
email: sec.electronics@siol.net |
fax: + + 386 5 753 2007 |
web: http: / / www.secelectro.com |
ISO 9001
The information held in this manual may be modified without notice and SEC electronics will not be responsible for changes that may occur in the future.
No part of this manual can be reproduced, for any reason, in any form or by any means ( including recording and photocopying) without the written consent of SEC electronics.
Before the control panel installation, wiring, commissioning and inspection, read this instruction manual carefully.
Keep the manual in a safe place and available to engineering and installation personnel during the control panel functioning period.
SEC electronics is not responsible for those mistakes that may be found in this manual and for the damages that they may cause.
All rights reserved.
2 |
291 842 003 |
CONTENTS
|
SAFETY SIMBOL LEGEND |
5 |
0. |
SAFETY PRECAUTIONS |
6 |
1. |
PRODUCT LIABILITY AND WARRANTY |
9 |
1.1 |
TERMS OF WARRANTY |
9 |
2. |
INSPECTION PROCEDURE |
10 |
2.1. |
UPON DELIVERY INSPECTION PROCEDURE |
10 |
2.2. |
CONTROL PANEL TYPE DESIGNATION |
10 |
2.3. |
NAMEPLATE |
11 |
2.4. |
STANDARD SPECIFICATIONS |
12 |
2.5. |
DISPOSAL OF THE DEVICE |
12 |
3. |
INSTALLATION GUIDELINES |
13 |
3.1. |
MECHANICAL SPECIFICATION |
13 |
3.2. |
INSTALLATION MOUNTING CLEARANCE |
14 |
4. |
WIRING PROCEDURE |
15 |
4.1. |
AC INPUT CONNECTION |
15 |
4.2. |
MAIN MOTOR CONNECTION |
16 |
5. |
CONNECTION TO PC OR PDA |
17 |
5.1. |
CONNECTION TO PC |
17 |
5.2. |
CONNECTION TO PDA |
17 |
6. |
PROGRAMMING |
19 |
6.1. |
MAIN MENU |
19 |
6.2. |
SUBMENU ORGANISATION |
20 |
6.3. |
1L FLOW CONTROL |
20 |
6.4. |
2E SHOW ERROR HISTORY |
22 |
6.5. |
3C STATISTICS |
27 |
6.6. |
4F FUNDAMENTAL SETTINGS |
28 |
6.7. |
5V DOOR SETTINGS |
29 |
6.8. |
6P PARAMETERS |
32 |
6.9. |
7D SPECIAL DRIVES |
37 |
6.10. |
8S ENCODER SETTINGS |
38 |
6.11. |
9I INPUT / OUTPUT SETTINGS |
39 |
6.12. |
0W SAVE SETTINGS TO EEPROM |
40 |
6.13. |
PRESETING AND FACTORY RESET |
40 |
7. |
ABBREVIATIONS |
42 |
7.1. |
TERMINALS ON CONTROL PANEL |
42 |
7.2. |
ELEMENTS ON CONTROL PANEL |
44 |
3 |
291 842 003 |
8. |
COUNTING SENSORS CONNECTION AND POSITION |
46 |
8.1. |
COUNTING SYSTEM PARAMETER P3 = 1- 8 |
47 |
8.2. |
COUNTING SYSTEM PARAMETER P3 = 1 |
48 |
8.3. |
COUNTING SYSTEM PARAMETER P3 = 3 |
49 |
8.4. |
COUNTING SYSTEM PARAMETER P3 = 4 |
50 |
8.5. |
COUNTING SYSTEM PARAMETER P3 = 4 WITH SEPARATED MAGNETS |
51 |
8.6 |
COUNTING SYSTEM PARAMETER P3 = 5 |
52 |
8.7 |
COUNTING SYSTEM PARAMETER P3 = 6 |
53 |
8.8 |
COUNTING SYSTEM PARAMETER P3 = 7 |
54 |
8.8. |
COUNTING SYSTEM PARAMETER P3 = 8 |
55 |
9. |
CONNECTION DURING INSTALLATION PHASE |
56 |
9.1. |
POWER SUPPLY |
56 |
9.2. |
MOTOR CONNECTION |
56 |
9.3. |
MAINTENANCE AND SAFETY CONNECTION |
57 |
10. |
START UP |
58 |
10.1. |
PRE POWER CHECK |
58 |
10.2. |
VOLTAGE AND CONTROL ELEMENTS CHECK |
58 |
10.3. |
MAINTENANCE MODE |
59 |
10.4. |
NORMAL MODE |
59 |
10.5. |
TROUBLESHOOTING |
60 |
11. |
63 |
|
11.1 |
TECHNICAL CHARACTERISTICS |
63 |
11.2. |
65 |
|
11.3. |
71 |
|
11.4. |
78 |
|
11.5. |
82 |
|
11.6. |
MULTIFUNCTION INPUTS / OUTPUTS |
84 |
12. |
SAFETY CIRCUIT 186 |
89 |
12.1. |
GENERAL FEATURES |
89 |
12.2. |
DETAILS AND CONNECTIONS |
90 |
12.3. |
REQUIREMENTS FOR INSTALLATION |
90 |
13. |
GUIDE TO ELECTROMAGNETIC COMPATIBILITY |
91 |
13.1. |
THE EMC DIRECTIVE AND APPLICABLE STANDARD |
91 |
13.2. |
EMC COMPLIANT ELECTRICAL CABINET WIRING RULES |
92 |
DECLARATION OF CONFORMITY |
93 |
|
ADDENDUMS FOR NEWER PROGRAM VERSIONS |
|
|
PRESET PARAMETERS |
|
|
4 |
291 842 003 |
SAFETY SYMBOL LEGEND
WARNING: Commands attention to an operating procedure, practice, condition, or statement, which, if not strictly observed, could result in personal injury or death.
CAUTION: Commands attention to an operation procedure, practice, condition, or statement, which, if not strictly observed, could result in damage or destruction of equipment .
NOTE: Commands attention to an operating procedure, practice, condition, or statement that must be highlighted.
5 |
291 842 003 |
0.SAFETY PRECAUTIONS
WARNING – ATTENTION
Drive systems cause mechanical motion. I t is the responsibility of the user to ensure that any such motion does not result in an unsafe condition. Factory provided interlocks and operating limits should not be bypassed or modified.
WARNING – ELECTRICAL SHOCK AND BURN HAZARD
When using instruments such as oscilloscopes to work on live equipment, the oscilloscope’s chassis should be grounded and a differential amplifier input should be used. Care should be used in the selection of probes and leads and in the adjustment of the oscilloscope so that accurate readings may be made. See instrument manufacturer’s instruction book for proper operation and adjustment to the instrument .
WARNING – FIRE AND EXPLOSION HAZARD
Fires or explosions might result from mounting control panels in hazardous areas such as locations where flammable or combustible vapors or dusts are present . Control panels should be installed away from hazardous areas, even if used with motors suitable for use in these locations.
WARNING – STRAIN HAZARD
I mproper lifting practices can cause serious or fatal injury. Lift only with adequate equipment and trained personnel. When carrying equipment without packaging the boards or metal panels can cause damage to the equipment and injury to you.
WARNING – CRUSHING HAZARD
Risk of crushing and dama ge to the control panel if it does not have a firm stand. Be sure to place the control panel on a flat surface witch can support it’s weight before installation! Do not stand the control panel on end as it could fall over.
WARNING – HIGH TEMPERATURE
After prolonged use, the parts in control panel will reach a maximum temperature of 90 oC. Touching them with bare hands can be painful. Allow the unit to cool before you get near the hot parts. When braking resistors are used (they are normally installed at the top or in the side of the box) this resistors can reach a maximum temperature of 200 oC. Touching them with bare hands can cause serious or fatal injury.
ATTENTION – ELECTRIC SHOCK
Control panel, motors and all other equipment must be ground connected according to the NEC ( Code Electrique National).
WARNING / ATTENTION
Replace all covers before applying power to the control panel. Failure to do so may result in death or serious injury.
WARNING / ATTENTION
Control panels are electrical apparatus for use in industrial installations. Parts of the control panels are energized during operation. The electrical installation and the opening of the device should therefore only be carried out by qualified personnel. I mproper installation of motors, control panel or other equipment may therefore cause the failure of the device as well as serious injury to persons or material damage. Control panels are not equipped with motor overspeed protection logic.
Follow the instructions given in this manual and observe the local and national safety regulations applicable.
6 |
291 842 003 |
CAUTION / PRECAUTION
Do not connect power supply voltage that exceeds the standard specification voltage fluctuation permissible. I f excessive voltage is applied to the control panel, damage to the internal components will result .
CAUTION / PRECAUTION
Do not operate the control panel without the ground wire connected. The motor chassis should be grounded to earth through a ground lead separate from all other equipment ground leads to prevent noise coupli ng.
The grounding wires shall be sized in accordance with the NEC or Canadian Electrical Code. The connection shall be made by a UL listed or CSA certified closed- loop terminal connector sized for the wire gauge involved. The connector is to be fixed using the crimp tool specified by the connector manufacturer.
CAUTION / PRECAUTION
Do not perform a megger test between the control panel terminals or on the control circuit terminals.
CAUTION / PRECAUTION
Because the ambient temperature greatly affects control panel life and reliability, do not install the control panel in any location that exceeds the allowable temperature. Leave the ventilation cover attached for temperatures of 40 oC or below.
CAUTION / PRECAUTION
The control panel must be mounted on a wall that is constructed of heat resistant material. While the control panel is operating, the temperature of the control panel parts can rise to a temperature of 90 oC. I n case when braking resistors are used, the temperature of this resistor can rise up to 200 oC.
7 |
291 842 003 |
NOTE
The terms ‘’controller’’, ‘’lift controller’’ and ‘’control box’’ are sometimes used interchangeably throughout the industry. We will use the term ‘’control panel’’ in this document
1Never remove the covers while the AC I nput power supply is switched on. Minimum time to wait before working on the terminals or inside the device is 1 minute after disconnecting for control panels without electronic regulators for motors and 5 minutes for control panels with electronic regulators
( VVVF, ACVV, soft start)
2Do not touch or damage any components when handling the device. The changing of the isolation gaps or the removing of the isolation and covers is not permissible. I f the doors have to be removed (or opened) because the room temperature is higher than 40 degrees, the user has to ensure that no occasional contact with live parts may occur.
3Protect the control panel from impermissible environmental conditions (temperature, humidity, shock etc.)
4No voltage should be connected to the output terminals for the motors, magnets, valves, lights
and switches (terminals 5, 6, 7, 8, 9, 10, 12, 13, 14, 15, 16, 17, 18, 19, 20, 21, 22, 25, 25a, 26, 26a, 27, 31, 40, 45, 46, 47, 48, 56, 57, 58, 59, 121, 122, 123, 130, 131,132, 222, 351, 352, 358, 360, 371, 372)
5A capacitative load ( e.g. Var compensation capacitors) should not be connected to the outputs for the motors (terminals 5, 6, 7, 8, 9, 10, 12, 13, 14, 15, 16, 17, 18, 19, 20)
6Always connect the control panel to the protective ground ( PE ) via the marked connection terminals ( 0 or GND ) and the housing ( 0 or GND ) . Control panels have ground discharge currents greater than 3,5 mA. EN 50178 specifies that with discharge currents greater than 3,5 mA the protective conductor ground connection ( 0 or GND ) must be fixed type and doubled for redundancy.
7The electrical commissioning should only be carried out by qualified personnel, who are also responsible for the provision of a suitable ground connection and a protected power supply feeder in accordance with the local and national regulations.
8No dielectric tests should be carried out on parts of the control panel. A suitable measuring
instrument (internal resistance of at least 10 kohm/ V ) should be used for measuring the signal voltages.
9I f the control panel has been stored for longer than three years, the operation of the capacitors may be impaired. Before commissioning devices that have been stored for long periods, connect them to a power supply for two hours with no load connected in order to regenerate the capacitors, ( the input
voltage has to be applied without enabling the functionality) .
10The control panel may start accidentally in the event of a failure, even if it is disabled, unless it has been disconnected from the AC input feeder.
8 |
291 842 003 |
1. PRODUCT LIABILITY AND WARRANTY
We guarantee the faultless condition of our product as described in our advertising, the product documentation we have published, and this manual. Product characteristics over and above this are not guaranteed.
Claims for damages are generally excluded, except in the case of proven premeditation, gross negligence by SEC electronics, or the absence of any promised features. I n particular we do not accept any liability if the control panels are used with other systems, encoders, switches, power supply systems and drive motors for which the control panels are unsuitable as stated in this manual or which fail to conform with the customary state of technology by virtue of their individual design.
We also disclaim responsibility for any damage to lift facilities and building facilities due to malfunction of the product or due to errors in this manual.
We are not responsible for violation of the patents and other rights of thir d parties.
We shall not be liable for any damage resulting from improper handling as defined in this manual. We expressly exclude liability for lost profit and especially for consequential damage due to the non- observance of safety regulations and warnings and/ or resulting from accessories not supplied by SEC electronics.
SEC electronics products are designed for a long service life. They confirm with the current state of science and technology and were individually tested in all their promised functions pr ior to shipment . SEC electronics is continuously engaged in product and market analysis in the interest of further development and constant improvement . However, if any malfunctions or breakdowns occur in spite of all the preventive measures, you should no tify the customer service department in Neverke, Slovenia. We assure you that suitable action to rectify the damage will be taken without delay.
1.1. TERMS OF WARRANTY
We guarantee the product’s proper working order as defined in this operating ma nual for a period of 24 months after shipment as per delivery note.
Repairs will only be carried out free of charge if this manual was observed for storage, transportation, installation, commissioning and operation.
I nterventions in a unit by the customer or third parties are only allowed after special consultation with SEC electronics. I f this condition is not observed, SEC electronics will accept no responsibility for any damage to the unit, injury to persons or consequential damage; in this case the warr anty shall expire. SEC electronics also disclaims all responsibility for unit faults resulting from damaged or functionally defective equipment in the control panel’s environment or following the use of accessories which were not supplied by SEC electronics.
The General Terms of Business of SEC electronics shall apply.
9 |
291 842 003 |
2. INSPECTION PROCEDURE
2.1. UPON DELIVERY INSPECTION PROCEDURES
A high degree of care is taken in packing our control panels and preparing them for delivery. They should only be transported with suitable transport equipment (see weight data) . Observe the instructions printed on the packaging. This also applies when the device is unpacked and installed.
Upon delivery, check the following:
-the packaging f or any external damage
-whether the delivery note matches your order
Open the packaging with suitable tools. Check whether:
-any parts were damaged during transport
-the device type corresponds to your order
In the event of any damage or of an incomplete or incorrect delivery please notify the responsible sales offices immediately.
The devices should only be stored in dry rooms within the specified temperature ranges.
NOTE:A certain degree of moisture condensation is permissible if this arises from changes in temperature ( see ‘’Permissible Environmental Conditions’’ ) . This does not however, apply when the devices are in operation. Always ensure that there is no moisture condensation in devices t hat are connected to the power supply
2.2 CONTROL PANEL TYPE DESIGNATION
The technical specification of the control panel is stated in the type code. Example
E 078/ 01
where letter E corresponds to E- type lift control panel
This code is also the same as is the code in the confirmation of order and other related papers. A Label with the type code is located at the bottom right corner of the control panel.
10 |
291 842 003 |

2.3. NAMEPLATE
Check that all the data stated in the nameplate enclosed wit h the control panel corresponds to what has been ordered.
SEC ELECTRONICS
Type |
________________ |
S/N ___________________ |
Input voltage ______________ |
Input frequency _________ |
|
Rated current ____________ |
Brake __________________ |
|
Retiring cam ______________ |
Valves _________________ |
|
Dimensions __________________________________________
Type |
- control panel model |
S/ N |
- serial number ( type code) |
I nput voltage |
- power supply voltage |
I nput frequency |
- power supply frequency |
Rated current |
- output rated current |
Brake |
- rated voltage of brake ( in electric lift) |
Retiring cam |
- rated voltage of retiring cam |
Valves |
- rated voltage of valves ( in hydraulic lift) |
Dimensions |
- dimensions of control panel H x W x D |
Nameplate is located in the left side of the box door.
11 |
291 842 003 |
2.4. STANDARD SPECIFICATIONS
|
Ta Ambient temperature |
0 … +40oC; 40 … +50oC with current derated to 0.8 rated output current |
||
|
|
|
||
|
Installation location |
Pollution degree 2 or better ( free from direct sunlight, vibration, dust, corrosive or |
||
|
|
inflammable gases, fog, vapor oil and dripped water, avoid saline environment) |
||
|
Degree of protection |
IP 44 |
|
|
|
|
|
||
|
Installation altitude |
Up to 1000 m above the sea level; for higher altitudes a current reduction of 1,2% |
||
ENVIRONMENT |
|
for every 100 m of additional height applies |
||
Temperature |
5% to 85% |
|
||
Air humidity |
|
|||
|
operation |
0… +50oC |
|
|
|
storage |
|
||
|
transport |
|
||
|
operation |
1 g/m3 to 25 g/m3 without moisture condensation or icing Class 3K3 as per |
||
|
|
5% to 95% |
|
|
|
storage |
1 g/m3 to 29 g/m3 |
Class 1K3 as per |
|
|
|
95% 60 g/m3 |
|
|
|
transport |
greatest absolute air humidity if the device is brought suddenly from 70 to 15oC |
||
|
|
A light condensation of moisture may occur for a short time occasionally if the |
||
|
|
device is not in operation ( Class 2K3 as per EN50178) |
||
|
|
|
|
|
STANDARD |
Climatic conditions |
IEC |
|
|
|
|
|
||
EMC compatibility |
EN12015 and EN12016 |
(see chapter ‘’EMC Guidelines ‘’) |
||
|
||||
|
|
|
|
|
|
Approvals |
CE |
|
|
|
|
|
|
|
2.5. DISPOSAL OF THE DEVICE
SEC electronics will take back old units free of charge provided they are delivered carriage paid to the SEC electronic factory in Neverke, Slovenia
Applicable local waste treatment and disposal regulations must be observed if you dispose of a unit yourself or replace any components. SEC electronics shall accept no liability for any parts and components that are not disposed of properly!
The following details are useful for disposal purposes:
the control panel box is made of steel, usually painted
the back panel is made of steel or aluminum, usually without lacquering or surface treatment
regulations on the disposal of electronic parts and components apply for disposal of p.c. boards, LCD units and other electric parts
backup battery is Lithium battery wich must be disposed properly
12 |
291 842 003 |
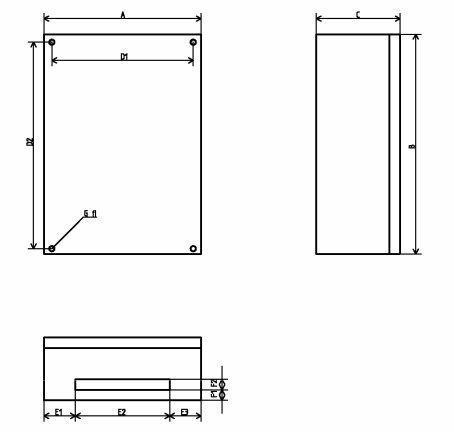
3.INSTALLATION GUIDELINES
3.1.MECHANICAL SPECIFICATION
Control panel dimensions and fixing holes dimensions
Doors can be left or right side opening.
|
|
|
CONTROL PANEL DIMENSIONS |
( information on nameplate) |
|
|
|
|||||||
|
|
|
|
|
|
|
|
|
|
|
|
|||
|
|
700 x |
|
700 x |
800 x |
800 x |
800 x |
1000 x |
1000 x |
1000 x |
900 x |
|||
|
|
500 x |
|
500 x |
600 x |
600 x |
600 x |
600 |
x |
600 |
x |
600 |
x |
800 x |
|
|
200 |
|
250 |
200 |
250 |
300 |
250 |
|
300 |
|
350 |
|
350 |
A |
mm |
500 |
|
500 |
600 |
600 |
600 |
600 |
|
600 |
|
600 |
|
800 |
B |
mm |
700 |
|
700 |
800 |
800 |
800 |
1000 |
|
1000 |
|
1000 |
|
900 |
C |
mm |
200 |
|
250 |
200 |
250 |
300 |
250 |
|
300 |
|
350 |
|
350 |
D1 |
mm |
450 |
|
450 |
550 |
550 |
550 |
550 |
|
550 |
|
550 |
|
700 |
D2 |
mm |
650 |
|
650 |
750 |
750 |
750 |
950 |
|
950 |
|
950 |
|
870 |
E1 |
mm |
107,5 |
|
107,5 |
157,5 |
157,5 |
157,5 |
157,5 |
157,5 |
157,5 |
150 |
|||
E2 |
mm |
285 |
|
285 |
285 |
285 |
285 |
285 |
|
285 |
|
285 |
|
500 |
E3 |
mm |
107,5 |
|
107,5 |
157,5 |
157,5 |
157,5 |
157,5 |
157,5 |
157,5 |
150 |
|||
F1 |
mm |
40 |
|
40 |
40 |
40 |
40 |
40 |
|
40 |
|
40 |
|
40 |
F2 |
mm |
30 |
|
30 |
30 |
30 |
30 |
30 |
|
30 |
|
30 |
|
40 |
G fi |
mm |
10 |
|
10 |
10 |
10 |
10 |
10 |
|
10 |
|
10 |
|
8 |
NOTE: I n case when VVVF control panel is used, the braking resistor is mounted on the control panel. Dimensions of braking resistor depends on model, power and manufacturer. Braking resistor can be fixed at the side or at the top of the box.
13 |
291 842 003 |
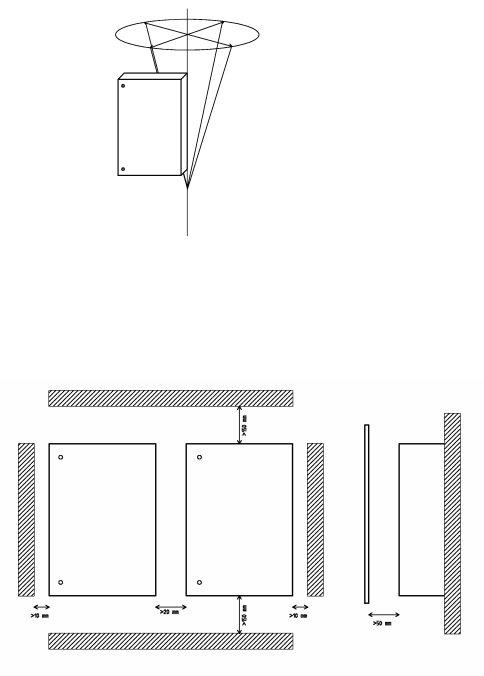
3.2. INSTALLATION MOUNTING CLEARANCE
NOTE: The dimensions specified in this manual and weights should be taken into consideration when the device is mounted. The technical equipment required ( carriage or crane for large weights) should be used. I m proper handling and the use of unsuitable tools may cause damage.
NOTE: The maximum angle of inclination is 30o
NOTE: The control panels must be mounted in such a way that the free flow of air is ensured. The clearance to the device must be at least 150 mm. A space of at lease 50 mm must be ensured at the front . Devices that generate a large amount of heat must not be mounted in the direct vicinity of the control panel.
14 |
291 842 003 |
4. WIRING PROCEDURE
4.1. AC INPUT CONNECTION
The device must be connected to a protective grounding which will be the first to be connected and the last one to be disconnected. Flexible copper cables, class 5, type O5V- K must be used for mains connection of the device. These copper cables must be short circuit protected with external fuses. Thermomagnetic differential switches for protection can be used.
NOTE: Residual – current ( FI- type)
Cable diameters and dimensions of protective switches must be consistent with table 4.4.4 for input voltage 400 V AC (415 V AC) or table 4.4.5 for in put voltage 230 V AC (240 V AC) .
INPUT VOLTAGE 400 VAC
P |
kW |
3 |
4 |
5,5 |
7,5 |
10 |
11 |
15 |
18,5 |
22 |
25 |
30 |
37 |
45 |
I n |
A |
8,6 |
10,5 |
13,5 |
17,5 |
20,5 |
24 |
32 |
39 |
46 |
54 |
62 |
72 |
87 |
Ci |
mm2 |
2,5 |
2,5 |
4 |
6 |
6 |
10 |
16 |
16 |
25 |
25 |
35 |
50 |
50 |
Cl |
mm2 |
2,5 |
2,5 |
2,5 |
2,5 |
2,5 |
2,5 |
2,5 |
2,5 |
2,5 |
2,5 |
2,5 |
2,5 |
2,5 |
S1 |
A |
16 |
16 |
20 |
25 |
32 |
32 |
40 |
50 |
63 |
80 |
80 |
100 |
125 |
S2 |
A |
25 |
25 |
25 |
40 |
40 |
40 |
63 |
63 |
80 |
100 |
100 |
125 |
160 |
S3 |
A |
16 |
16 |
16 |
16 |
16 |
16 |
16 |
16 |
16 |
16 |
16 |
16 |
16 |
S4 |
A |
25 |
25 |
25 |
25 |
25 |
25 |
25 |
25 |
25 |
25 |
25 |
25 |
25 |
INPUT VOLTAGE 230 VAC
P |
kW |
3 |
4 |
5,5 |
7,5 |
10 |
11 |
15 |
18,5 |
22 |
25 |
I n |
A |
13,5 |
16,5 |
22 |
29 |
37 |
41 |
54 |
66 |
77 |
87 |
Ci |
mm2 |
4 |
4 |
6 |
10 |
16 |
25 |
25 |
35 |
50 |
50 |
Cl |
mm2 |
2,5 |
2,5 |
2,5 |
2,5 |
2,5 |
2,5 |
2,5 |
2,5 |
2,5 |
2,5 |
S1 |
A |
20 |
20 |
32 |
40 |
63 |
63 |
80 |
100 |
100 |
125 |
S2 |
A |
25 |
25 |
40 |
63 |
63 |
80 |
100 |
125 |
125 |
160 |
S3 |
A |
16 |
16 |
16 |
16 |
16 |
16 |
16 |
16 |
16 |
16 |
S4 |
A |
25 |
25 |
25 |
25 |
25 |
25 |
25 |
25 |
25 |
25 |
P- rated power
In |
- rated current |
Ci |
- diameter of wires for main supply (mm2) |
Cl |
- diameter of wires for lighting connection (mm2) |
S1 |
- thermomagnetic main switch – curve type C (value is equivalent to short circuit current) |
S2 |
- differential main switch – sensitivity 300 mA |
S3 |
- thermomagnetic switch – lighting – curve C |
S4 |
- differential switch – lighting – sensitivity 30 mA |
15 |
291 842 003 |
4.2. MAIN MOTOR CONNECTION
Cable diameters must be consistent with table below for input voltage 400 V AC (415 V AC) or table below for input voltage 230 V AC (240 V AC) .
INPUT VOLTAGE 400 VAC
P |
kW |
3 |
4 |
5,5 |
7,5 |
10 |
11 |
15 |
18,5 |
22 |
25 |
30 |
37 |
45 |
I n |
A |
8,6 |
10,5 |
13,5 |
17,5 |
20,5 |
24 |
32 |
39 |
46 |
54 |
62 |
72 |
87 |
Isd |
A |
|
|
|
10 |
12 |
14 |
19 |
23 |
27 |
31 |
36 |
42 |
50 |
Cm |
mm2 |
2,5 |
2,5 |
4 |
4 |
6 |
6 |
10 |
16 |
25 |
25 |
35 |
35 |
50 |
Csd |
mm2 |
|
|
|
2,5 |
2,5 |
4 |
6 |
10 |
10 |
16 |
16 |
25 |
25 |
INPUT VOLTAGE 230 VAC
P |
kW |
3 |
4 |
5,5 |
7,5 |
10 |
11 |
15 |
18,5 |
22 |
25 |
I n |
A |
13,5 |
16,5 |
22 |
29 |
37 |
41 |
54 |
66 |
77 |
87 |
I sd |
A |
7,8 |
10 |
13 |
17 |
22 |
24 |
28 |
33 |
45 |
50 |
Cm |
mm2 |
4 |
4 |
6 |
10 |
16 |
16 |
25 |
35 |
50 |
50 |
Csd |
mm2 |
2,5 |
2,5 |
4 |
4 |
6 |
10 |
16 |
16 |
25 |
25 |
P- rated power
In |
- rated current |
I sd |
- star / delta current |
Cm |
- diameter of wires for motor (mm2) |
Csd |
- diameter of wires for star delta connection (mm2) |
16 |
291 842 003 |
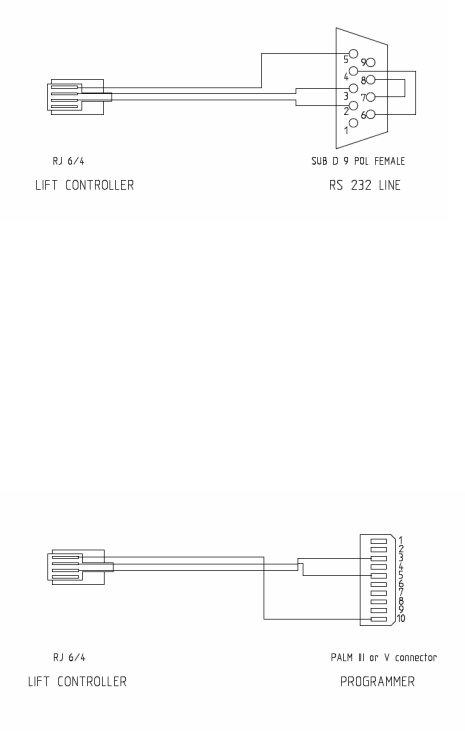
5.CONNECTION TO PC OR PDA
5.1. CONNECTION TO PC
Programming with PC is possible through RS 232 line. The drawing of cable is: Necessary program for programming is one of VT100 emulators. Suitable is program
Hyper Terminal wich is part of Windows operational system. Settings of Hyper Terminal
for using it for programming is next: |
|
|
|
|
- emulation |
ANSI |
|
|
|
- baud rate |
9600 |
8 |
N |
1 |
5.2. CONNECTION TO PDA
Programming with PDA is possible through RS232 line. The drawing of connection cable for PALM device series I I I or V is:
17 |
291 842 003 |
Necessary program for programming is one of VT100 emulators. Suitable is program PTELNET. Settings of Ptelnet program for using it for programming is next:
- Serial |
Port |
RS232 |
|
Baud |
9600 |
|
Parity |
N |
|
Word |
8 |
|
StopBits |
1 |
|
Xon/ Xoff |
0 |
|
RTS/ CTS |
0 |
- Terminal |
Mode |
Serial |
|
Return |
CR |
|
Font |
large |
|
Width |
32 |
|
Charset |
I SO- Latin 1 |
|
Lochal echo |
1 |
- the connection icon in the main window must be ON
WARNING:
Do not connect fourth wire from lift controller connector RJ 6/ 4.
This wire is internal + 5 VDC for special programmers only.
NOTE:
Windows |
is Microsoft trademark |
Hyper Terminal |
is Hilgraeve I nc. trademark |
Palm |
is 3com t radmark |
18 |
291 842 003 |
6.PROGRAMMING
6.1.MAIN MENU
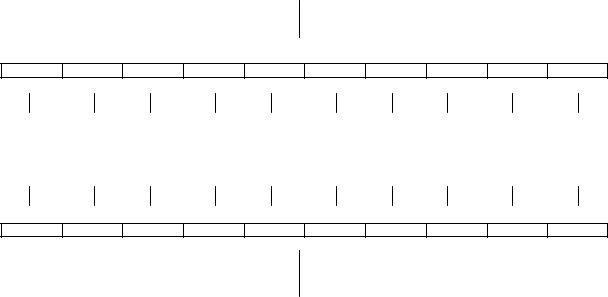
After connection is establish between programmer or E- Type console and controller, main menu appear in the display. I f not press ENTER or # two or three times.
The numbers in front of word for entering in menus are present in eprom version E1.10 or higher. They are made for programming with console where # is ENTER and * is ESCAPE.
SEC Electronics E - Type Lift
Controller V0.0
1L |
Flow control |
2 E |
Show error hist ory |
3C |
Statistics |
4 F |
Fundamental settings |
5V |
Door settings |
6P |
Parameters |
7 D |
Sprecial drives |
8S |
Encoder settings |
9 I |
I nput / Output settings |
0W |
Save settings to EEPROM |
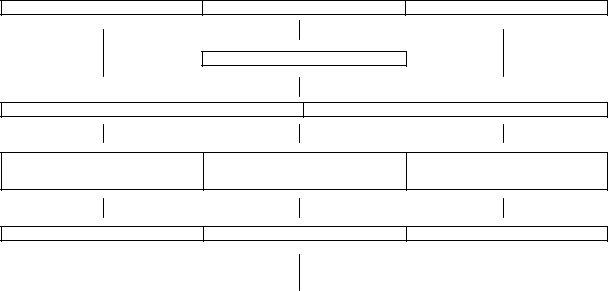
To select submenu press or write first letter of submenu. T he submenu must appear.
MAIN MENU
1L
2E
3C
4F
5V
6P
7D
8S
9I
0W
Flow |
Error |
Statistics |
Fund. |
Door |
Parameter |
Special |
Encoder |
I / O |
Save |
control |
history |
|
settings |
settings |
|
drives |
settings |
settings |
all |
Escape
Enter
Enter
Enter
Enter
Enter
Enter
Enter
Enter
Enter
MAIN MENU
19 |
291 842 003 |
6.2.SUBMENU ORGANISATION
The submenus F- Fundamental settings, V- Doors settings, P- Parameters, D- Special drives,
1L = list, 2E = edit, 3C = change
1L
2E
3C
Parameter number 00 - 99
Parameter value 00 - 99
Parameter value 00 – 99
Listing of all parameters
in submenu
Edit single parameter
Change parameters staring from first
Enter
Escape
Escape
1L = list, 2E = edit, 3C = change
Enter
MAIN MENU
6.3.1L FLOW CONTROL
Display show actual informations, activities, problems or errors of controll panel Sample of one display with explanations is next:
Flow control |
|
21 / 01 / 03 |
13: 45: 06 |
Station: 03 |
Status: 61 |
Maintenace drive on |
|
Press Esc for main menue...
20 |
291 842 003 |
Explanation: |
|
|
|
First row: |
Date (21 / 01 / 03) |
Hour (13: 45: 06) |
|
Second row: |
Position of lift |
(Station: 03) |
Message number as in seven segment |
|
lowest floor is 01 |
|
display in the main board (Status: 61) |
Third row: |
Message definition (Maintenance drive on) |
||
Message numbers 0 0 - 49 are ERRORS, numbers 50 - 99 are EVENTS.
List of messages:
|
EVENTS |
|
ERRORS |
50 |
Doors open |
1 |
Second slip correction |
51 |
Doors preopen |
2 |
First slip correction |
52 |
Doors close |
3 |
Error counting |
53 |
Doors lock |
4 |
Error preopening |
54 |
Error on doors closing |
5 |
Error car door A |
55 |
Fast speed up |
6 |
Error car door B |
56 |
Slow speed up |
7 |
Error door lock A |
57 |
Stabilisation time |
8 |
Error door lock B |
58 |
Fast speed down |
9 |
Error switch stop up |
59 |
Slow speed down |
10 |
Error switch slow up |
60 |
Fire alarm drive |
11 |
Error switch stop down |
61 |
Maintenance drive on |
12 |
Error switch slow down |
62 |
Parking drive |
13 |
Error battery low |
63 |
Waiting for call |
14 |
Error elements check |
65 |
Safety line 36 |
15 |
Error limit timer fast speed |
66 |
Doors are not lock |
16 |
Error limit timer slow speed |
68 |
Obstruction door A |
17 |
Error limit timer maintenance speed |
69 |
Obstruction door B |
18 |
Error communication CPU B |
70 |
Cabin oveload |
19 |
Error in parameters |
72 |
Relevelling up |
20 |
Error prelimit switches |
73 |
Relevelling down |
21 |
Error communication CAR module |
75 |
Lift in hold after maintenance function |
22 |
Error relevelling |
76 |
Priority drive |
23 |
Error photocell door A |
77 |
Photocell door A |
24 |
Error photocell door B |
78 |
Photocell door B |
25 |
Error first drive |
79 |
Maintenance drive down |
26 |
Error group |
80 |
Maintenance drive up |
27 |
Error SSL 2 |
81 |
Pump star sequence |
28 |
Error SSL 3 |
82 |
Error doors |
29 |
Error security 36 |
83 |
Corrigation up |
30 |
Start on |
84 |
Corrigation down |
31 |
|
85 |
Firefighters drive |
32 |
Learn floor positions first! |
86 |
Cabin doors are not close |
|
|
87 |
Landing doors are not close |
|
|
21 |
291 842 003 |
6.4.2E SHOW ERROR HISTORY
Display show errors in the error table. Up to 200 errors can be stored in the memory. When
memory is full, errors are not stored in the memory any more. The errors are displayed as first error first . The memory for errors is supplied by lithium battery in case of power down. I f battery is not in the system or battery voltage is low, error table will be destroyed when controller will be switched off . Sample of one display with explanations is next:
Er ror limit switches |
|
21 / 01 / 03 |
13: 45: 06 |
St at ion: 03 |
|
C cleans hist ory |
|
others main menue |
|
Explanation: |
|
|
First row: |
Error message (Error limit switches) |
|
Second row: |
Date of error (21 / 01 / 03) |
Hour of error (13: 45: 06) |
Third row: |
Position of lift when in error |
(Station: 03) |
|
lowest floor is 01 |
|
By pressing any key, errors are displayed. At the end message ( C cleans history others main menue) appear. For clean the error table press C, for leave the error table press any other key.
ERROR EXPLANATIONS
01 Second slip correction
Lift has tried to correct slip from floor after stopping two times unsuccessfully
-error in mechanical brake in electric lift
-brake in electric lift or valves in hydraulic switched off too late
-zone for stop magnet in station is t oo short
-slow speed is too fast (hydraulic or VVVF)
-error on elements for slow speed (lift attempts to stop in fast speed)
02 First slip correction
Lift has tried to correct slip from floor after stopping. First correction fails, second one passes
-error in mechanical brake in electric lift
-brake in electric lift or valves in hydraulic switched off too late
-zone for switch stop in station is too short
-slow speed is too fast (hydraulic or VVVF)
-error on elements for slow speed (lift attempts t o stop in fast speed)
22 |
291 842 003 |
03 Error in counting
Lift approaches bottom or top floor with wrong position number
-error in limit switch for fast speed at bottom (input 6) switch must be off when in zone for slow speed at bottom floor
-error in limit switch for fast speed at top (input 7) switch must be off when in zone for slow speed at top floor
-error on supply voltage for limit switches for fast speed
-magnet to activate bi- stable limit switch for fast speed is too close to switch or wrong polarity (this can cause two pulses)
-number of floors defined in parameter P 04 is not correct .
04 Error on
Error in Lift pre- opening cycle
-one of three conditional inputs failed during pre- opening- or opening in drive up inputs: 16 releve lling down, 12 zone A, 13 zone B in drive down inputs: 15 relevelling up, 12 zone A, 13 zone B
-wrong position of switches or magnets
-error on safety circuit 185 for pre- opening- opening and relevelling with open door
-error on elements for slow speed - pre- opening- opening in fast speed
05 Error on car door A
Error while closing car door
-error on car door contact - when door is closed input 9 and 10 must be activated
-error on motor or elements for drive motor for car door
-time in parameter V02 (closing door time) is too short timer comes to zero before door is closed
-error in power supply for car door contact
06 Error on car door B
Error while closing car door
- error on car door contact - when door is closed input 9 and 10 must be activate d
-error on motor or elements for drive motor for car door
-time in parameter V02 (closing door time) is too short timer comes to zero before door is closed
-error in power supply for car door contact
07 Error on door locks A
Error while locking landing doors (after closing car door)
-error in switches on landing doors when doors are locked inputs 9, 10, and 11 must be activated
-time in parameter F01 (security lock time) is too short timer comes to zero before doors are locked
-error in power supply for locks switches
08 Error on door locks B
Error while locking landing doors (after closing car door)
-error in switches on landing doors when doors are locked inputs 9, 10, and 11 must be activated
-time in parameter F01 (security lock time) is too short timer comes to zero before doors are locked
-error in power supply for locks switches
09 Error on switch for stop up
Error on input 12 - st op up
-error on switch or on magnet
-error on other switches for stop or slow speed
-when using bi- st able magnetic switch - magnet is too close to switch ( two pulses)
-error on power supply for switches
23 |
291 842 003 |
10 Error on switch for slow speed up
Error on input 14 - slow speed
-error on switch or on magnet
-error on other switches for stop or slow speed
-when using bi- stable magnetic switch - magnet is too close to switch ( two pulses)
-error on power supply for switches
11 Error on switch for stop down
Error on input 13 - st op dow n
-error on switch or on magnet
-error on other switches for stop or slow speed
-when using bi- stable magnetic switch - magnet is too close to switch ( two pulses)
-error on power supply for switches.
12 Error on switch for slow speed down
Error on input 14 - slow speed
-error on switch or on magnet
-error on other switches for stop or slow speed
-when using bi- stable magnetic switch - magnet is too close to switch (two pulses)
-error on power supply for switches
13 Error battery low
Battery BT1 in main board is low . This battery keep only statistics and errors information and real time clock during power down periods. All other parameters and values are stored in nonvolatiole memory. I n case of low battery also LED LD4 in main board is lit .
For replacement use same battery type CR 2032 lithium 3V
NOTE: Dispose old batteries properly
14 Error on input 21 - elements check
I nput 21 was off more than 5 seconds when lift was waiting at floor
-one of contractor or relays was not released after end of drive K1, K2, K3, K4, K6, K7, K9, K31, K32, K33, R11, R12, R13, R17
-error on security circuit 185 when elevator stopped at floor
-error on external element for temperature check connected to inputs 381, 382
-motor overheating - controller for thermistors TH1 detected overheat
-error on controller for thermistors TH1 or phase sequence controller
-error on control voltage on controller
15 Error travel timer fast speed
Error on security timer for fast speed
-timer reaches zero before lift changes speed or stops at floor
-error with ropes or oil pressure
-error on elements for drive ( contractor, relays, valves )
-timer setting is to short
16 Error travel timer slow speed
Error on security timer for slow speed
-timer reaches zero before lift changes speed or stops at floor
-error with ropes or oil pressure
-error on elements for drive ( contractor, relays, valves )
-timer setting is to short
24 |
291 842 003 |
17 Error travel timer maintenance speed
Error with security timer for maintenance speed
-timer reaches zero before lift changes speed or stops at floor
-error with ropes or oil pressure
-error on elements for drive ( contractor, relays, valves )
-timer setting is to short
18 Error communication CPU B
I nternal error in main board. There is no communication between microprocesor A and B
-error in microprocesor B
-error in main board
19 Error in parameters
Error in parameters in memory circuit on PCB
-error because parameters in memory circuit changed incorrectly check all parameters
-value in one or more parameters is not within the limits
-error with memory circuit on PCB.
NOTE |
I n this case all fundamental settings, door settings, parameters, encoder settings and |
|
input/ output settings must be read , check if they are good, and write to the control |
|
panel again. Aft er t his swit ch t he power of cont rol panel off and on again |
20 Error on limit switches for fast speed
Limit switches for fast speed both off at the same time
-error on bottom limit switch for fast speed (input 6) switch must be off when in zone for slow speed at bot t om floor
-error on top limit switch for fast speed (input 7) switch must be off when in zone of slow speed for top floor
-error with power supply for limit switches
21 Error communication car module
There is no communication between main and car board
-error in connection between boards
-error in main board
-error in car board
22 Error while relevelling
-while relevelling one of the inputs 12 or 13 (zone A o r zone B) goes off
-error on switches or magnets
-error on elements for drive (contractor, relays, valves)
-elevator has relevelled more than 10 times in a period of 2 minutes
-error on safety circuit 185 for relevelling and
23 Error on door photocell input A
I nput 63 car module door photocell was activated more than 1 minute
Lift runs on without checking input 63 door photocell
-error on photocell connected to input 63
-error on definition of input (NO / NC) with parameter V08
-error on power supply for photocell connected to input 63
25 |
291 842 003 |
24 Error on door photocell input B
I nput 65 car module door photocell was activated more than 1 minute Lift runs on without checking input 65 door photocell
-error on photocell connected to input 65
-error on definition of input (NO / NC) with parameter V10
-error on power supply for photocell connected to input 65
25 Error first drive
Lift was unable to made first drive after power on sequence.
-error on prelimit switches
-error on stop switches
-error on power supply
26 Error group
Lift is parametrized to work in group but no serial line of group is detected
-error in serial cable between group
-error in other lifts parameters
27 Error SSL2
There is an error in serial line link 2
-error in serial cable between nodes from 1 to 24
-error in other lifts parameters
28 Error SSL3
There is an error in serial line link 3
-error in serial cable between nodes from 25 to 48
-error in other lifts parameters
29 Error security 36
Continuous errors (more than 5 in one minute) on security 36 (terminal 303)
-bad connection or interrupted safety line
-continuous disconnections of high pressure safety on hydraulic
30 Start on
Elevator stopped and started again on pre - limit switch out of station.
This can happen due to safety line break (inputs safety line 36- 39) or some other reason. Lift goes to first drive after this error.
31
Elevator moved out of allowed area during
32 Learn floor positions first!
Counting system 2 requires learning of floor positions before normal operation. See explanation of parameter P3 setting 2.
26 |
291 842 003 |
6.5.3C STATISTICS
Statistics menu is menu with some statistical information regarding elevator drives. I n this menue the counters for drives to all floors and for every 30 minutes display how many drives was made.
Sample of display is next:
C0 Number of drives |
12 |
C1 Total drives |
123 |
C2- 50 Number of drives in period
00:00 - 00: 30 : 1
00:30 - 01: 00 : 2
01:00 - 01: 30 : 2
01:30 - 02: 00 : 4
Press any key to continue
Last display is:
C51- 99 Number of drives to floors
floor 01: 6
floor 02: 3
floor 03: 3
C clears counters,
others main menue
At the end message ( C clears counters others main menue) appear. For clear the counters press C, for leave the values in the counters and just go out from menue press any other key.
Explanation of the counters is next:
C1 COUNTER OF DRIVES - resetable
This counter, goes to zero when error table is reset .
C2 COUNTER OF DRIVES - life counter
Counter can not be reset .
C3 – C50 COUNTER OF DRIVES FROM STATION 1 TO STATION 48 - resetable
This counter, goes to zero when error table is reset .
C51 – C98 COUNTER OF DRIVES IN HALF HOUR TIME PERIOD - resetable
This counter, goes to zero when error table is reset .
27 |
291 842 003 |
6.6.4F FUNDAMENTAL SETTINGS
List of parameters in fundamental settings menue is next:
F1 DOORS LOCK TIMER |
1 - 20 sec. |
Time in which locks must be made after closing doors. I nput 11 - main must be active. I f the input is not active when the timer comes to zero, the doors will open again. After three attempts without a result the timer V5 (door error) will activate, and after this time there will be one attempt to close and lock the doors. Also the error will be logged in the error table.
F2 |
PARKING TIMER |
1 - 1250 s. |
Time after which the lift will go to the parking floor if there is no landing or car calls. Parking floor is defined in parameter P13. Value on terminal is multiplied by 5 (if the number is 10 then the value is 50s)
F3 PARKING TIMER FILLING AND EMPTYING |
1 - 1250 s. |
Time after which the lift will go to the parking floor if theere is no landing or car calls in filling or emptying sequece. Parking floors are defined in parameters P14 and P15. Value on terminal is multiplied by 5 (if the number is 10 then the value is 50s)
F4 |
DIRECTION HOLD TIMER |
1 - 20 sec. |
Time in which the output for the direction is still present after arrival at the floor. |
|
|
(outputs 47 and 48 - car) . Also the lift will continue to travel in this direction if a call is active in the same direction when time comes to zero..
F5 CALL DELAY TIMER |
1 - 20 sec. |
I n case using up and down selective system when one input will be accepted another will be refused in period on duration of this timer. Unit of setting is second. We can program from 1 to 20 seconds
F6 |
START FILLING |
hour |
0 - 23 |
|
Setting of hour for start filling |
|
|
|
|
F7 |
START FILLING |
minute |
0 - 59 |
|
Setting of minute for start filling |
|
|
||
F8 |
END FILLING hour |
|
0 - 23 |
|
Setting of hour for end filling |
|
|
|
|
F9 |
END FILLING minute |
0 - 59 |
||
Setting of minute for end filling |
|
|
|
|
F10 |
START EMPTYING |
hour |
0 - 23 |
|
Setting of hour for start emptying |
|
|
||
F11 |
START EMPTYING |
minute |
0 - 59 |
|
Setting of minute for start emptying |
|
|||
F12 |
END EMPTYING |
hour |
0 - 23 |
|
Setting of hour for end emptying |
|
|
||
F13 |
END EMPTYING |
minute |
0 - 59 |
|
Setting of minute for end emptying |
|
|||
28 |
291 842 003 |
F14 GROUP TIMER |
1 - 99 |
Timer is valid in group operaton (multi elevator) . I f first elevator not execute the |
command in this time, |
second one will also start to this command. Unit of setting |
is second. We can program from 1 to 99 |
seconds |
|
F15 ARRIVAL GONG TIMER |
1 - 20 sec. |
Timer for output arrival at floor - gong ( output 49 - car )
F16 CAR EXTRACTION FAN TIME |
1 - 90 sec. |
Timer to define how long the output for the car extraction fan (relay RE11 outputs 30, 31 - main) and (output 52 car) remains on after the end of travel.
F17 BUTTON BACKLIGHT |
0 - 50% |
I nactive call button backlight setting. Call buttons are illuminated all the time so we can see them in the darkness.
0 – button backlight is off
F18 BEEP TIME |
0.0 – 0.7s |
Beep time when some call pushbutton is pressed. |
|
Beeper output on car module is terminal 51 »occupied / beeper«. Combined display / floor modules have beeper already on board.
F18 = 0 – no beep, function of car module terminal 51 is occupied
F18 = 0.1 … 0.7 – beep, function of car module terminal 51 is beeper
NOTE: Function works only with system types P0= 5 and 6 with combined display / node (floor) modules.
F19 GONG DELAY TIME |
1 - 20s |
Gong delay after switching to slow speed or coming to the station (depends on parameter P5) .
6.7.5V DOOR SETTINGS
List of parameters in door settings menue is next:
V1 |
OPEN DOOR TIMER |
1 - 60 sec. |
Time in which doors will remain open at a floor |
|
|
V2 |
CLOSING DOOR TIMER |
1 - 60 sec. |
Time in which the doors must close - input 10- main must be active. I f input is not active when timer comes to zero, t he doors will open again. After three attempts without a result the timer V5 (door error) will activate, then after this time there will be one attempt to close the doors. Also the error will be logged in t he error t able
V3 HOLD DOOR TIMER |
1 - 90 sec. |
Timer is active when we use door type 5 or 8 (parameter V61) . I n this case after the timed period the outputs for doors will cancel as long as the lift stays at the floor. I f timer is set on value 60 then antivandal is not in function.
V4 EXCHANGE CLOSE OPEN TIMER |
0.1 - 9.0 sec. |
Time delay between close relay de- energizing and open relay energizing.
29 |
291 842 003 |
V5 DOOR ERROR TIMER |
1 - 10 min. |
Time which will start after 3 errors in doors closing or locking. Also all commands will be cleared when this is active.
V6 EXTEND OPEN DOOR TIMER |
1 - 60 sec. |
Additional time which will add to open door time (V1) when input Photocell (input 63- car for photocell door A and input 65 - car for photocell door B) is activated
V7 SPECIAL OPEN DOOR TIMER |
1 - 90 sec. |
Special open door timer will add time to open door time (V1) when input (Additional doors open terminal 67- car) is activated
V8 |
INPUT PHOTOCELL DOOR A |
NO / NC |
( 0 |
- 1) |
|
Definition for terminal 63 |
- car module |
|
|
|
|
V9 |
INPUT OBSTRUCTION DOOR A |
NO / NC |
( 0 |
- 1) |
|
Definition for terminal 64 |
- car module |
|
|
|
|
V10 |
INPUT PHOTOCELL DOOR B |
NO / NC |
( 0 |
- 1) |
|
Definition for terminal 65 |
- car module |
|
|
|
|
V11 |
INPUT OBSTRUCTION DOOR B |
NO / NC |
( 0 |
- 1) |
|
Definition for terminal 66 |
- car module |
|
|
|
|
V12 |
|
0 - 3 |
|||
0 - disabled
1 - reserved
2 - when relevelling switches + zone A and zone B are on
when traveling up |
|
input 16 main module |
relevelling down |
input 12 main module |
zone A |
input 13 main module |
zone B |
when traveling down |
|
input 15 main module |
relevelling up |
input 12 main module |
zone A |
input 13 main module |
zone B |
V13 DOOR TYPE |
1 - 8 |
1 - photocell / semiautomatic NOTE: NOT FOR USE I N THE EU
photocell is connected between inputs 9 and 10 main module. Doors locks are connected in series between inputs 10 and 11 main module. The output relay RE7 drives the retiring cam
2 - manual /
30 |
291 842 003 |
3 - folding ( bus ) / semi - automatic
Semi- automatic landing doors are connected between inputs 8 and 9 main module. Car door contact is connected between inputs 9 and 10 main module. Series connected switches of landing doors are connected between inputs 10 and 11 main module. Outputs RE8 and RE7 drives opening and closing of car door. Car door will remain open when the lift is waiting at floors
4 - automatic / semi - automatic
Semi- automatic landing doors are connected between inputs 8 and 9 main module. Car door contact is connected between inputs 9 and 10 main module. Series connected switches of landing doors are connected between inputs 10 and 11 main module. Outputs RE8 and RE7 drive opening and closing of car door. Car door remains open when lift is waiting at a floor
5 - automatic doors without limit switches / semi- automatic
Semi- automatic landing doors are connected between inputs 8 and 9 main module. Car door contact is connected between inputs 9 and 10 main module. Series connected switches of landing doors are connected between inputs 10 and 11 main module. Outputs RE8 and RE7 drive opening and closing of car door. Car door remains open when lift is waiting at floor. When lift is waiting at floor after time defined with parameter V3, output RE8 for open door goes off
6 - automatic / automatic
I nputs 8 and 9 main module are short connected. Car door contact is connected between inputs 9 and 10 main module. Series connected switches of landing doors are connected between inputs 10 and 11 main module. Outputs RE8 and RE7 drives opening and closing of car door. Car door parks closed when lift is waiting at floor..
7 - automatic / automatic - waiting with open door NOTE: NOT FOR USE I N THE EU
I nputs 8 and 9 main module are short connected. Car door contact is connected between inputs 9 and 10 main module. Series connected switches of landing doors are connected between inputs 10 and 11 main module. Outputs RE8 and RE7 drives opening and closing of car door. Car door parks opened when lift is waiting at floor..
8 - automatic doors without limit switches / automatic
I nputs 8 and 9 main module are short connected. Car door contact is connected between inputs 9 and 10 main module. Series connected switches of landing doors are connected between inputs 10 and 11 main module. Outputs RE8 and RE7 drives opening and closing of car door. Car door parks closed when lift is waiting at floor. Park time defined with parameter V3 output RE7 for close door goes off
V14 – V61 OPENING DOORS FLOOR 1 - 48 |
0 - 3 |
||
Possible setting is 0 do 3 |
0 |
car doors are closed |
|
|
1 |
opening of doors A |
|
|
2 |
opening of doors B |
|
|
3 |
opening of doors A and B |
|
31 |
291 842 003 |
6.8. 6P PARAMETERS
P0 SYSTEM TYPE
1E - type classic 8 stops
2 E - type classic 12 stops
3 E - type classic 16 stops
4 E - type classic 24 stops
5 |
E - type serial |
24 |
stops |
6 |
E - type serial |
48 |
stops |
1 - 6
UP and DOWN collective ( main and car modules ) DOWN collective ( main and car modules )
UP and DOWN collective ( main, car and ext modules ) DOWN collective ( main, car and ext modules )
UP and DOWN collective ( main, car modules and nodes )
UP and DOWN collective ( main, car, ext modules and nodes )
P1 ELEVATOR TYPE |
0 - 4 |
0 - electric two speed - or one speed
1 - electric VVVF
2 - hydraulic type 1 - delay of pump on travel UP time of delay is defined in parameter P11 (delay time) 3 - hydraulic type 2 - no delays
4 - hydraulic type 3 - delay of valves on travel UP time of delay is defined in parameter P11 (delay time)
P2 |
OPERATION SYSTEM |
|
1 - 7 |
||
1 |
- up and down collective two buttons |
|
|
||
2 |
– down collective only single button |
|
|
||
3 |
– down collective all floors + |
2 floors up and down, single button |
|
|
|
4 |
– down collective all floors + |
2 and 3 floor up and down |
|
|
|
5 |
– down collective all floors + |
2 + 3 and 4 floor up and down |
|
|
|
6 |
– not in use |
|
|
|
|
7 |
- APB - only 1 call at any one time |
|
|
||
P3 |
COUNTING SYSTEM |
|
1 - 8 |
||
1 |
- 4 switches |
stop up |
input |
12 main module |
|
|
|
|
stop down |
input |
13 main module |
|
|
|
slow speed up |
input |
15 main module |
|
|
|
slow speed down |
input |
16 main module |
2 |
– incremental pulses (in preparation) |
|
|
||
3 |
- 1 switch |
stop and slow speed |
input |
12 and 13 main module |
|
4 |
- 3 switches ( 2 switches ) |
stop up |
input |
12 main module |
|
|
|
|
stop down |
input |
13 main module |
|
|
|
slow speed |
input |
14 main module |
5 |
- 3 switches ( 2 switches ) |
stop up |
input |
12 main module |
|
|
|
|
stop down |
input |
13 main module |
|
|
|
slow speed |
input |
14 main module |
6 |
- 6 switches - tip 1 + zone A and B slow speed up |
input |
12 main module |
||
|
|
|
slow speed down |
input |
13 main module |
|
|
|
zone A and B |
input |
14 main module |
|
|
|
relevelling up |
input |
15 main module |
|
|
|
relevelling down |
input |
16 main module |
32 |
291 842 003 |
7 - 5 switches - tip 4 + zone A and B |
zone A |
input |
12 main mo dule |
|
|
|
zone B |
input |
13 main module |
|
|
relevelling up |
input |
15 main module |
|
|
relevelling down |
input |
16 main module |
|
|
slow speed |
input |
14 main module |
8 - 5 switches - tip 5 + zone A and B |
zone A |
input |
12 main module |
|
|
|
zone B |
input |
13 main module |
|
|
relevelling up |
input |
15 main module |
|
|
relevelling down |
input |
16 main module |
|
|
slow speed |
input |
14 main module |
P4 |
NUMBER OF FLOORS |
|
|
2 - 48 |
Defines the number of floors for the lift . Change of value will be valid only after restart of CPU (power off and on)
P5 ARRIVAL (GONG) OUTPUT TYPE |
1 - 8 |
1 and 5 – starts on change down to slow speed.
Output is activated when the lift changes speed from fast to slow . Length of time is defined in parameter F14.
2 and 6 - starts when lift stops at floor level.
Output is activated when lift has stopped at floor level. Length of time is defined in parameter F14.
3 and 7 - starts in slow speed but only active if floor call present .
Output is activated when lift changes speed from fast to slow but only if the landing call is active at the current floor. Length of time is defined in parameter F14.
4 and 8 - starts when lift has stopped at floor and has active floor call.
Output is activated when lift arrives at floor level but only if the landing call is active at that floor. Length of time is defined with parameter F14.
5, 6, 7 and 8 – two outputs for gong.
When lift is traveling down gong output (49 car), and when is traveling up »out of work« output (50 car) is switched on. Output »out of work« doesn't have its basic function in this case.
P6 DIRECTION INDICATOR OUTPUT TYPE |
1 - 4 |
Setting is valid for direction outputs on CAR module and NODE modules!
1 – when lift running + direction hold time.
Outputs for direction (47 and 48 car) are active during all drive time (fast and slow speed) and during direction hold time (parameter F4) .
2 – when lift running only.
Outputs for direction (47 and 48 car) are active during all drive time (fast and slow speed) .
3 – when lift is in slow speed and waiting at floor.
Outputs for direction (47 and 48 car) are active when lift is in slow speed and when waiting at a floor. When the lift is waiting at a floor without calls both outputs (47 and 48 car) are activated.
4 – when lift is waiting at a floor.
Outputs for direction (47 and 48 car) are active when lift is waiting at a floor. When lift is waiting at a floor without calls both outputs (47 and 48 car) are activated.
33 |
291 842 003 |
P7 |
OUTPUT FROM FIRE ALARM |
0 - 2 |
|
0 |
– Lift works normally after end of fire alarm |
|
|
After input (20 main - fire alarm) goes off the lift resumes work normally |
|
||
1 |
- Power off and on after end of fire alarm |
|
|
After input (20 main - fire alarm) goes off, restart of CPU is necessary for normal working (power off and power on again)
2 - maintenance on and maintenance off after fire alarm
After input (20 main - fire alarm) goes off it is necessary for maintenance input (09 car) to be switched on and off for normal working to be resumed
P8 DOORS IN FIRE ALARM |
0 - 5 |
Definition for doors when fire alarm input (input 20 main) is activated. I nput for fire alarm is defined as on when the remote alarm contact is closed. Conversion to a normally closed contact is not possible. With these parameter we also select European or Australian norm:
0 – doors in fire alarm closed – fire drive in AS 1735.2 norm,
1 - doors in fire alarm opened – fire drive in AS 1735.2 norm, 2 - doors in fire alarm closed - fire drive in EN81- 72 norm,
3 - doors in fire alarm opened - fire drive in EN81- 72 norm,
4 - doors in fire alarm closed - fire drive in EN81- 72 norm, when fire drive is on doors are closing with reduced power regardless to door obstruction,
5 - doors in fire alarm opened - fire drive in EN81- 72 norm, when fire drive is on doors are closing with reduced power regardless to door obstruction.
Doors are opened when lift comes to the fire alarm floor and then closed or not regarding to parameter P8. I t is possible to open doors later with car and landing call buttons or with opening door button.
ATTENTION
When doors are closing and obstruction is present door slow speed must be made with relay logic. (EN81- 72 norm chapter 5.8.6)
P9 CORRECTION AT SLIP |
0 - 1 |
0 - if the lift drops the input for the stop signal after it has stopped at a floor before the time of stabilization (parameter P23) The lift will continue to the next floor in the same direction in fast speed.
1 - if the lift drops the input for the stop signal after it has stopped at a floor before the time of stabilization (parameter P23) The lift is reversed back to previous floor in slow speed in the opposite direction
P10 STAR DELTA TIMER |
0 - 20 sec. |
Timer for the pump change- over in star delta connection. On starting, outputs (relay RE1 terminals 44,45 main) and (relay RE3 terminals 38,39 main) are activated. After the star delta timer output (relay RE3) goes off and output (relay RE2 terminals 41,42 main) goes on.
P11 PUMP OR VALVES DELAY TIME |
0.0 - 9.9 sec. |
Timer defining the delay of outputs for the pump or valves after the end of travel in up direction on hydraulic lifts. Selection between pump or valves is made with parameter P1 (settings 2 or 4 ) .
P12 SPEED AT TEST slow / fast |
1 - 2 |
1 - maintenance ( test ) speed is low speed 2 - maintenance ( test ) speed is high speed
34 |
291 842 003 |
P13 |
PARKING STATION |
0 |
- 48 |
Definition of parking station . I f input value is 0 parking is disabled. |
|
|
|
Time without calls needed before parking is defined with parameter F2. |
|
|
|
I f value is set to 99, the AUTOPARK system is in use. Lift define most usable station for each 30 |
minutes |
||
as parking station. |
|
|
|
P14 |
PARKING STATION FOR FILLING |
0 |
- 48 |
Definition of parking station for filling . I f input value is 0 filling is disabled. |
|
|
|
Time without calls needed bef ore parking is defined with parameter F3. |
|
|
|
Real time for filling function is define with parameters F6, F7, F8 and F9 |
|
|
|
P15 |
PARKING STATION FOR EMPTYING |
0 |
- 48 |
Definition of parking station for emptying . I f input value is 0 emptying is disabled. |
|
|
|
Time without calls needed before parking is defined with parameter F3. |
|
|
|
Real time for emptying function is define with parameters F10, F11, F12 and F13 |
|
|
|
P16 |
FIRE ALARM STATION |
1 |
- 48 |
Defines fire alarm floor. Setting 0 is not possible. Lift goes to fire alarm floor when input for fire alarm (input 20 main) becomes active.
P17 SHORT DRIVE |
0 - 5 |
Possible setting is from 0 to 5 stations. This function is used with VVVF regulation. I f call is in area of this stations, elevator will start with middle speed and calculate delay for change speed from middle to slow
P18 DELAY SHORT DRIVE |
0,0 - 9,9 sec. |
Possible setting is from 0 to 99 miliseconds |
|
This is delay for slow speed when elevator work with middle speed in short drive function. |
|
P19 TRAVEL TIME - FAST SPEED |
0 - 450 sec. |
Security timer. Timer runs when the lift is in fast speed. W hen t he lift reaches sw it ch for st op in
st at ion t he t imer runs again. The lift must reach next station or stop before this timer reaches zero. I f the timer reaches zero during fast speed all outputs are disabled. Reset is only possible by switching the power off and back on after a few seconds
Timer is disabled when it is set to 0.
P20 TRAVEL TIME - SLOW SPEED |
0 - 450 sec. |
Security timer. Timer runs when the lift is in slow speed. The lift must stop before this timer reaches zero. I f the timer reaches zero during slow speed all outputs are disabled . Reset is only possible by switching the power off and back on after a few seconds
Timer is disabled when it is set to 00.
P21 TRAVEL TIME – TEST SPEED |
0 - 450 sec. |
Security timer. Timer runs when the lift is driven on maintenance ( test ) . The lift must stop before this timer reaches zero. I f the timer reaches zero during maintenance drive all outputs are disabled. Reset is only possible by switching the power off and back on after a few seconds
Timer is disabled when it is set to 00..
P22 SWITCH |
0.0 - 9.0 sec. |
Timer to eliminate double counting because of bad contacts on the switches for counting and positioning. This timer is active on inputs 12, 13, 14, 15 and 16 in main module. After changing the state of these inputs the input is enabled for the period of this timer. The timer runs for each input indep endently.
35 |
291 842 003 |
P23 STABILIZATION TIME |
0.0 - 9.0 sec. |
Timer starts after the end of travel. I n the period of this timer all activities are disabled. After this time expires the next stage starts (opening doors, drive with fast or slow speed etc. )
P24 YEAR
Setting of year in date for real time clock
P25 MONTH
Setting of year in date for real time clock
P26 DAY
Setting of year in date for real time clock
P27 HOUR
Setting of year in date for real time clock
P28 MINUTE
Setting of year in date for real time clock
P29 |
GROUP |
1 |
- 4 |
|
|
Possible setting is 1 to 4 |
|
|
|
|
1 |
one elevator – simplex |
|
|
|
2 |
up to 8 equal elevators |
|
|
|
3 |
reserved ( do not use ) |
|
|
|
4 |
reserved ( do not use ) |
|
|
P30 |
NUMBER OF ELEVATORS IN GROUP |
1 |
- 8 |
|
P31 |
ELEVATOR NUMBER |
1 |
- 8 |
|
Each elevator in group operation must have different number. |
|
|
||
Numbers starts from number one. |
|
|
||
P32 FLOOR SHIFT IN GROUP |
0 |
- 8 |
||
This setting allows group operation with shifted floors. I f the 1st station of the lift is in the level of 2nd or 3rd station of other lift in group, difference can be written in this parameter.
Setting of display PK96 is the same for all elevators in group. I t should be set according to the lift with the
lowest first sta tion. |
|
|
Example for two elevators connected in duplex: |
|
|
Elevator 1 |
with stations C2, C1, G, 1, 2; setting of P32= 0, P4= 5; setting of PK96 is C2, C1, G, 1, 2. |
|
Elevator 2 |
with stations G, 1, 2; setting of P32= 2, P4= 3; setting of PK96 is C2, C1, G, 1, 2. |
|
P33 MAX. FLOORS FOR SINGLE DRIVE |
0 - 48 |
|
Maximal number of floors for single drive. I t should be set in case when traveling time between first and last station is longer than maximal allowed traveling time.
When lift reaches preset number of floors it stops in station and then continues to desired station. Function is disabled when this parameter is set to 0.
P34 DIRECTION INDICATOR ON DISPLAY |
1 - 4 |
Setting is valid for direction display on PK96 dot- matrix display!
1 – when lift running + direction hold time.
Outputs for direction (47 and 48 car) are active during all drive time (fast and slow speed) and during direction hold time (parameter F4) .
36 |
291 842 003 |
2 – when lift running only.
Outputs for direction (47 and 48 car) are active during all drive time (fast and slow speed) .
3 – when lift is in slow speed and waiting at floor.
Outputs for direction (47 and 48 car) are active when lift is in slow speed and when waiting at a floor. When the lift is waiting at a floor without calls both outputs (47 and 48 car) are activated.
4 – when lift is waiting at a floor.
Outputs for direction (47 and 48 car) are active when lift is waiting at a floor. When lift is waiting at a floor without calls both outputs (47 and 48 car) are activated.
6.9.7D SPECIAL DRIVES
D1 |
RESERVED |
(TEST DRIVE) |
0 |
- 1 |
DI SABLED |
( ACCORDI NG EU RULES ) |
|
|
|
D2 |
RESERVED |
(EXTRACTING) |
0 |
- 1 |
DI SABLED |
( ACCORDI NG EU RULES ) |
|
|
|
D3 |
RESERVED |
(MOVE FOR ONE FLOOR) |
+ / - 1 |
|
Elevator can drive one floor up od down by thi s command |
|
|
||
8 = UP, |
2 = DOWN |
|
|
|
D4 |
RESERVED |
(MOVE TO FLOOR) |
1 |
- 48 |
Elevator can drive to desire floor by this comand |
|
|
||
D5 |
DEMO SYSTEM |
minute |
0 |
- 99 |
Demonstration system is system wich generates random commands for elevator. Also all commands wich are present by passangers are valid. Time for duration of this mode is entering in minutes. After this time is running out elevator continues with normal operation.
D6 HOLD AFTER TEST |
0 - 1 |
We can select between setting 0 or 1. I f we input 0, this function is deactivated. When 1 is set function is in operation. I n normal mode this function have no influence to work. Also start of maintenance mode and all maintenance mode is normal. When we put elevator from maintenace mode to normal mode again, it will not start but hold until we put 0 to this parameter again. Also turn main switch off and on again will made that elevator will
start working.
D7 |
LANDING CALLS OFF |
0 |
- |
1 |
Put 1 to this function will made that all landing calls will not be valid and not accepted |
|
|
|
|
D8 |
OPENING DOORS OFF |
0 |
- |
1 |
Put 1 to this function will made that doors will not be opened in stations.
37 |
291 842 003 |
6.10.8S ENCODER SETTINGS – in preparation
S1 |
ENCODER CODE |
2602 |
Code to avoid unwanted acces to encoder menu |
|
|
S2 |
LEARNING |
0N / 0FF ( 1 - 0) |
CPU |
will read distances between stations. Lift will go down to bottom, |
|
than up to top and down to bottom again. |
|
|
Lift must not be stopped during this function. |
|
|
S3 |
DISTANCE OF SWITCH SLOW DOWN |
increments |
Distance between slow down point and stop point in increments of encoder |
|
|
S4 |
DISTANCE OF SWITCH SLOW UP |
increments |
Distance between slow up point and stop point in increments of encoder |
|
|
S5 – S51 LEVEL OF STATION 2 - 48 |
increments |
|
Position of station in increments of encoder. Value is automaticaly calculated |
|
|
in Learning function and can be manually adjust |
|
|
6.11.9I INPUT / OUTPUT SETTINGS
I1 |
SLOW SPEED |
|
NO / NC |
( 0 - 1) |
|
Definiti on for terminal 14 - main module |
|
|
|
|
|
I2 |
RELEVELLING UP |
|
NO / NC |
( 0 - 1) |
|
Definition for terminal 15 - main module |
|
|
|
|
|
I3 |
RELEVELLING DOWN |
|
NO / NC |
( 0 - 1) |
|
Definition for terminal 16 - main module |
|
|
|
|
|
I4 |
MAINTENANCE ON |
|
NO / NC |
( 0 - 1) |
|
Definition for terminal 17 - main module |
and terminal 09 - car module |
|
|
|
|
I5 |
MAINTENANCE UP |
|
NO / NC |
( 0 - 1) |
|
Definition for terminal 18 - main module |
and terminal 10 - car module |
|
|
|
|
I6 |
MAINTENANCE DOWN |
|
NO / NC |
( 0 |
- 1) |
Definition for terminal 19 - main module |
and terminal 11 - car module |
|
|
|
|
I7 |
FIRE DRIVE |
|
NO / NC |
( 0 |
- 1) |
Definition for terminal 20 - main module |
|
|
|
|
|
I8 |
ELEMENTS CHECK |
|
NO / NC |
( 0 |
- 1) |
Definition for terminal 21 - main module |
|
|
|
|
|
I9 |
STOP IN STATION DOWN ( ZONE B ) |
NO / NC |
( 0 |
- 1) |
|
Definition for terminal 13 - main module |
|
|
|
|
|
38 |
291 842 003 |
I10 |
STOP IN STATION UP ( ZONE A ) |
NO / NC ( 0 - 1) |
Definition for terminal 12 - main module |
|
|
I11 |
reserved |
|
I12 |
POSITION INDICATOR TYPE |
0 - 1 |
Definition for type of digital position outputs
0- decimal ( wire per floor )
1 - binary
I13 |
BINARY INDICATOR TYPE |
0 - 1 |
|
Definition for binary position output |
|
||
0 |
- |
position for first floor is |
0 0 0 0 0 0 |
|
|
position for second floor is |
0 0 0 0 0 1 |
|
|
position for thirth floor is |
0 0 0 0 1 0 |
|
|
position for fourth floor is |
0 0 0 0 1 1 |
1 |
- |
position for first floor is |
0 0 0 0 0 1 |
|
|
position for second floor is |
0 0 0 0 1 0 |
|
|
position for thirth floor is |
0 0 0 0 1 1 |
|
|
position for fourth floor is |
0 0 0 1 0 0 |
I14 |
DOOR OPEN A |
NO / NC |
( 0 - 1) |
|
Definition for terminal 68 - car module |
|
|
|
|
I15 |
DOOR OPEN B |
NO / NC |
( 0 - 1) |
|
Definition for terminal 69 - car module |
|
|
|
|
I16 |
DOOR CLOSE |
NO / NC |
( 0 - 1) |
|
Definition for terminal 70 - car module |
|
|
|
|
I17 DOORS OPEN OUT OF STATION |
NO / YES |
( 0 - 1) |
||
I f there is no “ stop in station” signal and value is 0 doors can not open in any case |
|
|
||
I18 |
CAR FULL LOAD |
NO / NC |
( 0 |
- 1) |
Definition for terminal 05 - car module |
|
|
|
|
I19 |
CAR OVERLOAD |
NO / NC |
( 0 |
- 1) |
Definition for terminal 06 - car module |
|
|
|
|
I20 |
PRIORITY DRIVE |
NO / NC |
( 0 |
- 1) |
Definition for terminal 07 - car module |
|
|
|
|
I21 |
FIREFIGHTERS DRIVE |
NO / NC |
( 0 |
- 1) |
Definition for terminal 08 - car module |
|
|
|
|
39 |
291 842 003 |
6.12.0W SAVE SETTINGS TO EEPROM
After changes parameters are stored only in working memory. To save parameters to permanent memory, function W (Save settings to EEPROM) must be executed. To save the parameters elevator must be in maintenance mode. This is made to avoid change in parameters by other people than officially maintenance personal.
WARNING
Elevator parameters must be saved to permanent memory in 10 minutes after change. Otherwise elevator stops and previous parameter set is restored. After that elevator goes to first drive and works normal with previous parameter set .
6.13.PRESETING AND FACTORY RESET
Parameter preseting is made in production process and it depens on customer order. With that parameters is also made complete testing.
Preset parameters are placed in the last page of instructions. There is also place made where installer can write parameters which he will change during the instalation.
WARNING
SEC ELECTRONI CS is not responsible for all additional parameter changing, which would be made from non authorizated person and could bring to controller or person damage,.
FACTORY RESET can be made when the power is ON, controller is in maintenance mode (terminal 17 on main module) . We must activate for 1 second, fire drive (terminal 20 on main module) maintenance up and maintenance down (terminals 18 and 19 on main module ) at the same time. These function is possible only 10 seconds after the controller is powered ON (LED display is ON) .
WARNING
When factory reset is made parameters are diferent as preset values. I s essential to made parameter correction. Look to the list of preset paramet ers or cont act SEC ELECTRONI CS!
WARNING
Between factory reset procedure it could came to uncontrollable controller activity so all controller outputs must be disconected.
40 |
291 842 003 |
Parameters after factory reset:
Parameter F |
Value |
|
|
|
|
01 Lock door time [1 - 20s] |
10 |
|
02 |
Parking time [5 - 1250s]* |
120 |
03 |
Parking time filling/emptying [5 - 1250s]* |
15 |
|
|
|
04 |
Direction hold time [1 - 20s] |
2 |
05 |
Call delay timer [s] |
2 |
06 |
Start filling [hh] |
0 |
|
|
|
07 |
Start filling [mm] |
0 |
08 |
Stop filling [hh] |
0 |
09 Stop filling [mm] |
0 |
|
|
|
|
10 |
Start emptying [hh] |
0 |
|
|
|
11 |
Start emptying [mm] |
0 |
12 |
End emptying [hh] |
0 |
|
|
|
13 |
End emptying [mm] |
0 |
|
|
|
14 |
Group time [1 - 99s] |
20 |
15 |
Arrival gong time [1 - 20s] |
5 |
16 |
Cabine blower time [1 - 90s] |
20 |
|
|
|
17 |
Button backlight [0 - 50%] |
0 |
18 |
Beep time [0,0 - 0,7s] |
0 |
19 |
Gong delay time [1 - 20s] |
1 |
|
|
|
Parameter V |
Value |
|
|
|
|
01 |
Open door time [1 - 60s] |
3 |
02 |
Closing door time [1 - 60s] |
10 |
|
|
|
03 |
Hold door time [1 - 60s] |
1 |
04 Exchange close/open [0,1 - 9,9s]* |
0,5 |
|
|
|
|
05 |
Door error time [1 - 10min] |
1 |
|
|
|
06 |
Extend open door time [1 - 60s] |
1 |
07 |
Special open door time [1 - 60s] |
1 |
|
|
|
08 |
Input photocell door A |
0 |
|
|
|
09 |
Input obstruction door A |
0 |
10 |
Input photocell door B |
0 |
|
|
|
11 |
Input obstruction door B |
0 |
|
|
|
12 |
Preopening doors [0,1,2] |
0 |
13 |
Door type [1 - 8] |
6 |
|
|
|
14 |
Opening doors floor 1 - 48 |
1 |
Parameter P |
Value |
|
|
|
|
00 |
System type |
1 |
01 |
Elevator type |
0 |
02 |
Operation system |
1 |
|
|
|
03 |
Counting system |
4 |
04 |
Number of stations |
8 |
05 |
Arrival output type |
1 |
|
|
|
06 |
Direction indicator outputs type |
1 |
07 |
Ouput from fire alarm |
0 |
08 |
Doors in fire alarm, EU/AUS |
0 |
|
|
|
09 |
Correction at slip |
1 |
|
|
|
10 |
Star delta time [0 - 20s] |
1 |
11 |
Pump or valves delay time [0,1 - 9,9s]* |
1 |
|
|
|
12 |
Speed on maintenance |
1 |
|
|
|
13 |
Parking station |
0 |
14 |
Parking station filling |
0 |
15 |
Parking station emptying |
0 |
|
|
|
16 |
Fire alarm station |
1 |
17 |
Short drive |
0 |
18 |
Switch delay short drive |
0 |
|
|
|
19 |
Flight time - fast speed [0 - 450s] |
300 |
20 |
Flight time - slow speed [0 - 450s] |
300 |
21 |
Flight time - maint. speed [0 - 450s] |
0 |
|
|
|
22 |
Switch debounce time [0,0s - 9,9s]* |
1 |
23 |
Stabilisation time [0,0 - 9,9s]* |
1 |
|
|
|
29 |
Group |
1 |
|
|
|
30 |
Number of lifts in group |
1 |
31 |
Lift number in group |
1 |
|
|
|
32 |
Floor shift in group |
0 |
|
|
|
33 |
Max. floors for single drive |
0 |
34 |
Direction indicator on display |
2 |
|
|
|
NOTE * - The value on console is different, this is the value on computer editor - I nput logic: I 04 and I 08 have value 1, other 0
- Parameters D – all values are 0
41 |
291 842 003 |
7.ABBREVIATIONS
7.1.TERMINALS ON CONTROL PANEL
0ground
1 |
L1 input |
3F 400V (415V) AC 50 Hz (60 Hz) |
2L2 input
3 L3 input
4N input
NN input
Nc |
N input - neutral for cabin light |
5motor U1 main motor on electric elevator or pump motor on hydraulic elevator
6 motor V1
7 motor W1
8 motor U2
9 motor W2
10 motor V2
11 |
L input phase for cabin light |
|
Lc |
L input phase for cabin light |
|
12 |
door motor U1 |
DOOR A |
13door motor V1
14door mot or W1
15 |
door motor U1 |
DOOR B |
16door motor V1
17door mot or W1
18blower mot or U1 ( only on electric elevator )
19blower motor V1
20blower motor W1
21blower in cabin 230V AC
22oil heater
23 |
thermal switch for blower motor ( only on electric elevator ) |
|
24 |
thermal switch for blower motor |
|
25 |
brake |
( only on electric elevator ) |
25a |
brake |
second terminal ( if brake voltage is not insulated with transformer) |
26 |
ret iring cam |
( only on semiautomatic door ) |
26a |
retiring cam |
second terminal ( if retiring cam voltage is not insulated with transformer) |
27+ 48V
28fast speed limit switch down
29fast speed limit switch up
30
30A final limit switch in hydraulic systems
31 safety circuit start
31a safety circuit after stop in cabin
31b safety circuit after stop maintenance
31c safety circuit after maintenance switches
31d safery circuit after slack rope switch
42 |
291 842 003 |
32safety circuit after final limit switch
33safety circuit after safety gear switch
33a safety circuit after oil buffer switch
33b safety circuit after final limit switch - botto m
33c safety circuit after final limit switch - t op
34safety circuit after overspeed brake switch
34a safety circuit afer overspeed slack rope switch
35safety circuit after stop in shaft switch
36safety circuit after internal protections (phase failure, VVVF st at us et c )
37safety circuit after landing doors switches
38safety circuit after cabin door switch
39safety circuit after landing doors lock switches
40+ 48V
41open contact for door - common
42open contact for door - opening
43open contact for door - closing
44door close input
45
46end switch door opening
48end switch door closing
45B
46B end switch door B opening
47B
48B end switch door B closing
49door A open input
50door B open input
54photocell input door B
55obstruction input door B
56solenoid valve down
57solenoid valve up
58solenoid valve fast speed down
59solenoid valve fast speed up
61stop up switch or zone A switch
62stop down switch or zone B switch
63relevelling up swit ch
64relevelling down switch
65slow speed up switch
66slow speed down switch
67cabin full load switch
68cabin overload
69maintenance drive on switch
70maintenance drive up switch
71maintenance drive down swit ch
72button force door closing
73priority drive switch
74door photocell switch
75button force door opening
76door obstruction switch
43 |
291 842 003 |
121output cabin overload
122output arrival to station - gong
123output out of work
124output occupied / beeper
131output direction down
132output direction up
222 serial indicator - data
276solenoid valve down - hydraulic BERI NGER with module ELRV
276a
277 |
solenoid valve up - hydraulic BERI NGER with module ELRV |
277a |
|
351switch for emergency lower ing
352switch for emergency lowering
538 output for emergency door opening
360solenoid valve for emergency lowering ( 12V DC )
371output emergency alarm ( 12V DC )
372output emergency light ( 12V DC )
373emergency alarm button input (connection to the ground)
383thermistors in main motor or pump motor
A, B intercom connection
C1 |
- |
C48 |
cabin inputs 1 to 48 floor |
U1 |
- U48 |
upward calls 1 to 48 floor |
|
D1 |
- |
D48 |
downward calls 1 to 48 floor |
P1 - P48 |
position output 1 to 48 floor |
||
PA - PF |
position output - binary |
||
7.2.ELEMENTS ON CONTROL PANEL
K1 contactor UP
K2 cont act or DOWN
K3 cont act or FAST SPEED
K4 contactor SLOW SPEED
K6 contactor motor ( VVVF lift )
K6A contactor motor ( VVVF lift )
K18 contactor RETI RI NG CAM
K31 contactor PUMP STAR
K32 contactor PUMP ON
K33 contactor PUMP DELTA
K20 contactor motor BLOWER
K21 contactor door A open
K22 contactor door A close
K23 contactor door B open
K24 contactor door B close
44 |
291 842 003 |
R1 |
safety relay on safety circuit 185 |
R2 |
safety relay on safety circuit 185 |
R3 |
safety relay on safety circuit 185 |
R4 |
safety relay on safety circuit 185 |
R10 |
relay light in car |
R11 |
relay dow n |
R12 |
relay up |
R13 |
relay up and down |
R14 |
relay safety after cabin door |
R15 |
relay safety after doors locks |
R17 |
relay fast speed |
R18 |
relay retiring cam |
R30 |
relay emergency lowering |
R31 |
relay emergency lowering |
R32 |
relay emergency opening door |
R91 |
relay down – hydraulic BERI NGER module ELRV |
R92 |
relay up - hydraulic BERI NGER module ELRV |
R93 |
relay maintenance - hydraulic BERINGER module ELRV |
RL |
relay emergency light |
RB |
relay blower in the cabin |
F1 |
fuse for electronic board main |
F2 |
3F fuse for door motor |
F4 |
fuse transformer |
F5 |
fuse transformer |
F6 |
fuse 24V |
F7 |
fuse 48V |
F8 |
fuse 230V AC for contactors |
F31 |
3F fuse for motor |
V1 |
solenoid valve down |
V2 |
solenoid valve up |
V3 |
solenoid valve slow speed |
V4 |
solenoid valve fast speed |
V9 |
solenoid valve emergency lowering |
RE1 |
relay pump on |
RE2 |
relay pump delta |
RE3 |
relay pump star |
RE4 |
relay up |
RE5 |
relay dow n |
RE6 |
relay high speed |
RE7 |
relay door A close |
RE8 |
relay door A open |
RE9 |
relay door B close |
RE10 |
relay door B open |
45 |
291 842 003 |
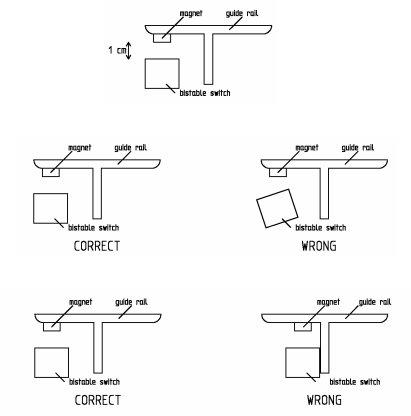
8.COUNTING SENSORS CONNECTION AND POSITION
E – type control panels can work with 7 different counting sensor installations. Correct counting system is selected through programming with parameter P3
All inputs for counting ( input 61, 62, 63, 64, 65 and 66) can be programmed as normally open or normally close inputs depending on switches used.
Some notes for installation:
NOTE bistable switches must be mounted correctly – cable is on bottom side of switch
NOTE There must be 10 mm space between magnet and switch for proper operation
NOTE magnet must be mounted at 90 degree angle according to switch
NOTE switches and magnets must not be mounted near to other metal parts ( bolts, brackets)
NOTE |
magnets for bistable switches must be correctly oriented ( black – white) |
NOTE |
first time bistable switches must be triggered manually ( by magnet ) |
NOTE |
prelimit switches described in this manual are bistable magnetic type which is not always |
|
acceptable – especially for speeds up to 1,6 m/ s where prelimit switches must be |
|
mechanical type |
|
(as final limit switch ) |
NOTE |
final limit switch is not described in this manual – but it is obligatory |
46 |
291 842 003 |
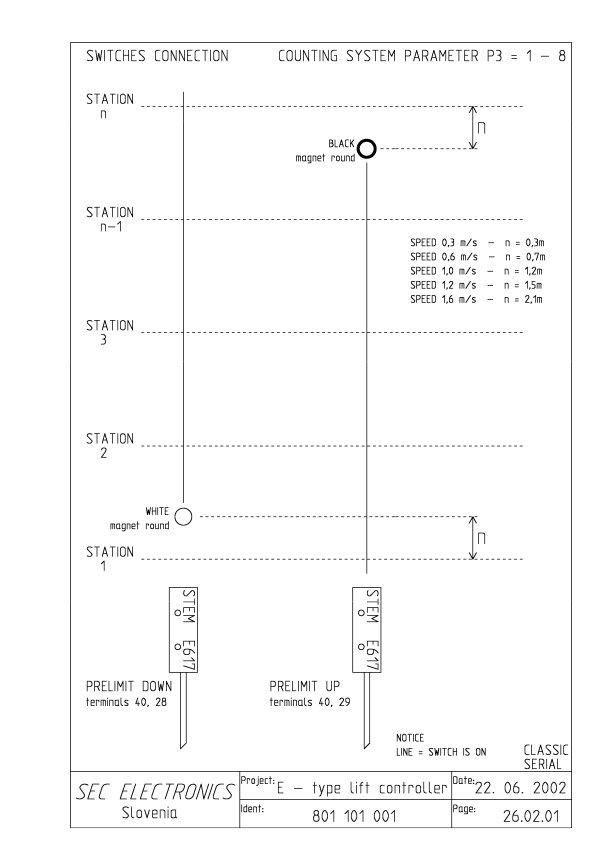
47 |
291 842 003 |
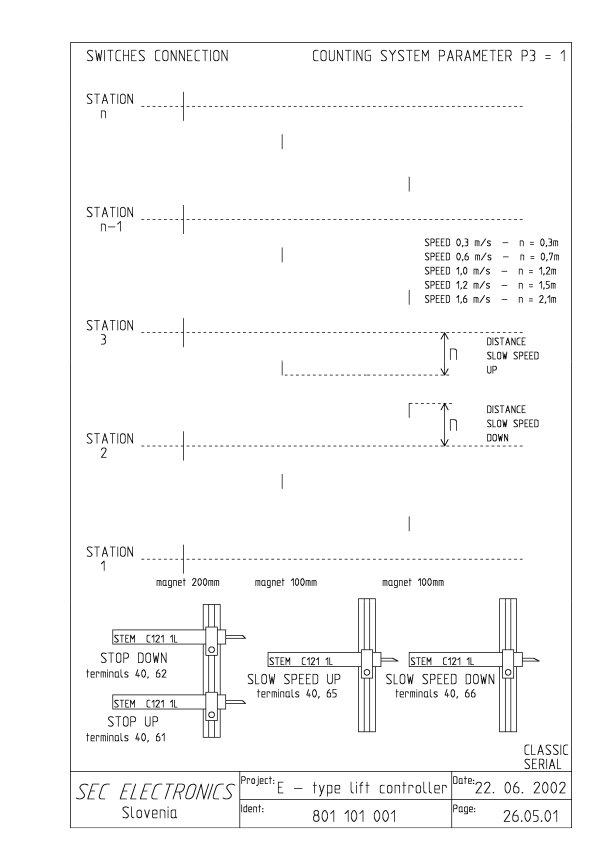
48 |
291 842 003 |
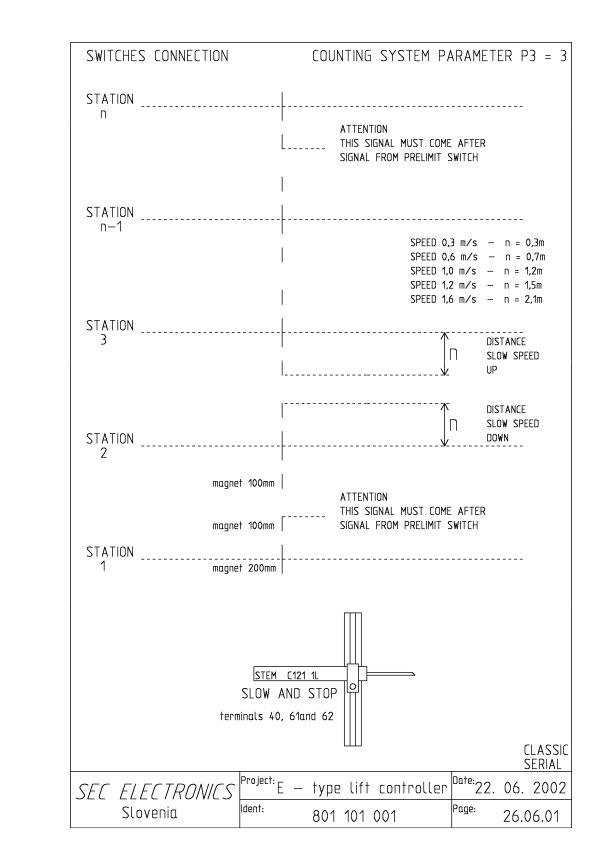
49 |
291 842 003 |
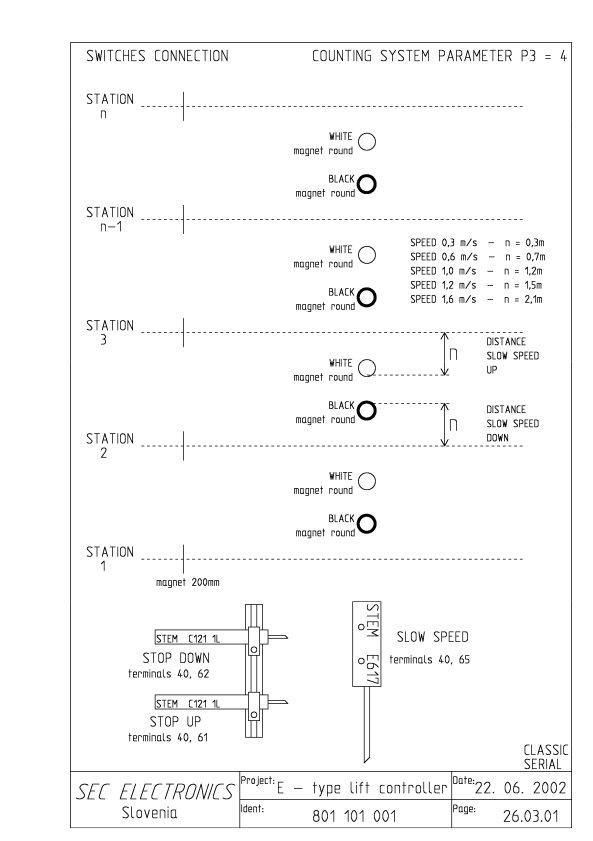
50 |
291 842 003 |
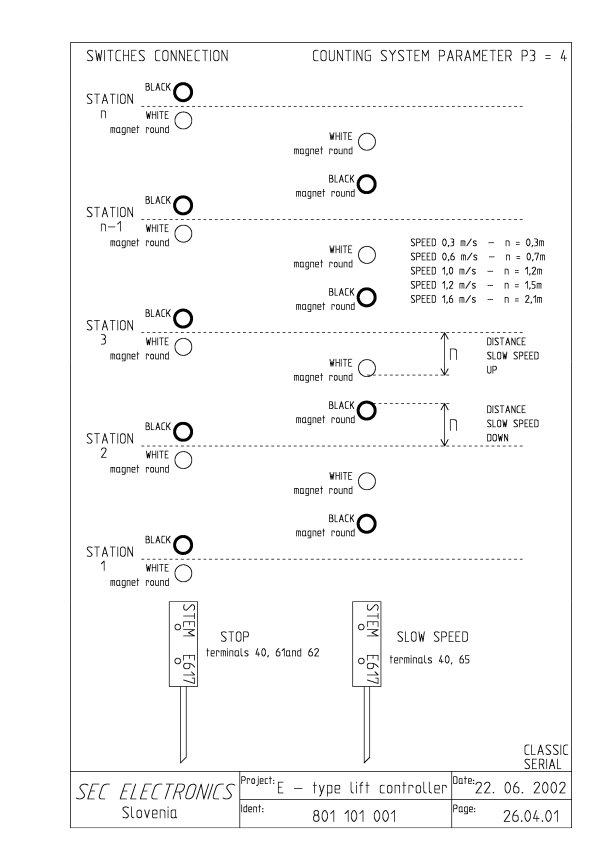
51 |
291 842 003 |
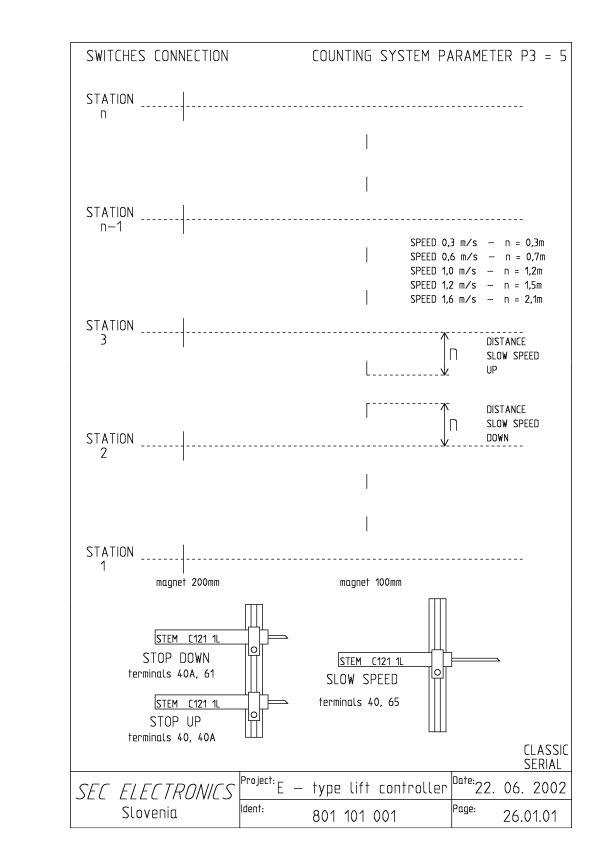
52 |
291 842 003 |
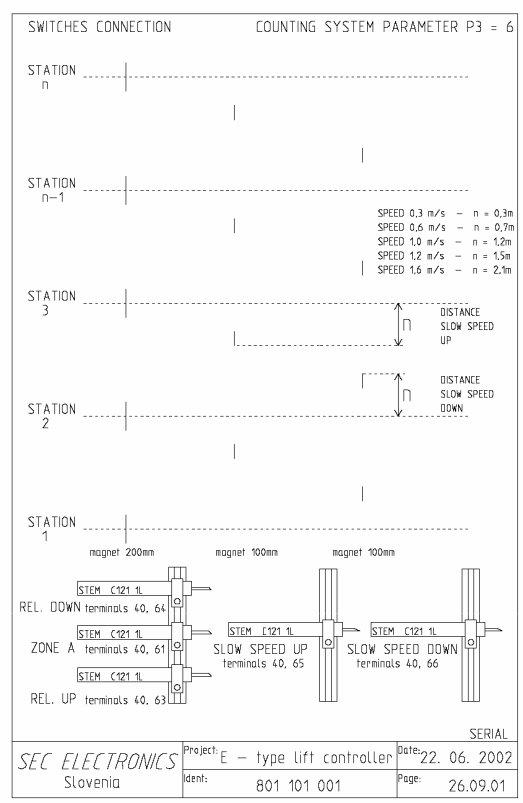
53 |
291 842 003 |
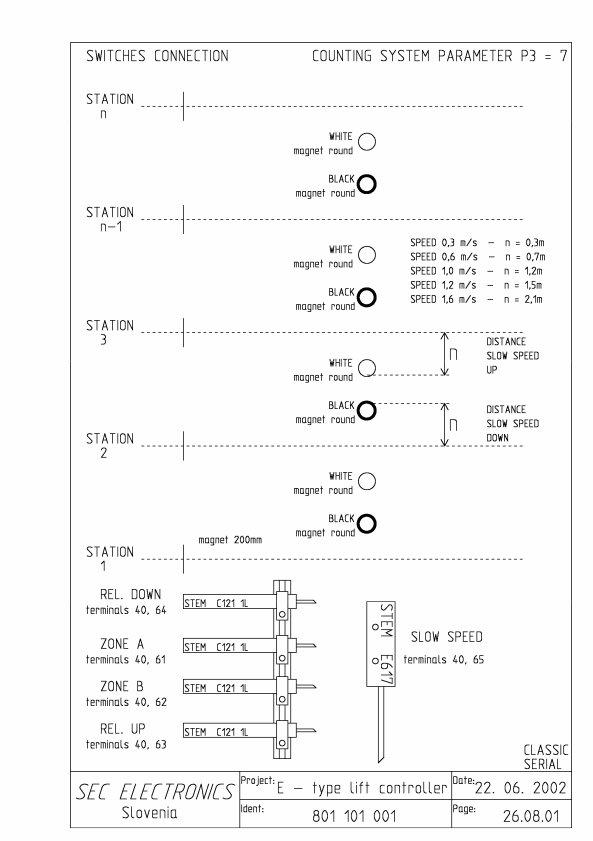
54 |
291 842 003 |
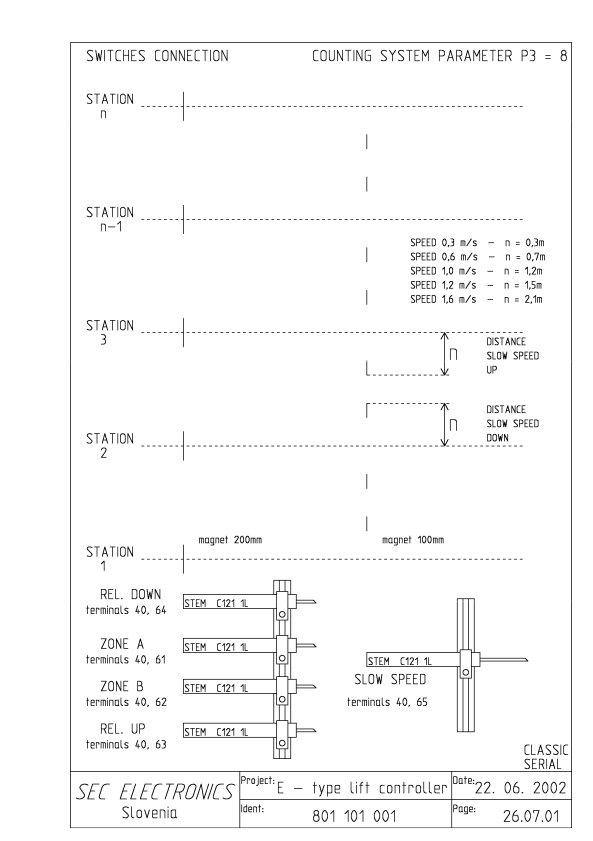
55 |
291 842 003 |
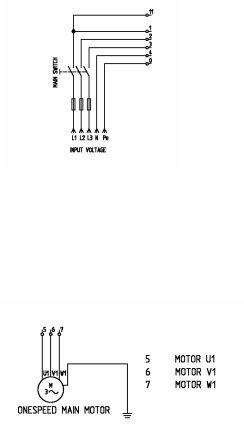
9.CONNECTION DURING INSTALLATION PHASE
WARNING – ATTENTION This wiring is temporary wiring acceptable only during installation phase. Wiring and use of lift systems under these conditions is permitted only for qualified personnel. Only qualified personnel may undertake the moving of the lift . After end of work, lift must be switched OFF. After installation phase, this temporary wiring must be removed, and replaced with normal and valid wiring system
WARNING – ATTENTION I nvolved personnel must be made fully aware that when using this wiring during installation phase, the only safety element for stopping lift is the stop button. No other device is connected to the system during this period.
WARNING – ATTENTION All wire bridges for terminal’s short circuit connection must be removed after the installation period and replaced with the valid wiring system.
WARNING – ATTENTION This method for installation is not valid in all countries. I n this case local and national safety regulation must be considered.
9.1. POWER SUPPLY
Power supply must be applied to the control panel. I n some version terminal Lc is used instead 11.
NOTE |
After switch ON check phase sequence device. BOTH LED DI ODES MUST LI T. I f not, |
|
switch supply OFF and change wires between terminals 2 and 3 (correct phase sequence) |
9.2. MOTOR CONNECTION
Terminals for one speed motor ( hydraulic direct start, hydraulic soft start, electric one speed electric VVVF, electric ACVV )
56 |
291 842 003 |
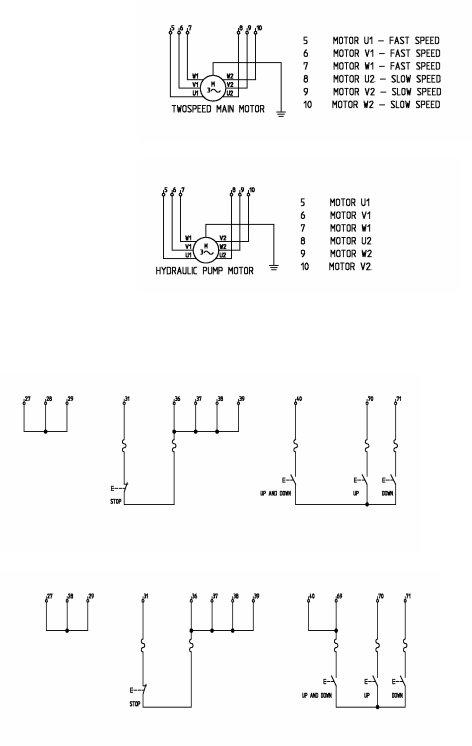
Terminals for two speed motor ( electric two speed)
Terminals for one speed motor with 6 wires ( hydraulic star delta start)
9.3. MAINTENANCE AND SAFETY CONNECTION
I f switch for maintenance drive is normally close ( parameter I 4 is 1) connection is:
I f switch for maintenance drive is normally open ( parameter I 4 is 0) connection is:
NOTE I n some systems terminal 27 is not in use. I n this case terminal 40 is the same as terminal 27
At hidraulic lift instalation we must also bridge terminals 30 and 30A (final limit switch) .
WARNING – ATTENTION
Prelimit and final limit switches are not connected in this case and therefore offer no protection from over travel of the lift car
57 |
291 842 003 |
10.START UP
10.1.PREPOWER CHECKS
The following should be checked before switching ON the control panel:
Grounds / Grounding
Verify ground connections control panel to main motor and control panel to car Verify ground connections input to control panel
Verify AC I nput, AC Output and control wiring aren’t grounded
Connections |
|
Verify AC I nput connections |
( 0, 1, 2, 3, 4, 11 ) |
Verify main motor connections |
( 5, 6, 7, 8, 9, 10 ) |
Verify prelimit switches connections |
( 27, 28, 29 ) |
Verify safety line connections |
( 30,30A,31,31A,31C,31D,32,33,33A,33B,33C,34,34A, |
|
35,36,37,38,39 ) |
Verify stop in station switches connections |
( 61, 62, 63, 64 ) |
Switch maintenance drive ON |
( 69 ) |
WARNING On first switching on, the control panel must be in maintenance mode
10.2. VOLTAGE AND CONTROL ELEMENTS CHECK
After first switching on the control voltages in system:
Measure 48V DC on terminal 40. Measured voltage must be in range between 60 and 70 V DC
NOTE This voltage have smoothing capacitor
Measure 24V DC on terminal 80. Measured voltage must be in range between 24 and 30 V DC
NOTE This voltage have smoothing capacitor
Measure 12V DC from accumulator charger on faston connectors by removing accumulator. Red faston connector is + 12V DC and black one is grou nd. Measured voltage must be in range between 13 and 15 V DC
NOTE When accumulator is applied this voltage goes down to 13 V DC
Check phase sequence device. BOTH LED DI ODES MUST LI T. I f not, switch supply OFF and change wires between terminals 2 and 3 ( correct phase sequence)
Check PTC module ( thermistor control ) . LED PTC OK must lit . I f not, check thermistors and switches connected on terminals 383, 384.
58 |
291 842 003 |
10.3. MAINTENANCE MODE
Move the car upward by pressing maintenance up button ( terminal 70 ). Lift must stop on upper prelimit switch
(terminal 29 ) which means that this switch function normally. Check of upper prelimit switch is possible with LED “FAST SPEED LI MI T SWI TCH UP” . This LED is ON when switch is ON.
Move the car downward by pressing maintenance down button ( terminal 71 ) . Lift must stop on lower prelimit switch
(terminal 28 ) which means that this switch function normally. Check of lower prelimit switch is possible with LED “ FAST SPEED LI MI T SWI TCH DOWN” . This LED is ON when switch is ON.
Check the function of final limit switch ( bottom and top ) .
On maintenance mode door tests are possible:
By pressing car call 1 ( terminal C1 ), doors will open
By pressing car call 2 ( terminal C2 ) . doors will close
WARNING Maintenance up button must move lift up. I f lift goes down, change wires in main motor connections. I f a two speed motor is applied, the fast speed wires must be changed also
WARNING I n hydraulic lift check correct pump rotation. I f pump runs in reverse change wires in pump motor connections
10.4. NORMAL MODE
I f lift works normally in maintenance mode, switch from maintenance mode to normal mode.
I f lower prelimit switch is ON:
Lift will start down with fast speed. Lift will switch to slow speed when lower prelimit switch goes off. Lift will stop in station when stop down signal goes on.
I f lower prelimit switch is OFF:
Lift will start up with fast speed. Lift will switch to slow speed when slow speed up signal will come. Lift will stop in station when stop up signal goes on.
After lift comes to the station all functions work normally. Doors will open and lift is ready for operation.
NOTE |
When lift is in station LED “ ELEMENTS CHECK” must light . This LED checks the operation |
|
of relays, contactors, thermo switches and thermistors |
59 |
291 842 003 |
10.5. TROUBLESHOOTING
LIFT WILL NOT OPERATE IN MAINTENANCE MODE
check AC input voltage on terminals 1, 2 and 3, check AC input neutral on terminal 4, check AC input voltage on terminal 11 ( if exist)
check proper operation of “ phase sequence and failure device” . I n normal operation both LED’s lit .
check fuses and motor protection devices |
|
check low voltage in system: |
48V DC on terminal 40 ( 60 – 70 VDC ) |
|
24V DC on terminal 80 ( 24 – 30 VDC ) |
|
5V DC L ED in PCB “ 5V DC” |
check safety line on terminals 31, 36, 37, 38, 39 ( use first LED’s in PCB “ safety circuit 36, 37, 38 and 39 ) . Measure also voltage in terminals 31, 36, 37, 38 and 39. Voltage range must be between 60 and 70 VDC. LED’s are only indicators for voltage presence but voltage can be too low .
check prelimit switches on terminals 28 and 29 ( use first LED’s in PCB “ fast speed limit switch up and down” ) . Measure also voltage in terminals 28 and 29. Voltage range must be between 60 and 70 VDC. LED’s are only indicators for voltage presence but voltage can be too low.
check parameters and input definitions. ( see section PROGRAMMI NG ) . Specially check parameters and definitions related to maintenance mode:
-parameter P12 speed at test
-definition I4 input maintenance ON definition
-definition I 5 input maintenance UP definition
-definition I 6 input maintenance DOWN definition
check action with programmer in the flow control menue
LIFT WILL NOT OPERATE IN MAINTENANCE DOWN DRIVE
check action with programmer in the flow control menue
if there is message maintenance down, computer works normally and problem is in power section:
check motor, valves or brake connection check contactors and relays
if there is no action in programmer check prelimit switch down ( terminal 28 ) – LED “ fast speed limit switch down” . Measure also voltage in terminal 28. Voltage range must be between 60 and 70 VDC. LED’s are only indicators for voltage presence but voltage can be too low.
60 |
291 842 003 |
LIFT WILL NOT OPERATE IN MAINTENANCE UP DRIVE
-check action with programmer in the flow control menue
if there is message maintenance up, computer works normally and problem is in power section: check motor, valves or brake connection
check contactors and relays
if there is no action in programmer check prelimit switch up ( terminal 29 ) – LED “ fast speed limit switch up” . Measure also voltage in terminal 29. Voltage range must be between 60 and 70 VDC. LED’s are only indicators for voltage presence but voltage can be too low .
LIFT WILL NOT START IN NORMAL MODE
check if lift operates normally in maintenance mode. Lift must operate normally in both directions in maintenance mode
-check with programmer in the flow control menue if there is any error
check door operation. Doors must close ( safety line 39 ) . Check conditions which will prevent door closing:
- |
input 76 |
door obstruction signal |
|
- |
input |
74 |
door photocell signal |
- |
input |
75 |
button door opening |
check also related input definitions ( definitions 74, 75 and 76)
-check conditions which prevent normal mode:
- |
input 68 |
car overload |
- |
input 73 |
key priority drive |
- |
input 307 |
fire drive input |
check also related input definitions ( definitions 68 and 73)
-check action with programmer on flow control menue
if there is message lift goes down or up ,computer works normally and problem is in power section: check motor, valves or brake connection
check contactors and relays ( especially for fast speed )
-check parameters and definitions
table for help to find out reason for abnormal work.
SUGGESTI ON: - |
clear the error table |
|
switch control panel off and after 30 seconds on again |
|
if lift does not start in normal operation look to the error table |
|
there must be at least one error which caused this situation |
|
if error table is still empty use flow control to find out the |
|
reason by looking at last event in lift |
61 |
291 842 003 |
LIFT WILL NOT STOP IN STATION FIRST TIME AFTER POWER ON
-check stop in station signals ( terminals 61, 62, 63, 64 ) Measure also voltage in these terminals. Voltage range must be between 60 and 70 VDC. LED’s are only indicators for voltage presence but voltage can be too low.
check appropriate input definitions for these inputs ( definitions 61, 62, 63, 64 )
LIFT STOPPED IN STATION AFTER FIRST TIME BUTWILL NOT ACCEPT CALLS
check “ ELEMENTS CHECK” input . LED for this input must lit when lift is in station
check “ FI RE DRI VE” input ( terminal 307 ) . LED for this input must NOT be lit when lift is in station
check safety circuit 185, LED safety OK must lit, if not the device or zone switches are not working properly, see section “ SAFETY CI RCUI T 185”
LIFT COUNTS TWO FLOORS INSTEAD ONE
check operation of magnetic switches ( switches for prelimit signals, slow speed signals, stop signals and zone signals)
check bistable magnetic switches, distance between switches and magnets must be 1 cm
check if there is some bolts or nuts near to the magnets ( they can work like magnets if they are too close to the magnets
if magnets are mounted on the guide rails they must be on the outside of the guide, because on the other hand magnetic switches will not work properly
LIFT SOMETIMES STOPS IMMEDIATELY AFTER STARTING
check stop is not station switches ( terminals 61 and 62 or LED’s “ STOP UP and STOP DOWN” ) both LED’s must be LI T when lift stops in station.
62 |
291 842 003 |
11.
11.1.TECHNICAL CHARACTERISTICS
|
t erminals |
volt age |
current |
|
ot her |
||
|
on PCB |
|
|
|
|
|
|
Pow er supply |
|
|
|
|
|
|
|
main module |
|
12 VAC |
max |
1200 mA |
fuse F2 in main module |
||
|
|
(10 |
- 14 VAC) |
|
|
|
|
car module |
|
24 VDC |
max |
2000 mA |
|
||
|
|
(17 |
- 28 VDC) |
|
|
|
|
ext module |
|
through car module |
through car module |
|
|||
node module |
|
through SSL link |
through SSL link |
optional through K7 |
|||
|
|
|
|
|
|
|
24VDC (17 - 28 VDC) |
Signalizat ion |
|
18 VAC |
max. 2000 mA |
fuse F1 and rectifier D1 in |
|||
|
|
(14 |
- 22 VAC) |
|
|
|
main module |
I nput voltage |
|
|
|
|
|
|
|
main module |
06 - 21 |
48VDC stabilised |
typical |
5 mA |
common 47, 53, 57, 61 |
||
inputs |
|
(35 |
- 58 VDC) |
|
|
|
|
car module |
04 - 11 |
24VDC stabilised |
typical |
5 mA |
common 12 |
||
inputs |
|
(17 |
- 28 VDC) |
|
|
|
|
car module |
63 - 70 |
24VDC stabilised |
typical |
5 mA |
common 62 |
||
inputs |
|
(17 |
- 28 VDC) |
|
|
|
|
I / O modules |
|
|
|
|
|
|
|
for push |
|
|
|
|
|
|
|
buttons |
|
|
|
|
|
|
|
car module I / O |
14 - 21 |
input to 24VDC |
output to 0VDC max. |
|
|||
|
|
stabilised(17 - 28 VDC) |
250 mA |
|
|
||
car module I / O |
32 - 39 |
input to 24VDC stabilised |
output to 0VDC max. |
|
|||
|
|
(17 |
- 28 VDC) |
250 mA |
|
|
|
car module I / O |
53 - 60 |
input to 24VDC stabilised |
output to 0VDC max. |
|
|||
|
|
(17 |
- 28 VDC) |
250 mA |
|
|
|
ext module I / O |
80 - 87 |
input to 24VDC stabilised |
output to 0VDC max. |
|
|||
|
|
(17 |
- 28 VDC) |
250 mA |
|
|
|
ext module I / O |
89 - 96 |
input to 24VDC stabilised |
output to 0VDC max. |
|
|||
|
|
(17 |
- 28 VDC) |
250 mA |
|
|
|
ext module I / O |
110 - 117 |
input to 24VDC stabilised |
output to 0VDC max. |
|
|||
|
|
(17 |
- 28 VDC) |
250 mA |
|
|
|
node module |
K3, K4 |
input to 24VDC stabilised |
output |
to 0VDC max. |
|
||
I / O |
|
(17 |
- 28 VDC) |
250 mA |
|
|
|
Outputs |
|
|
|
|
|
|
|
car module |
22 - 29 |
24VDC |
max. 250 mA |
common 30 |
|||
car module |
45 - 52 |
24VDC |
max. 250 mA |
common 44 |
|||
ext module |
101 - 108 |
24VDC |
max. 250 mA |
common 109 |
|||
node module |
K5, K6 |
24VDC |
max. 250 mA |
|
|||
main module |
22 - 45 |
24VDC |
max. 1000 mA NO |
|
|||
|
|
|
|
INDUCTIV E LOAD |
|
||
63 |
291 842 003 |
Serial lines |
|
|
|
|
|
|
|
|
47 |
|
0V |
12 VDC |
|
|
opto insulated 9600 B |
|
48 |
|
RX |
|
|
|
|
|
49 |
|
TX |
|
|
|
|
main module |
plug K1 |
|
12 VDC |
|
|
RS 232 9600 B |
|
programming |
|
|
|
|
|
|
|
main module |
50 |
|
+ 24V |
24 VDC |
max. |
500 mA |
SSL opto insulated |
serial link 1 |
51 |
|
TX |
|
|
|
1000 B |
|
52 |
|
RX |
|
|
|
|
|
53 |
|
0V |
|
|
|
|
main module |
54 |
|
+ 24V |
24 VDC |
max. |
500 mA |
SSL opto insulated |
serial link 2 |
55 |
|
TX |
|
|
|
1000 B |
|
56 |
|
RX |
|
|
|
|
|
57 |
|
0V |
|
|
|
|
main module |
58 |
+ 24V |
24 VDC |
|
|
SSL opto insulated |
|
serial link 3 |
59 |
|
TX |
|
|
|
1000 B |
|
60 |
|
RX |
|
|
|
|
|
61 |
|
0V |
|
|
|
|
node module |
K1 |
|
output |
24 VDC |
max. |
500 mA |
opto insulated |
serial link |
K2 |
|
input |
|
|
|
1000 B |
64 |
291 842 003 |
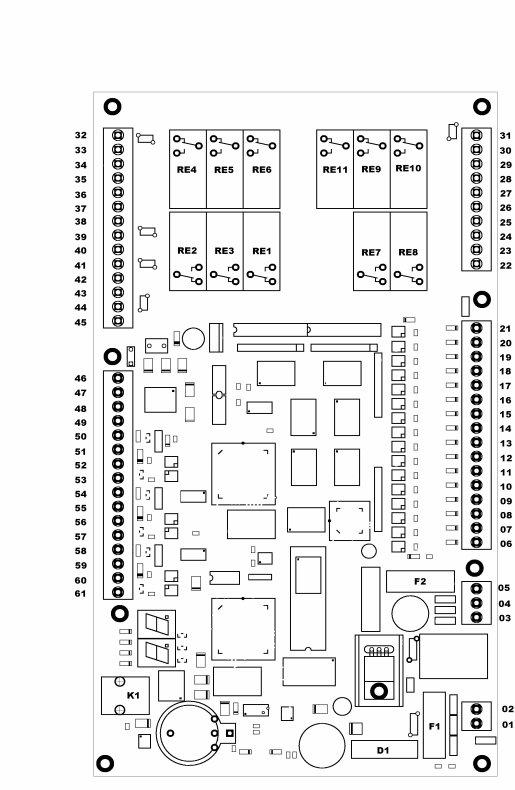
11.2. E - type MAIN MODULE
65 |
291 842 003 |
E - type MAIN MODULE TERMINALS
118V AC
218V AC ( AC votage for 24 VDC )
312V AC
4GND
512V AC ( supply voltage for CPU )
6input prelimit switch in lower station - bottom
7 input prelimit switch in upper station - t op
8 input safety line 36
9 input safety line 37
10 input safety line 38
11 input safety line 39
12 input stop in station up
13 input st op in st at ion down
14 input slow speed
15 input relevell up
16 |
input relevell down |
|
17 |
input maintenance on |
( maintenance on teminal 09 car module have priority ) |
18 |
input maintenance up |
( when maintenance on from car module in active, this input not work ) |
19input maintenance down( when maintenance on from car module in active, this input not work )
20input fire drive
21input elements check
22 |
output door A open |
relay RE8 |
23 |
output door A close |
relay RE7 |
24output common door A
25output
26 |
output door B open |
relay RE10 |
27output common door B
28output
29 |
output door B close |
|
relay RE9 |
30 |
output car blower |
|
relay RE11 |
31 |
output car blower |
|
|
32 |
output high speed |
|
relay RE6 |
33 |
output high speed |
|
|
34 |
output direction down |
|
relay RE5 |
35 |
output direction up and down |
|
|
36 |
output direction up |
|
relay RE4 |
37 |
output common for direction |
|
|
38 |
output pump star |
NO |
relay RE3 |
39 |
output pump star |
COM |
|
40 |
output pump star |
NC |
|
66 |
291 842 003 |
41 |
output pump delta |
NO |
relay RE2 |
42 |
output pump delta |
COM |
|
43 |
output pump delta |
NC |
|
44 |
out put pump on |
|
relay RE1 |
45out put pump on
46+ 24V DC
470V
48 |
group line |
RX |
49 |
group line |
TX |
50 |
+ 24V DC |
|
51 |
line LI NK3 |
TX |
52 |
line LI NK3 |
RX |
530V
54+ 24V DC
55 |
line LI NK2 |
TX |
56 |
line LI NK2 |
RX |
570V
58+ 24V DC
59 |
line LI NK1 |
TX |
60 |
line LI NK1 |
RX |
61 |
0V |
|
67 |
291 842 003 |
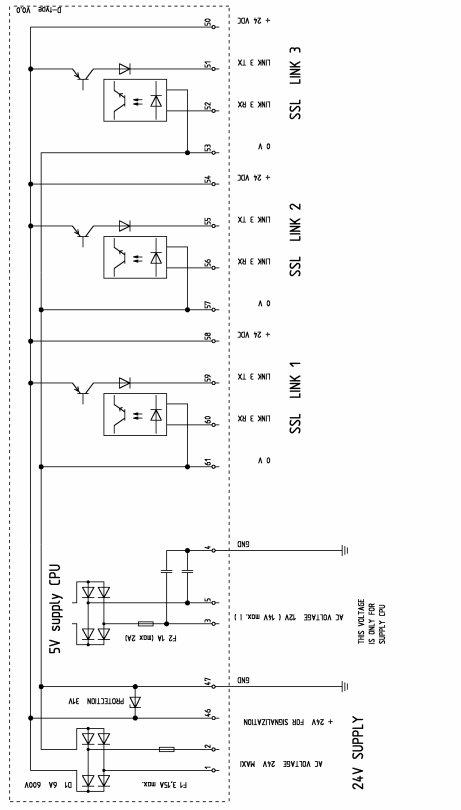
E - type MAIN MODULE SCHEME
68 |
291 842 003 |
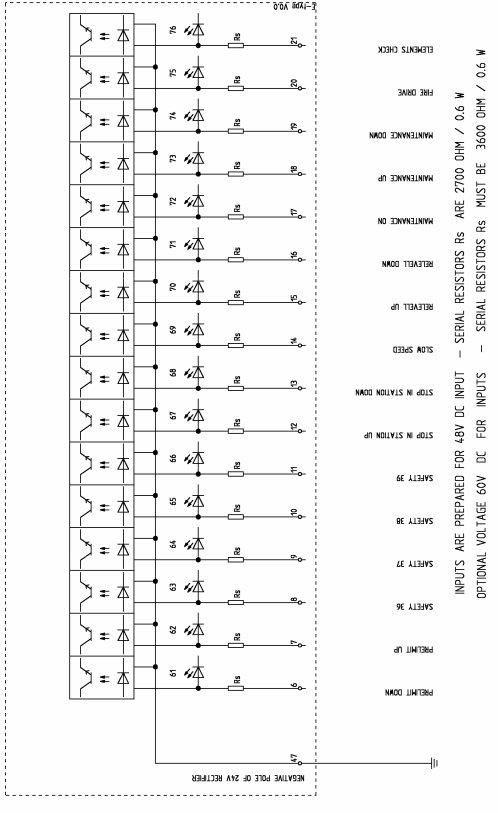
E - type MAIN MODULE SCHEME
69 |
291 842 003 |
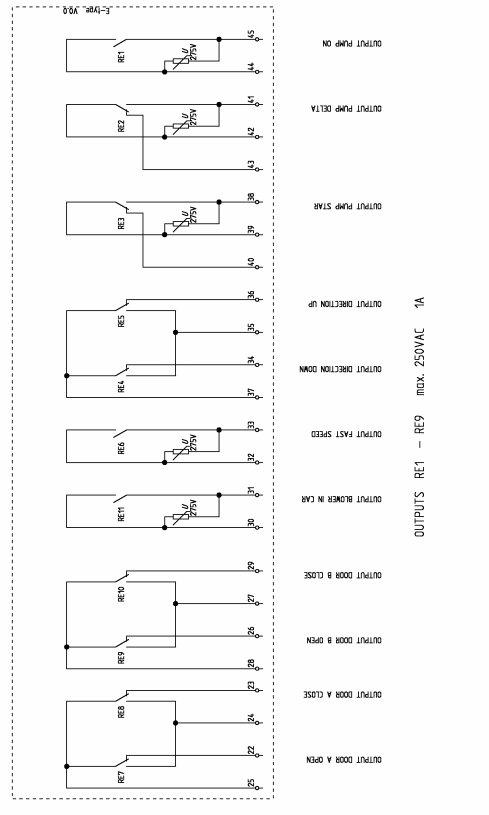
E - type MAIN MODULE SCHEME
70 |
291 842 003 |
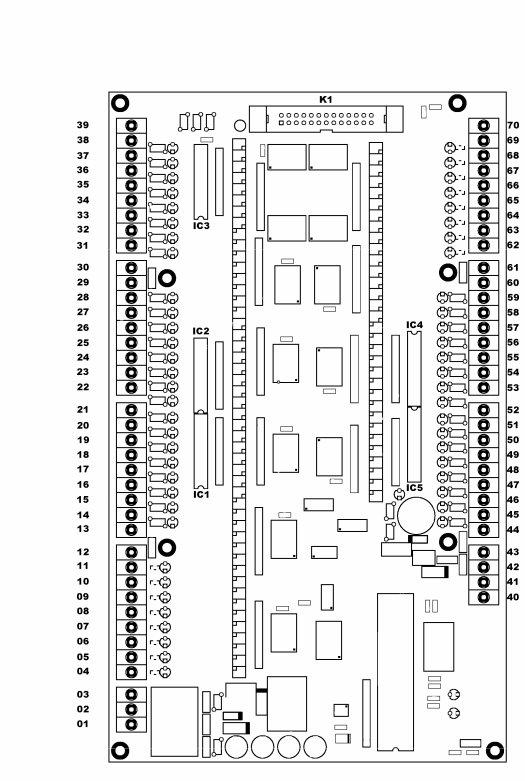
11.3. E - type CAR MODULE
71 |
291 842 003 |
E - type CAR MODULE TERMINALS
01 |
0V DC |
( supply voltage ) |
02 |
GND |
|
03 |
24V DC |
( supply voltage ) |
04input SSL link ( to terminal 59 main module )
05input full load car
06input overload car
07input priority drive
08input fireman drive
09input maintenance ON
10input maintenance UP
11input maintenance DOWN
12GND
13 |
GND |
|
14 |
I / O |
multi function |
15 |
I / O |
multi function |
16 |
I / O |
multi function |
17 |
I / O |
multi function |
18 |
I / O |
multi function |
19 |
I / O |
multi function |
20 |
I / O |
multi function |
21 |
I / O |
multi function |
22 |
output |
multi function |
23 |
output |
multi function |
24 |
output |
multi function |
25 |
output |
multi function |
26 |
output |
multi function |
27 |
output |
multi function |
28 |
output |
multi function |
29 |
output |
multi functi o n |
30GND
31GND
32 |
I / O |
multi function |
33 |
I / O |
multi function |
34 |
I / O |
multi function |
35 |
I / O |
multi function |
36 |
I / O |
multi function |
37 |
I / O |
multi function |
38 |
I / O |
multi function |
39 |
I / O |
multi function |
40 |
GND |
|
41 |
+ 24V DC |
( voltage for outputs ) |
42 |
+ 24V DC |
( voltage for outputs ) |
43 |
GND |
|
72 |
291 842 003 |
44 |
GND |
45 |
output SSL link ( to terminal 60 main module ) |
46output car overload
47output direction down
48output direction up
49output gong - arrival
50output out of work
51output occupied / beeper
52output car blower
53 |
I / O |
multi function |
54 |
I / O |
multi function |
55 |
I / O |
multi function |
56 |
I / O |
multi function |
57 |
I / O |
multi function |
58 |
I / O |
multi function |
59 |
I / O |
multi function |
60 |
I / O |
multi function |
61GND
62GND
63 |
input photocell door |
A |
64 |
input door obstruction A |
|
65 |
input photocell door |
B |
66input door obstruction B
67input additional doors open
68input open door A
69input open door B
70input door close
73 |
291 842 003 |
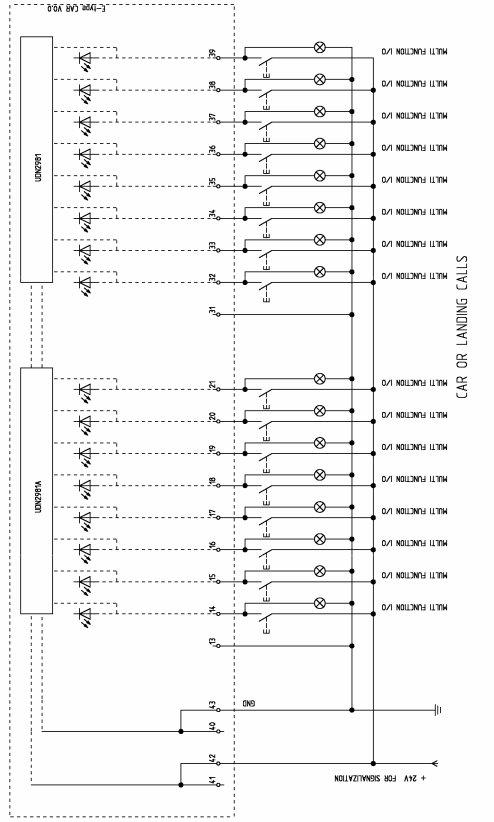
E - type CAR MODULE SCHEME
74 |
291 842 003 |
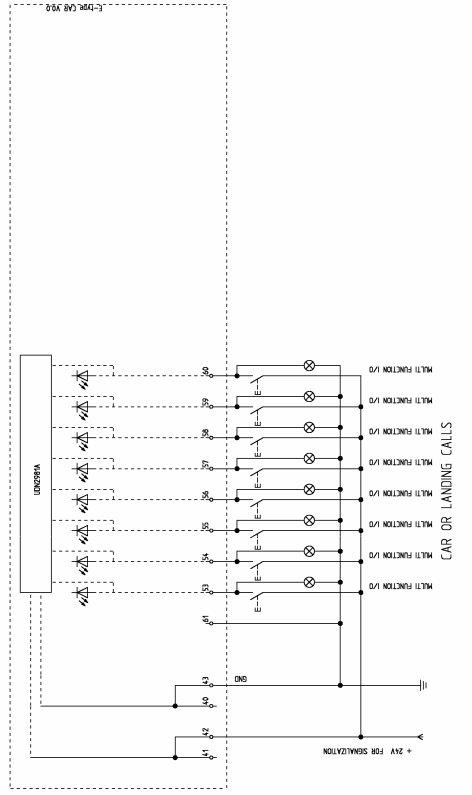
E - type CAR MODULE SCHEME
75 |
291 842 003 |
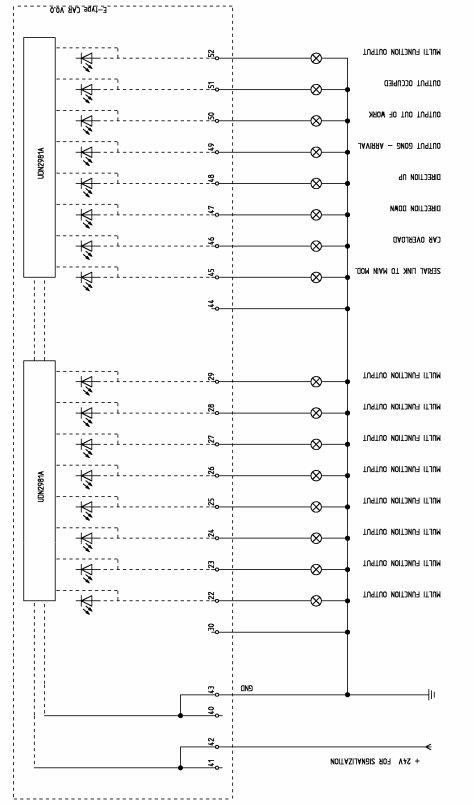
E - type CAR MODULE SCHEME
76 |
291 842 003 |
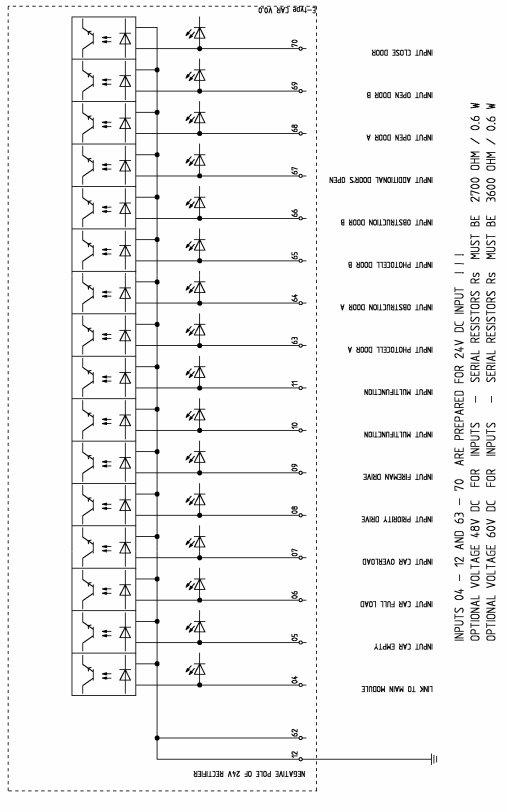
E - type CAR MODULE SCHEME
77 |
291 842 003 |
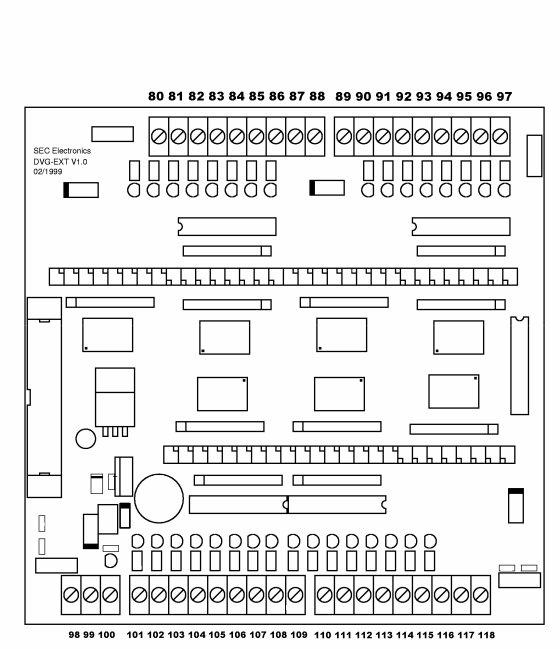
11.4. E - type EXT MODULE
78 |
291 842 003 |
E - type EXT MODULE TERMINALS
80 |
I / O |
multi function |
81 |
I / O |
multi function |
82 |
I / O |
multi function |
83 |
I / O |
multi function |
84 |
I / O |
multi function |
85 |
I / O |
multi function |
86 |
I / O |
multi funct ion |
87 |
I / O |
multi function |
88 |
GND |
|
89 |
I / O |
multi function |
90 |
I / O |
multi function |
91 |
I / O |
multi function |
92 |
I / O |
multi function |
93 |
I / O |
multi function |
94 |
I / O |
multi function |
95 |
I / O |
multi function |
96 |
I / O |
multi function |
97GND
98GND
99 |
+ 24V DC |
( voltage for outputs ) |
100 |
+ 24V DC |
( voltage for outputs ) |
101 |
output |
multi function |
102 |
output |
multi function |
103 |
output |
multi function |
104 |
output |
multi function |
105 |
output |
multi function |
106 |
output |
multi function |
107 |
output |
multi function |
108 |
out put |
multi function |
109 |
GND |
|
110 |
I / O |
multi function |
111 |
I / O |
multi function |
112 |
I / O |
multi function |
113 |
I / O |
multi function |
114 |
I / O |
multi function |
115 |
I / O |
multi function |
116 |
I / O |
multi function |
117 |
I / O |
multi function |
118 |
GND |
|
79 |
291 842 003 |
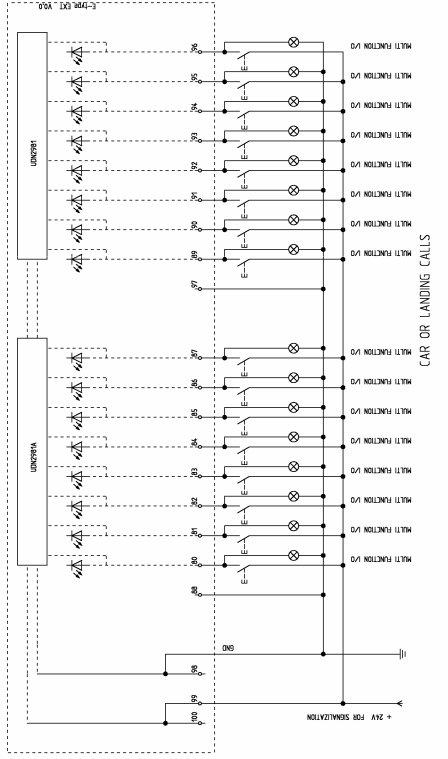
E - type EXT MODULE SCHEME
80 |
291 842 003 |
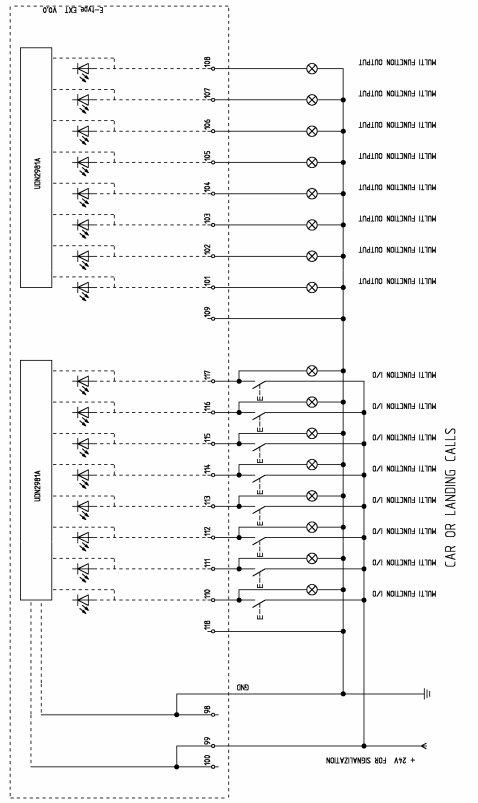
E - type EXT MODULE SCHEME
81 |
291 842 003 |
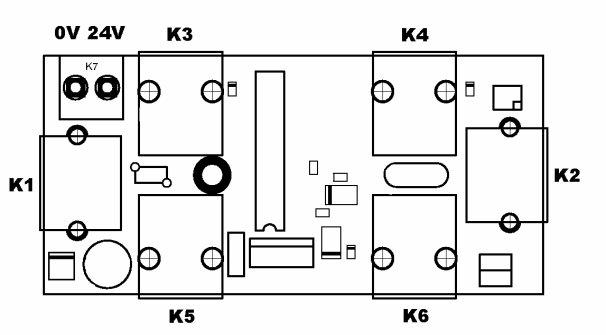
11.5. E - type FLOOR MODULE - NODE
E - type FLOOR MODULE TERMINALS - PLUGS
K1 |
8 pol connector |
SSL link output |
|
K2 |
8 |
pol connector |
SSL link input |
K3 |
4 |
pol connector |
multifunction I / O |
K4 |
4 |
pol connector |
multifunction I / O |
K5 |
4 pol connector |
multifunction output |
|
K6 |
4 pol connector |
multifunction output |
|
K7 |
optional power supply 24VDC |
||
82 |
291 842 003 |
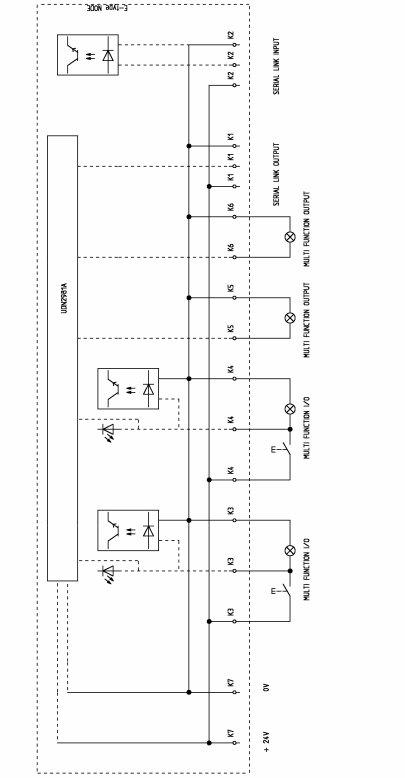
E - type FLOOR MODULE – NODE SCHEME
83 |
291 842 003 |
|
11.6. MULTIFUNCTION |
INPUTS / OUTPUTS |
|
||
1. |
8 STOPS |
UP and DOWN collective ( main and car modules ) |
|||
|
E - type C |
( classic ) |
P0 = 1 |
|
|
14 |
car module |
CAR CALL 1 |
53 |
car module |
DOWN CALL 1 |
15 |
car module |
CAR CALL 2 |
54 |
car module |
DOWN CALL 2 |
16 |
car module |
CAR CALL 3 |
55 |
car module |
DOWN CALL 3 |
17 |
car module |
CAR CALL 4 |
56 |
car module |
DOWN CALL 4 |
18 |
car module |
CAR CALL 5 |
57 |
car module |
DOWN CALL 5 |
19 |
car module |
CAR CALL 6 |
58 |
car module |
DOWN CALL 6 |
20 |
car module |
CAR CALL 7 |
59 |
car module |
DOWN CALL 7 |
21 |
car module |
CAR CALL 8 |
60 |
car module |
DOWN CALL 8 |
32 |
car module |
UP CALL 1 |
22 |
car module |
output position 1 or A |
33 |
car module |
UP CALL 1 |
23 |
car module |
output position 2 or B |
34 |
car module |
UP CALL 1 |
24 |
car module |
output position 3 or C |
35 |
car module |
UP CALL 1 |
25 |
car module |
output position 4 or D |
36 |
car module |
UP CALL 1 |
26 |
car module |
output position 5 |
37 |
car module |
UP CALL 1 |
27 |
car module |
output position 6 |
38 |
car module |
UP CALL 1 |
28 |
car module |
output position 7 |
39 |
car module |
UP CALL 1 |
29 |
car module |
output position 8 |
2. |
12 STOPS |
DOWN collective ( main and car modules ) |
|||
|
E - type C |
( classic ) |
P0 = 2 |
|
|
14 |
car module |
CAR CALL 1 |
53 |
car module |
DOWN CALL 1 |
15 |
car module |
CAR CALL 2 |
54 |
car module |
DOWN CALL 2 |
16 |
car module |
CAR CALL 3 |
55 |
car module |
DOWN CALL 3 |
17 |
car module |
CAR CALL 4 |
56 |
car module |
DOWN CALL 4 |
18 |
car module |
CAR CALL 5 |
57 |
car module |
DOWN CALL 5 |
19 |
car module |
CAR CALL 6 |
58 |
car module |
DOWN CALL 6 |
20 |
car module |
CAR CALL 7 |
59 |
car module |
DOWN CALL 7 |
21 |
car module |
CAR CALL 8 |
60 |
car module |
DOWN CALL 8 |
32 |
car module |
CAR CALL 9 |
36 |
car module |
DOWN CALL 9 |
33 |
car module |
CAR CALL 10 |
37 |
car module |
DOWN CALL 10 |
34 |
car module |
CAR CALL 11 |
38 |
car module |
DOWN CALL 11 |
35 |
car module |
CAR CALL 12 |
39 |
car module |
DOWN CALL 12 |
22 |
car module |
output position 1 or A |
|
|
|
23 |
car module |
output position 2 or B |
|
|
|
24 |
car module |
output posit ion 3 or C |
|
|
|
25 |
car module |
output position 4 or D |
|
|
|
84 |
291 842 003 |
3. |
16 STOPS |
UP and DOWN collective ( main, car and ext modules ) |
|||
|
E - type C |
( classic ) |
P0 = 3 |
|
|
14 |
car module |
CAR CALL 1 |
53 |
car module |
DOWN CALL 1 |
15 |
car module |
CAR CALL 2 |
54 |
car module |
DOWN CALL 2 |
16 |
car module |
CAR CALL 3 |
55 |
car module |
DOWN CALL 3 |
17 |
car module |
CAR CALL 4 |
56 |
car module |
DOWN CALL 4 |
18 |
car module |
CAR CALL 5 |
57 |
car module |
DOWN CALL 5 |
19 |
car module |
CAR CALL 6 |
58 |
car module |
DOWN CALL 6 |
20 |
car module |
CAR CALL 7 |
59 |
car module |
DOWN CALL 7 |
21 |
car module |
CAR CALL 8 |
60 |
car module |
DOWN CALL 8 |
80 |
ext module |
CAR CALL 9 |
110 |
ext module |
DOWN CALL 9 |
81 |
ext module |
CAR CALL 10 |
111 |
ext module |
DOWN CALL 10 |
82 |
ext module |
CAR CALL 11 |
112 |
ext module |
DOWN CALL 11 |
83 |
ext module |
CAR CALL 12 |
113 |
ext module |
DOWN CALL 12 |
84 |
ext module |
CAR CALL 13 |
114 |
ext module |
DOWN CALL 13 |
85 |
ext module |
CAR CALL 14 |
115 |
ext module |
DOWN CALL 14 |
86 |
ext module |
CAR CALL 15 |
116 |
ext module |
DOWN CALL 15 |
87 |
ext module |
CAR CALL 16 |
117 |
ext module |
DOWN CALL 16 |
32 |
car module |
UP CALL 1 |
22 |
car module |
output position 1 or A |
33 |
car module |
UP CALL 1 |
23 |
car module |
output position 2 or B |
34 |
car module |
UP CALL 1 |
24 |
car module |
output position 3 or C |
35 |
car module |
UP CALL 1 |
25 |
car module |
output position 4 or D |
36 |
car module |
UP CALL 1 |
26 |
car module |
output position 5 or E |
37 |
car module |
UP CALL 1 |
27 |
car module |
output position 6 |
38 |
car module |
UP CALL 1 |
28 |
car module |
output position 7 |
39 |
car module |
UP CALL 1 |
29 |
car module |
output position 8 |
89 |
ext module |
UP CALL 9 |
101 |
ext module |
out put position 9 |
90 |
ext module |
UP CALL 10 |
102 |
ext module |
output position 10 |
91 |
ext module |
UP CALL 11 |
103 |
ext module |
output position 11 |
92 |
ext module |
UP CALL 12 |
104 |
ext module |
output position 12 |
93 |
ext module |
UP CALL 13 |
105 |
ext module |
output position 13 |
94 |
ext module |
UP CALL 14 |
106 |
ext module |
output position 14 |
95 |
ext module |
UP CALL 15 |
107 |
ext module |
output position 15 |
96 |
ext module |
UP CALL 16 |
108 |
ext module |
output position 16 |
85 |
291 842 003 |
4. |
24 STOPS |
DOWN collective ( main, car and ext modules ) |
|||
|
E - type C |
( classic ) |
P0 = 4 |
|
|
14 |
car module |
CAR CALL 1 |
53 |
car module |
DOWN CALL 1 |
15 |
car module |
CAR CALL 2 |
54 |
car module |
DOWN CALL 2 |
16 |
car module |
CAR CALL 3 |
55 |
car module |
DOWN CALL 3 |
17 |
car module |
CAR CALL 4 |
56 |
car module |
DOWN CALL 4 |
18 |
car module |
CAR CALL 5 |
57 |
car module |
DOWN CALL 5 |
19 |
car module |
CAR CALL 6 |
58 |
car module |
DOWN CALL 6 |
20 |
car module |
CAR CALL 7 |
59 |
car module |
DOWN CALL 7 |
21 |
car module |
CAR CALL 8 |
60 |
car module |
DOWN CALL 8 |
32 |
car module |
CAR CALL 9 |
36 |
car module |
DOWN CALL 9 |
33 |
car module |
CAR CALL 10 |
37 |
car module |
DOWN CALL 10 |
34 |
car module |
CAR CALL 11 |
38 |
car module |
DOWN CALL 11 |
35 |
car module |
CAR CALL 12 |
39 |
car module |
DOWN CALL 12 |
89 |
ext module |
CAR CALL 13 |
93 |
ext module |
DOWN CALL 13 |
90 |
ext module |
CAR CALL 14 |
94 |
ext module |
DOWN CALL 14 |
91 |
ext module |
CAR CALL 15 |
95 |
ext module |
DOWN CALL 15 |
92 |
ext module |
CAR CALL 16 |
96 |
ext module |
DOWN CALL 16 |
80 |
ext module |
CAR CALL 17 |
110 |
ext module |
DOWN CALL 17 |
81 |
ext module |
CAR CALL 18 |
111 |
ext module |
DOWN CALL 18 |
82 |
ext module |
CAR CALL 19 |
112 |
ext module |
DOWN CALL 19 |
83 |
ext module |
CAR CALL 20 |
113 |
ext module |
DOWN CALL 20 |
84 |
ext module |
CAR CALL 21 |
114 |
ext module |
DOWN CALL 21 |
85 |
ext module |
CAR CALL 22 |
115 |
ext module |
DOWN CALL 22 |
86 |
ext module |
CAR CALL 23 |
116 |
ext module |
DOWN CALL 23 |
87 |
ext module |
CAR CALL 24 |
117 |
ext module |
DOWN CALL 24 |
22 |
car module |
output position 1 or A |
23 |
car module |
output position 2 or B |
24 |
car module |
output position 3 or C |
25 |
car module |
output position 4 or D |
26 |
car module |
output position 5 or E |
86 |
291 842 003 |
5. |
24 STOPS |
UP and DOWN collective |
|
|
|
|
( main, car modules and nodes in floors ) |
|
|||
|
E - type S |
( serial ) |
P0 = 5 |
|
|
14 |
car module |
CAR CALL 1 |
53 |
car module |
CAR CALL 17 |
15 |
car module |
CAR CALL 2 |
54 |
car module |
CAR CALL 18 |
16 |
car module |
CAR CALL 3 |
55 |
car module |
CAR CALL 19 |
17 |
car module |
CAR CALL 4 |
56 |
car module |
CAR CALL 20 |
18 |
car module |
CAR CALL 5 |
57 |
car module |
CAR CALL 21 |
19 |
car module |
CAR CALL 6 |
58 |
car module |
CAR CALL 22 |
20 |
car module |
CAR CALL 7 |
59 |
car module |
CAR CALL 23 |
21 |
car module |
CAR CALL 8 |
60 |
car module |
CAR CALL 24 |
32 |
car module |
CAR CALL 9 |
22 |
car module |
output position 1 or A |
33 |
car module |
CAR CALL 10 |
23 |
car module |
output position 2 or B |
34 |
car module |
CAR CALL 11 |
24 |
car module |
output position 3 or C |
35 |
car module |
CAR CALL 12 |
25 |
car module |
output position 4 or D |
36 |
car module |
CAR CALL 13 |
26 |
car module |
output position 5 or E |
37 |
car module |
CAR CALL 14 |
27 |
car module |
output position 6 or F |
38 |
car module |
CAR CALL 15 |
28 |
car module |
door open A |
39 |
car module |
CAR CALL 16 |
29 |
car module |
door open B |
UP and DOWN calls are connect to the nodes
Nodes for 1 - 24 floor are connect to SSL LI NK 2
87 |
291 842 003 |
6. |
48 STOPS |
UP and DOWN collective |
|
|
|
|
( main, car, ext modules and nodes in floors ) |
|
|||
|
E - type S |
( serial ) |
P0 = 6 |
|
|
14 |
car module |
CAR CALL 1 |
53 |
car module |
CAR CALL 17 |
15 |
car module |
CAR CALL 2 |
54 |
car module |
CAR CALL 18 |
16 |
car module |
CAR CALL 3 |
55 |
car module |
CAR CALL 19 |
17 |
car module |
CAR CALL 4 |
56 |
car module |
CAR CALL 20 |
18 |
car module |
CAR CALL 5 |
57 |
car module |
CAR CALL 21 |
19 |
car module |
CAR CALL 6 |
58 |
car module |
CAR CALL 22 |
20 |
car module |
CAR CALL 7 |
59 |
car module |
CAR CALL 23 |
21 |
car module |
CAR CALL 8 |
60 |
car module |
CAR CALL 24 |
32 |
car module |
CAR CALL 9 |
22 |
car module |
output position 1 or A |
33 |
car module |
CAR CALL 10 |
23 |
car module |
output position 2 or B |
34 |
car module |
CAR CALL 11 |
24 |
car module |
output position 3 or C |
35 |
car module |
CAR CALL 12 |
25 |
car module |
output position 4 or D |
36 |
car module |
CAR CALL 13 |
26 |
car module |
output position 5 or E |
37 |
car module |
CAR CALL 14 |
27 |
car module |
output position 6 or F |
38 |
car module |
CAR CALL 15 |
28 |
car module |
door open A |
39 |
car module |
CAR CALL 16 |
29 |
car module |
door open B |
80 |
ext module |
CAR CALL 25 |
110 |
ext module |
CAR CALL 41 |
81 |
ext module |
CAR CALL 26 |
111 |
ext module |
CAR CALL 42 |
82 |
ext module |
CAR CALL 27 |
112 |
ext module |
CAR CALL 43 |
83 |
ext module |
CAR CALL 28 |
113 |
ext module |
CAR CALL 44 |
84 |
ext module |
CAR CALL 29 |
114 |
ext module |
CAR CALL 45 |
85 |
ext module |
CAR CALL 30 |
115 |
ext module |
CAR CALL 46 |
86 |
ext module |
CAR CALL 31 |
116 |
ext module |
CAR CALL 47 |
87 |
ext module |
CAR CALL 32 |
117 |
ext module |
CAR CALL 48 |
89 |
ext module |
CAR CALL 33 |
101 |
ext module |
|
90 |
ext module |
CAR CALL 34 |
102 |
ext module |
|
91 |
ext module |
CAR CALL 35 |
103 |
ext module |
|
92 |
ext module |
CAR CALL 36 |
104 |
ext module |
|
93 |
ext module |
CAR CALL 37 |
105 |
ext module |
|
94 |
ext module |
CAR CALL 38 |
106 |
ext module |
|
95 |
ext module |
CAR CALL 39 |
107 |
ext module |
|
96 |
ext module |
CAR CALL 40 |
108 |
ext module |
|
UP and DOWN calls are connect to the nodes
Nodes for 1 - 24 floor are connect to SSL LI NK 2
Nodes for 25 - 48 floor are connect to SSL LI NK 3
88 |
291 842 003 |
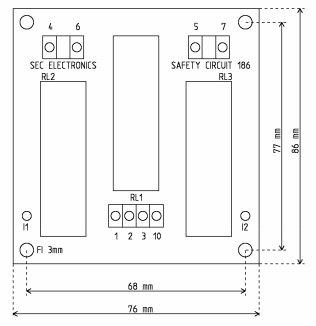
12.SAFETY CIRCUIT 186
12.1.GENERAL FEATURES
This circuit is specially developed to make it possible to move the car while the doors are open.
Circuit board |
76 x 86 mm with heigh of 35 mm for installation in control unit |
|
4 x 3mm hole for mounting |
The following manouvres are possible:
-advanced door opening
-relevelling upwards or downwards with the doors open
Circuit content: |
- |
3 |
x safety relay with six guided contacts |
|
- |
2 |
x LED diode for status display |
|
- |
7 |
x terminal for connection |
Supply voltage |
+ 48 VDC |
Supply current |
Max. 200 mA |
Ambient temperature |
Max. 45 oC |
Degree of protection |
IP00 |
EMC compatibility |
EN12015 and EN12016 |
Approvals |
CE |
89 |
291 842 003 |
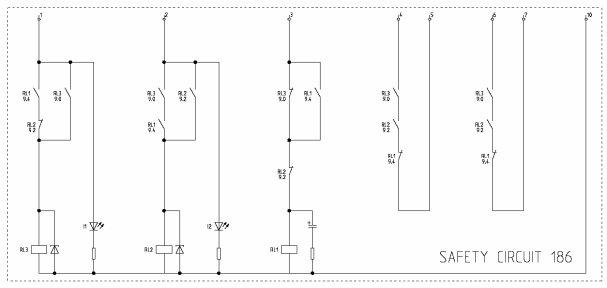
12.2. DETAILS AND CONNECTIONS
Schematic plan of safety circuit 186
The circuit does not need any additional power supply. All relays are made for 48 V DC supply.
Explanation of work: |
- |
elevator control unit give 48 VDC to terminal 3 when elevator start slow speed |
|
|
|
in arriving to station. This voltage must stay all the time to the next start |
|
|
- then magnetic switch ZONE A give 48 VDC to terminal 2 |
||
|
- and magne tic switch ZONE B give 48 VDC to terminal 1 |
||
|
- in this case connection is closed between terminals 4 - 5 and 6 - 7 |
||
|
- |
when elevator stopped in station elevator control unit should |
|
|
|
check one of link (4 – 5 or 6 |
|
|
- |
in the case that there is no connection elevator must not |
|
|
|
proceed to drive |
|
Explanation of LED: |
- |
LED I 1 |
parallel to input 1 |
-LED I 2 parallel to input 2
12.3.REQUIREMENTS FOR INSTALLATION
- This product should be installed into a controller with minimum protection level of I P2X
-The maximum voltage permissible for the series connection is 230 VAC or VDC
-The safety series connection which are connected to terminals 4- 5 and 6 - 7 should be
protected with maximum 4 Amp fuse
- Applied voltage for relays ( + 48V DC ) should be fused with a maximum of 4 Amp fuse
-The ambient temperature at which the unit ideally functions is between 0 C and 55 C
-Once the equipment has been installed a test run should be carried out in both upward and downward directions stopping at every landing, so the control unit can check the perfect operat ion of t he module
90 |
291 842 003 |
13.GUIDE TO ELECTROMAGNETIC COMPATIBILITY
13.1.THE EMC DIRECTIVE AND APPLICABLE STANDARD
The EMC Directive 89/ 336/ EEC, and as amended by Directives 91/ 263/ EEC, 92/ 31/ EEC, 93/ 68/ EEC and 93/ 97/ EEC requires that in order to guarantee the free movement of electrical and electronic apparatus, and to create an acceptable electromagnetic environment, all such apparatus shall ensure that the electromagnetic disturbances produced by the apparatus do not affect the correct functioning of other apparatus or radio and telecommunications networks as well as related equipment and electricity distribution networks. The apparatus is also required to have an adequate level of intrinsic immunity to electromagnetic disturbances to enable it to wo rk as intended.
SEC lift control panels are according to the “ Guidelines on the application of Directive 89/ 336/ EEC “ Clause 6.2.3.2 “ Components performing a direct function not intended to be placed on the market for distribution and final use “
The SEC position
I t is responsibility of the user to determinate the category under which the product is obtained however. SEC, in common with most other manufacturers, has prepared this document on the following basis:
- |
The sales are of the restricted distr ibution class |
-Neither a “ CE” mark nor a Declaration of Conformity are permitted under the EMC Directive
This product is intended only for professional assemblers.
The responsibility for the maintenance of EMC compliance of an installation shall be with the installer and not the manufacturer.
The manufacturer is required to provide recommendations and guidelines for maintaining EMC compliance after installation and this is given in this guide.
The “ CE” mark and Manufacturer’s Declaration of Conformity on SEC control panels relate to compliance with the Low Voltage directive only.
The product standard for lift control panel is EN 12015 for emission and EN12016 for immunity and all SEC control panels have been tested for conformity with the various level s applicable under the standard.
Next normative references are used:
Emission: |
EN 55011 |
|
|
EN 55014 |
|
I mmunity: |
EN 61000 - 4 - 2 |
|
|
EN 61000 - 4 - 3 |
|
|
EN 61000 - 4 |
- 4 |
|
EN 61000 - 4 |
- 11 |
91 |
291 842 003 |
13.2. EMC COMPLIANT ELECTRICAL CABINET WIRING RULES
PANELS AND CABINETS
Mounting panel and cabinet ( including the doors ) have to be grounded, with a direct connection to the ground bus.
REMOVAL OF THE PAINT FROM THE SUPPORT AREAS
The paint should be removed from the mounting panel and chassis support areas.
WARNING Rheanodized aluminum does not conduct
GROUND TERMINALS OF THE CONTROL PANEL
SEC control panels are provided with two ground terminals (
MINIMAL DISTANCE BETWEEN SIGNAL AND POWER CABLES
The minimum distance between parallel signals and power cables is 30 cm. Possible crossings have to be made at 90o.
SHIELDING OF THE SUPPLY FOR AN AC MOTOR
The AC motors have to be supplied through a four pole shielded cable ( three phases plus a green/yellow ground wire), or though four unshielded cables, which are inserted inside a metal channel. It is important that a direct connection ( four cables ) between the panel grounding and the motor ground has been made and that the fourth cable had been inserted in a shield.
GROUND CONNECTION TO BOTH SIDES OF THE CABLE SHIELD ( AC MOTOR )
The shield of the supply cable of the AC motors must be grounded on both sides in order to obtain 360o contact, that means the whole shield. This can be accomplished using suitable metallic EMC cables press grounded at full 360o at the input of the cabinet and of the motor’s terminal strip. If this connection is not possible, the shielded cables should be brought inside the cabinet and connected with an omega connector to the mounting panel- The same must be done on the motor side. In case a 360o connection on the motor’s terminal strip is not possible, the shield must be grounded before entering into the terminal strip. This should be done on the metal support of the motor, using an omega connector. In case a metal duct has to be used, it should be grounded at full 360o where possible.
PIGTAIL AVOIDANCE
While grounding the shields of the cables, one has to use a 360o connection ( E.g. omega bus ) with a pigtail connection to be absolutely avoided. By pigtail is meant the connection to earth ground of the cable shield by means of an additional wire.
SUPPLY CABLES TO THE DC MOTORS
The supply cables of DC motor do not need to be shielded.
DIRECT CONNECTION BETWEEN THE GROUND BUS AND MOTOR CHASSIS
Independently from
MAXIMAL LENGTH OF THE AC MOTOR’S CABLES INSIDE THE CABINET
From the grounding of the screen side cabinet of the panel terminal strip, the supply’s cables have to measure 30 cm maximum.
ENCODER CABLES
The encoder cable must be shielded and grounded at the panel at a full 360o. The female connector on the inverter has been foreseen for that connection, therefore it is enough to have the cable shield connected at 360o in the conductive case of the male connector. In order to check that the shield is not connected on the motor side remove the encoder connector from the inverter and verify with a tester the presence of a high impedance between the shield and the metal case of the encoder or of the motor.
92 |
291 842 003 |
SEC ELECTRONI CS |
Neverke 30 6256 Košana, SLOVENI A |
tel: + + 386 5 753 2006 |
email: sec.electronics@siol.net |
fax: + + 386 5 753 2007 |
web: http: / / www .secelectro.com |
ISO 9001
|
Declaration of Conformity |
Manufacturer: |
SEC ELECTRONI CS |
|
Neverke 30 |
|
6256 KOSANA |
|
SLOVENI A |
Details of electrical equipment |
|
Model number: |
E - TYPE |
|
LI FT CONTROLLER PCB |
Harmonised |
|
Standard applied: |
EN 12016 |
|
EN 12015 |
and complies with the previsions of the following EC – Directive(s):
-73/ 23/ EEC modified by 93/ 68/ EEC and named Low Voltage Directive
CE marking from: |
2002 |
Authorised Signatory:
Name: |
Milan Samsa |
Position: |
Managing director |
Date of I ssue: |
01. 12. 2002 |
Place of I ssue: |
Neverke |
93 |
291 842 003 |