Hunting Lease Agreement Templates
Using a Hunting Lease Agreement is the safest way to secure the right to hunt on any private land. This involves a legal process wherein a landowner and hunter enter into a contract that discusses how the hunter should use the property.
Take note, however, that there are guidelines when using hunting leases, which are discussed on this page. If you’re already familiar with these concepts and have no questions whatsoever, feel free to skip to the free lease agreement form.
Build Your Document
Answer a few simple questions to make your document in minutes
Save and Print
Save progress and finish on any device, download and print anytime
Sign and Use
Your valid, lawyer-approved document is ready
Here are some terms you’ll need to familiarize yourself with:
- Hunter – (also known as “lessee”) rents a certain part of the property for hunting purposes.
- Landowner – (also known as “lessor”) owns the property and rents it out for the sole purpose of hunting.
- Property – usually a vast woodland. In the hunting lease agreement, the “property” will only describe an area or parcel of land, which the hunter can rent for a certain amount of time.
The wording found in the hunting lease agreement is quite similar to other contracts on this website. There are, however, special clauses that discuss safety concerns and other hunting arrangements.
When to use?
If you are hunting on private property— For those who will be hunting in National forests or parks, there is no need to write a hunting lease. Instead, some permits and licenses must be secured through a different process. Hunting Lease Agreements are solely for those who are interested in hunting on private woodlands or fields.
If your name is not included in the deed — Even if you are hunting on a property your family owns, it is still important to secure a hunting lease agreement to avoid any questions or misunderstandings.
Types of hunting lease
A hunting agreement can come in three types— daily, short-term, and long-term. The difference mainly lies on both the duration and set-up.
Daily Hunting Lease
Much like a day-tour, the landowner can accommodate different hunters on a per-day basis. However, he or she must provide additional services like a reception for walk-ins or guides so that hunters can acquaint themselves easily with the hunting grounds given the time restraint.
Short-Term Hunting Lease
These are the most preferred hunting leases because most hunting activities are seasonal. U.S. laws also specify an “open season” wherein hunting can be legal for certain animals.
Long-Term Hunting Lease
For some avid hunters who want to hunt anytime and do not want to write a new lease every season, a long-term lease is recommended. This can last for an entire year or any duration specified in the contract.
When using FormsPal’s template, there is no need to distinguish between the three. You may simply choose any of the applicable duration listed under “Section 4: Term.”
Pros and cons of leasing land for hunting
Opening lands for hunting comes with pros and cons, which are discussed below:
PROS
- It will give you extra income.
- You can take advantage of the vast land without building anything.
- Application for hunting can be done quickly, so anyone with a permit can rent the place.
CONS
- Safety will be a concern if your family is residing within the area.
- If you are also a hunter, you may no longer use the place anytime you want.
- You cannot strictly regulate hunters and they may venture out into restricted areas.
- Hunting is prone to injury, so you may need to provide immediate assistance.
- If you have crops in the area, they might be collateral damage if you rent out your land.
Keep in mind that safety and legal concerns are the biggest issues of hunting. Still, if you have proper documentation and permits, there is nothing to worry about.
How to set a price for a hunting lease
You may find a hunting lease calculator on huntinglocator.com. It computes the number of acres, species for hunting, and other factors to determine the value. If you are adding features of amenities (e.g. option to camp), you may also compute the additional cost.
On the other hand, you may determine the price by contacting hunting lease agents who can determine the value of different lands. One great thing about hiring an agent is that he or she can also assist you in the documentation and application processes. This will give you more opportunities to lease out the place. There is, however, payment for this type of assistance, which the lessor usually pays once a lease is signed.
How to find a hunting ground for lease?
To find areas available for a hunting lease, you may visit any listing website that specializes in hunting. Then, filter to it to your state, the species that you want to hunt, and preferred dates.
Aside from this, you may also ask local tour guides or tourism offices for the type of hunting ground you are looking for. If you are a member of a hunting club, you can also ask the veteran hunters for tips about the best areas.
How to obtain a hunting license?
Though requirements for a hunting license varies from state to state, the following are common requirements of local Department of Fish and Wildlife offices:
- A safety education course for hunting (certificate of completion as proof)
- Your old hunting license (for renewal)
- Minimal payment of license fees
- If you are bringing your own gun, you must bring some paperwork with you as proof of your right to carry firearms.
If you are unsure of the requirements, it is best to get more information from the state’s assigned officers. For landlords, you must check the hunter’s documents as listed above. This should be one of the top items in your to-do list, since you may be deemed responsible for the entire hunting activity.
General Hunting laws
Aside from following “open season” schedules, here are some of the general laws of hunting that are common to every state:
- Roads are off-limits for hunting whether it is where the game (animal) or the hunter is standing.
- You must tag all animals and declare their gender.
- A separate permit and lease agreement must be secured within private hunting grounds.
- You must check the species before hunting them. If you are keeping animals captive, check state laws on possession of animals.
- You must have a hunting license.
In general, it is important to re-visit the official hunting guidelines set by your state, since they also update it from time to time. If you are going to another state for hunting, you have to make time to read through their safety education pamphlets or materials because they may have more rules than your original state.
Hunting Lease Agreement Form Details
| Document Name | Hunting Lease Agreement Form |
| Other Name | Hunting Lease Contract |
| Avg. Time to Fill Out | 17 minutes |
| # of Fillable Fields | 97 |
| Available Formats | Adobe PDF |
Filling Out a Hunting Lease Agreement
Step 1 – Download the agreement template below.
Choose the file that is compatible with your computer:
- Hunting Lease Agreement Template – Open Office Format (.odt)
- Hunting Lease Agreement Template – Microsoft Office Format (.docx)
Step 2— Complete the opening paragraph.
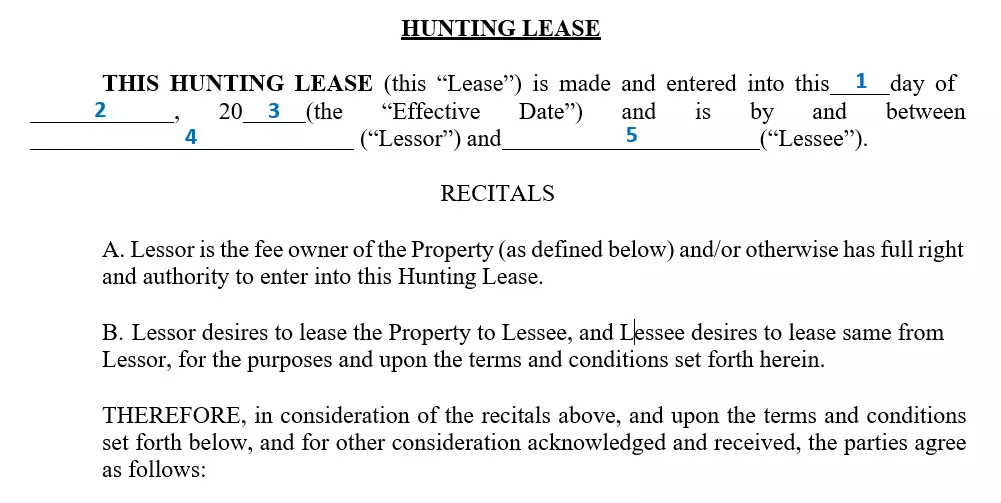
Type the following in their corresponding blanks:
Blank 1: Day of the month (e.g. “4th”)
Blank 2: Month in words (e.g. “January”)
Blank 3: Last two digits of the year (e.g. “2020”)
Blank 4: Full name of the landowner
Blank 5: Full name of the Hunter
Step 3— Describe the property.
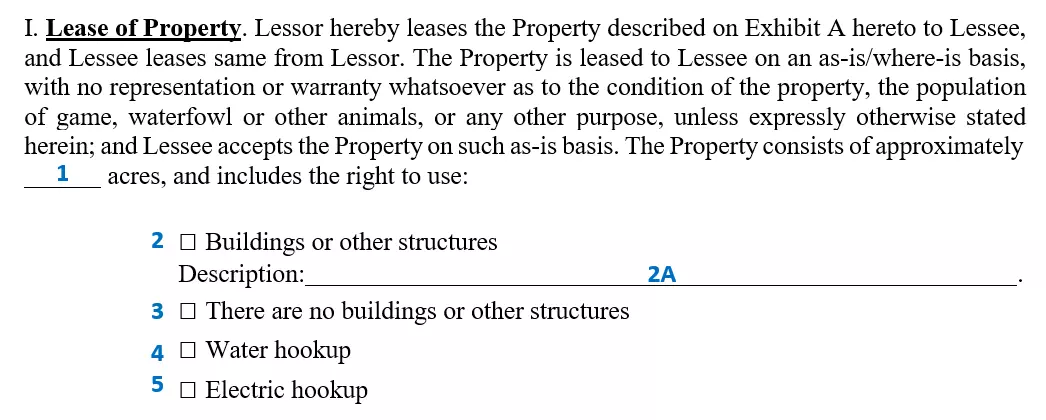
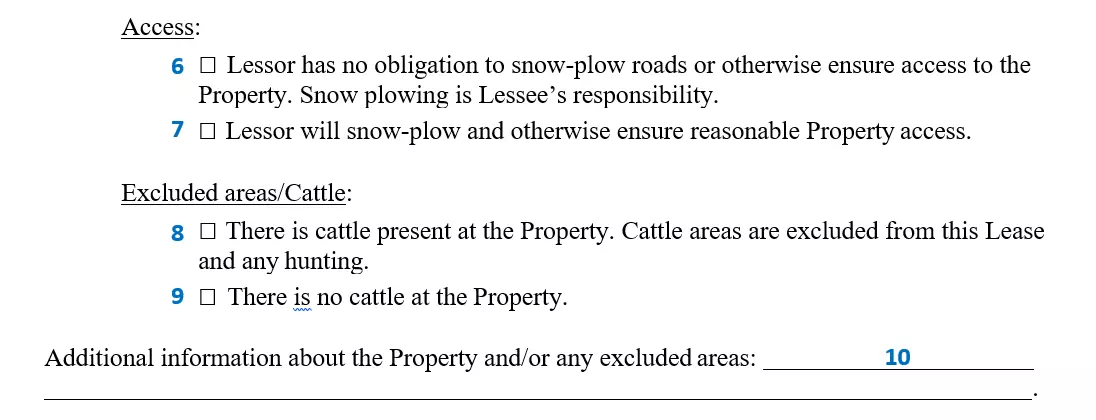
Write the measurement of acres (e.g. “3” acres) that will be rented on the first blank. Then, pick a check mark on other features or amenities of the property boxes 2 to 5). You may further describe other buildings or structures on the space provided (2A).
You may also provide or deny additional services (e.g. snow plowing) using boxes 6 and 7.
In addition, the lessor can also exclude certain animals from being hunted by ticking boxes 8 and 9.
On blank 10, you may then write additional conditions.
Step 4— Make the property exclusive or non-exclusive.
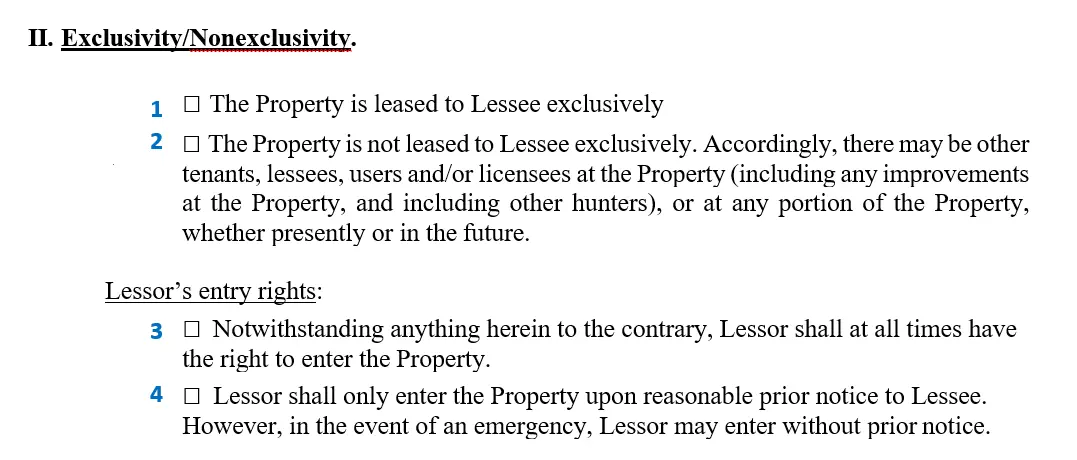
Boxes 1 and 2: Choose whether to make the hunting grounds exclusive or not.
Boxes 3 and 4: Determine if the lessor still has some rights over property usage. For safety purposes, it is important to make this agreement clear with the lessee, since one single mistake can lead to injuries. For example, the lessee is unaware of the presence of other people, he or she may think that the movement is coming from an animal.
Step 5— Add detailed conditions of use.

Determine which activities are permitted by ticking any of boxes 1 to 5. Describe the additional activity (if any) on the blank provided (5A).

Landowners may add any restrictions on blank 6 and indicate a maximum headcount of hunters on blank 7.

If the landlord and the hunter are under a long-term hunting lease agreement, additional guidelines can be determined by ticking boxes 8 to 12. This set-up would usually give the lessee more hunting rights.
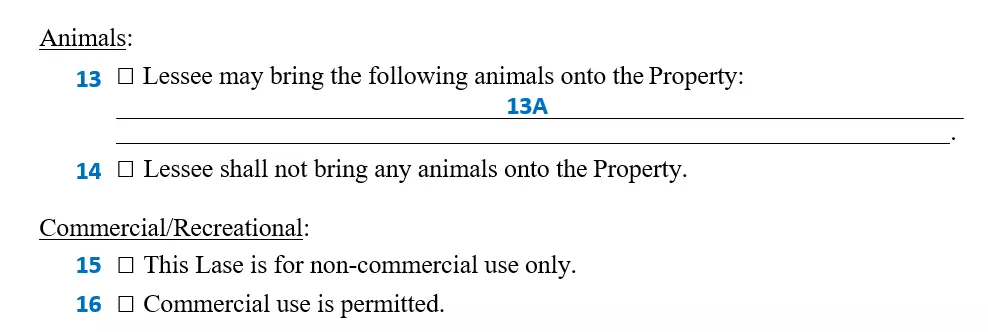
Tick box 13 if animals are allowed in the property with certain conditions set by the landowners on blank 13A. If they are not allowed, tick box 14.
By choosing between boxes 15 and 16, the hunter will be permitted to use the property for private activities only (box 15) or for business (box 16).
Step 6— Decide on the duration.
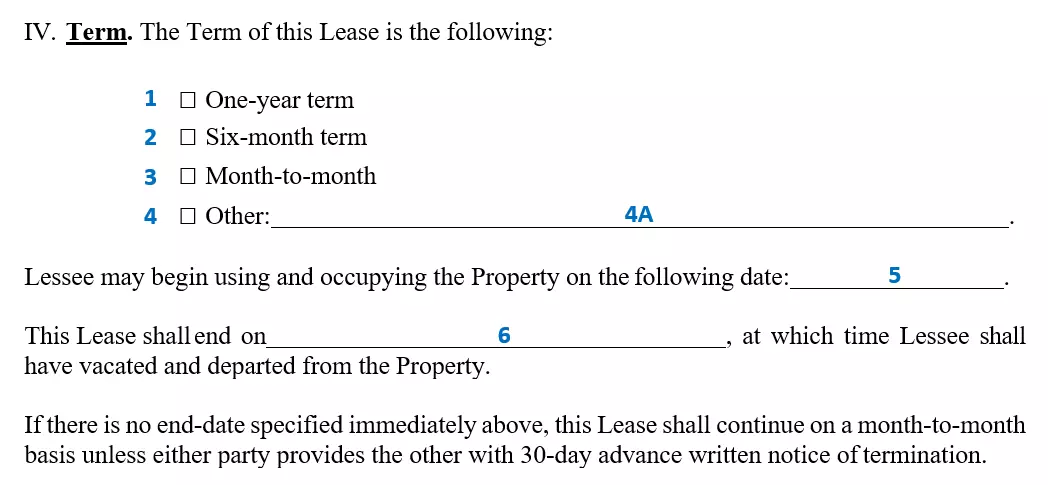
Select the duration by ticking any of boxes 1 to 3 of the template, or supplying another term on blank 4A.
On blank 5, write the date when the hunting lease begins.
On blank 6, write the date when the hunting lease ends.
Step 7— Finalize the financial aspect.

Type the following on the corresponding blanks of the template:
Blank 1: Total amount of lease per period
Blank 2: Write the period or frequency (e.g. “month” or “day”).
Blank 3: Write the deadline of payments. This can be a specific date for short-term rentals or a day in a month or week for long-term leases (e.g. “5th” of the month or “every Monday”).
Blank 4: Write an additional amount to be paid and indicate what type of fee it is.
Blank 5: Add the complete address or bank account details of the lessor.

If late fees are applicable, select box 6. Otherwise, tick box 7.

Boxes 8 and 9 discuss insurance premiums for hunters. Select the condition that is applicable.
Step 8— Complete the details about the security deposit.
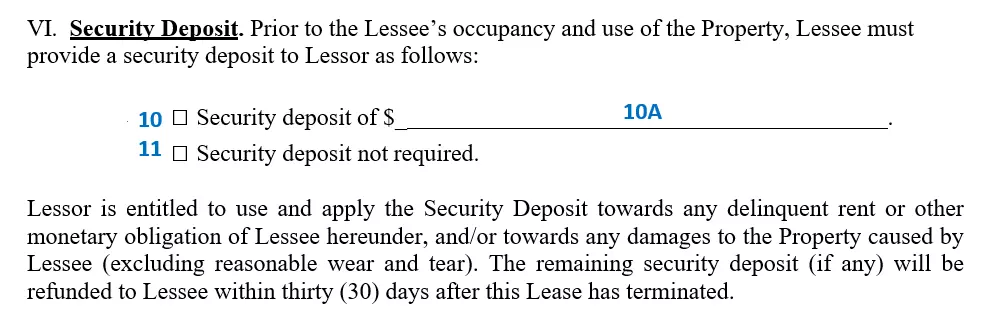
If a security deposit is required, select box 10 and write the amount on blank 10A. If this is not applicable, tick box 11.
Step 9— Further discuss hunting insurance.
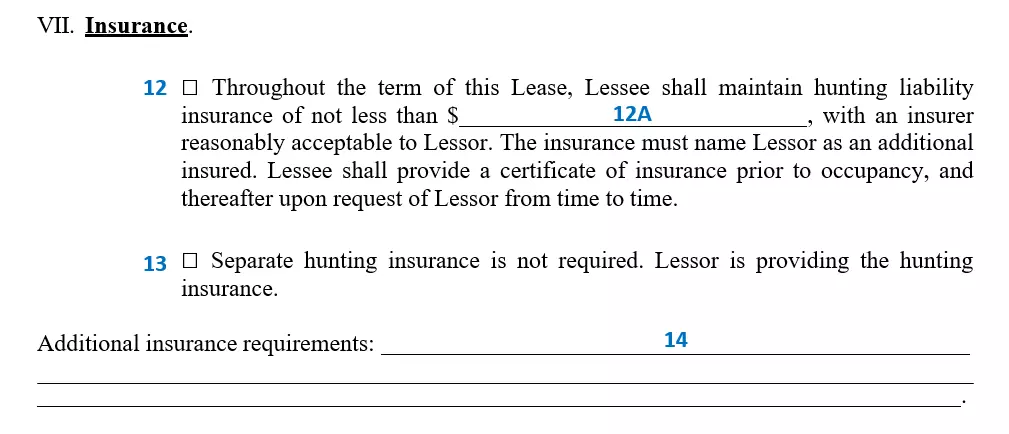
Based on section 5 (Rent) of the agreement, tick the box that applies. If there is no insurance provided by the landowner, select box 12. If the hunting insurance is provided and inclusive of the rent, select box 13. For blank 14, add any other requirements for insurance.
Step 10— Add the contact information.


Supply the complete details for blanks 1 to 8 of the agreement template. The first half (Lessor) is for the landowner’s contact details, while the second half (Lessee) asks for the hunter’s contact information. The lessor’s mobile phone must be reachable during hunting hours, in case there are any emergencies. Likewise, the lessee’s phone must also be with him or her during the hunt, especially if there is no guide and they get lost in the woods.
Step 11— Read the standard paragraphs.
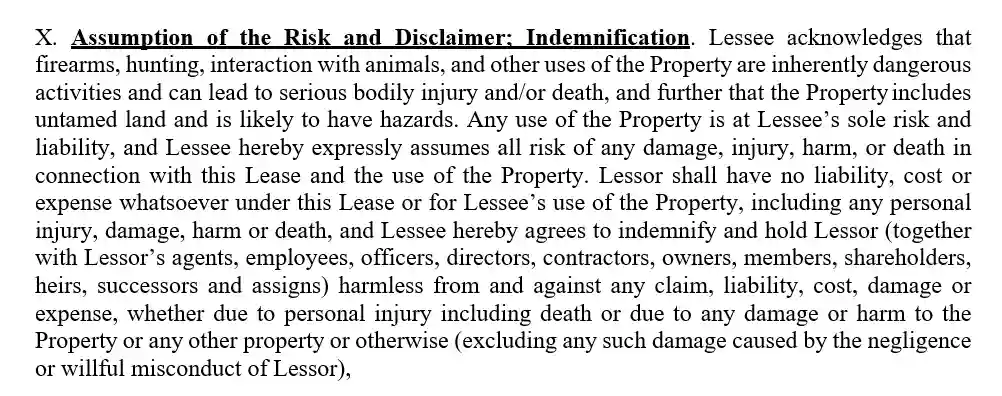
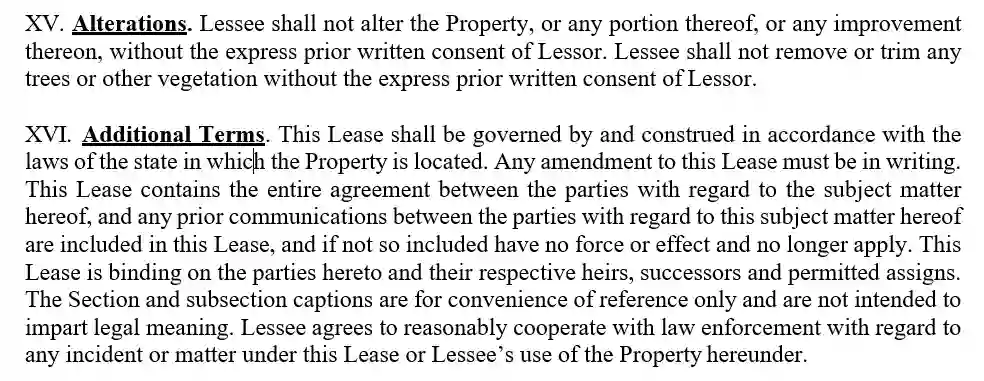
Sections 8, 10, 11, 15, and 16 are standard. Go through these with both the landowner’s and the hunter’s attorneys, so that you do not misunderstand any important terms of the agreement.


Step 12— Indicate if subletting is allowed.

If the landowner agrees to allow commercial use, this does not automatically mean that subletting or subleasing is allowed. Both parties must still agree if either box 1 (prohibited) or box 2 (permitted) will be applicable.
Step 13— Write the cure period.


In case any violation occurs, set a date when the problem must be resolved by writing a period next to box 1. If the cure period is not an issue, simply tick box 2.
Step 14— Formalize details about the broker’s fees.

Determine whether the landowner (box 1) or the lessee (box 2) is responsible for paying the broker’s fees.
Step 15— Add your own conditions.

If there is any additional condition, the landowner may type these out under section 17 of the document.
Step 16— Sign the hunting lease agreement.
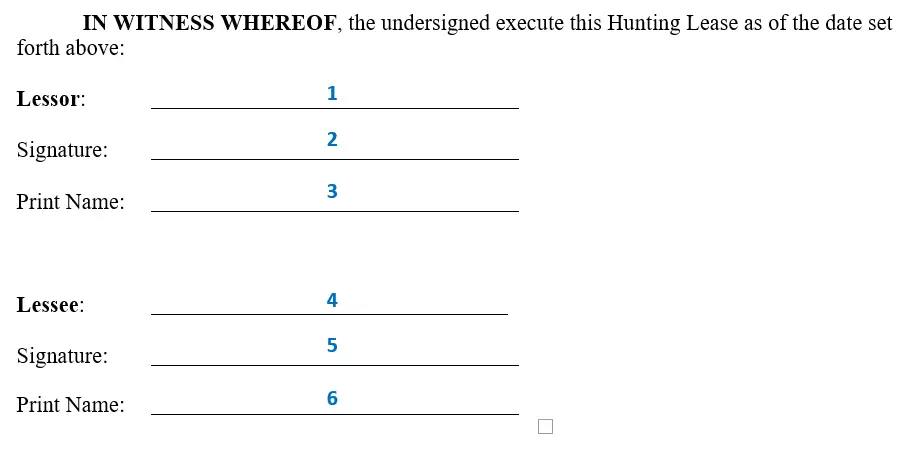
Supply the needed details. Make sure that both parties have signed on all pages of the agreement. Following this step, the document must be notarized so that it can be legally binding.
Step 17— Attach annexes.
The landlord may provide a description or map of the land for the hunter’s use. Likewise, the hunter may also provide a copy of his or her hunting license or permit in order for the landowner’s reference. Any relevant document may be added as an attachment, like an informal “Hunter’s Rights” pamphlet or official guidelines taken from the safety education program.
When writing a hunting lease agreement, both landowners and hunters must make sure that they abide by the provisions of the agreement as well as the state guidelines. This will help alleviate dangerous situations that can cause irreversible consequences. Aside from the hunting lease, the lessee must secure a hunting license. Otherwise, the lease agreement will be halted. Though hunting serves a recreational purpose, both parties must be careful since the negligence of state laws can lead to an unwanted situation. Of course, if each document is ready, hunters can have a good time exploring each of their leased acres of land while catching prized game.
