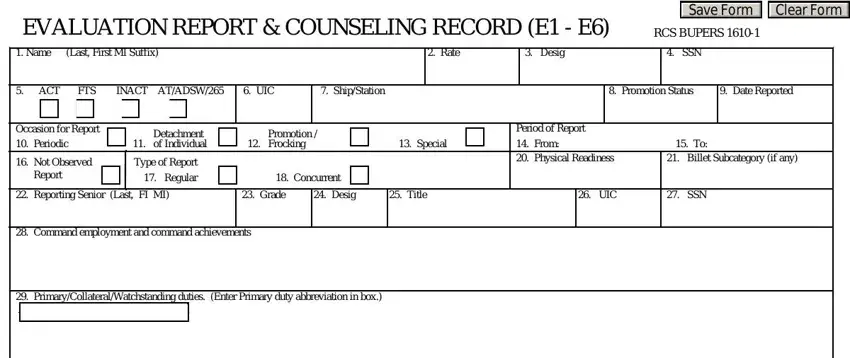
|
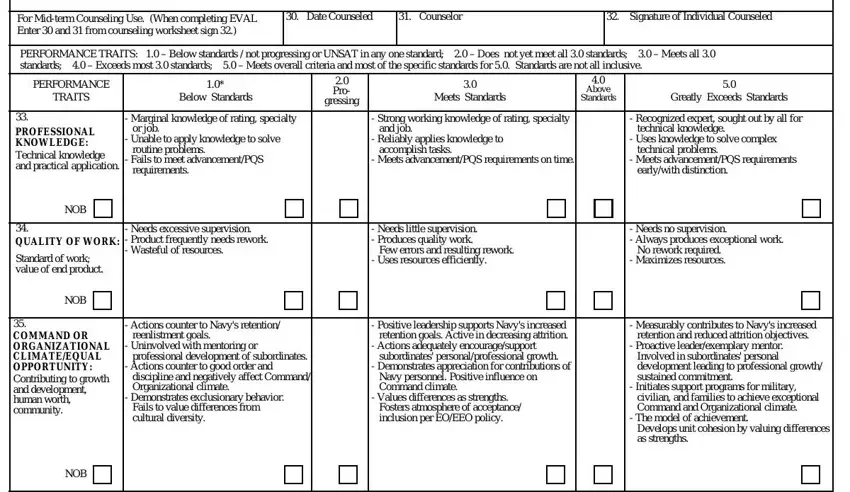
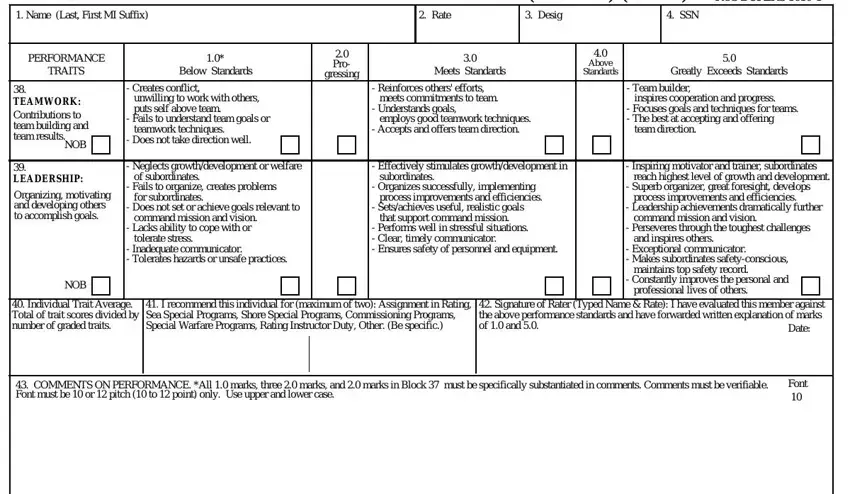
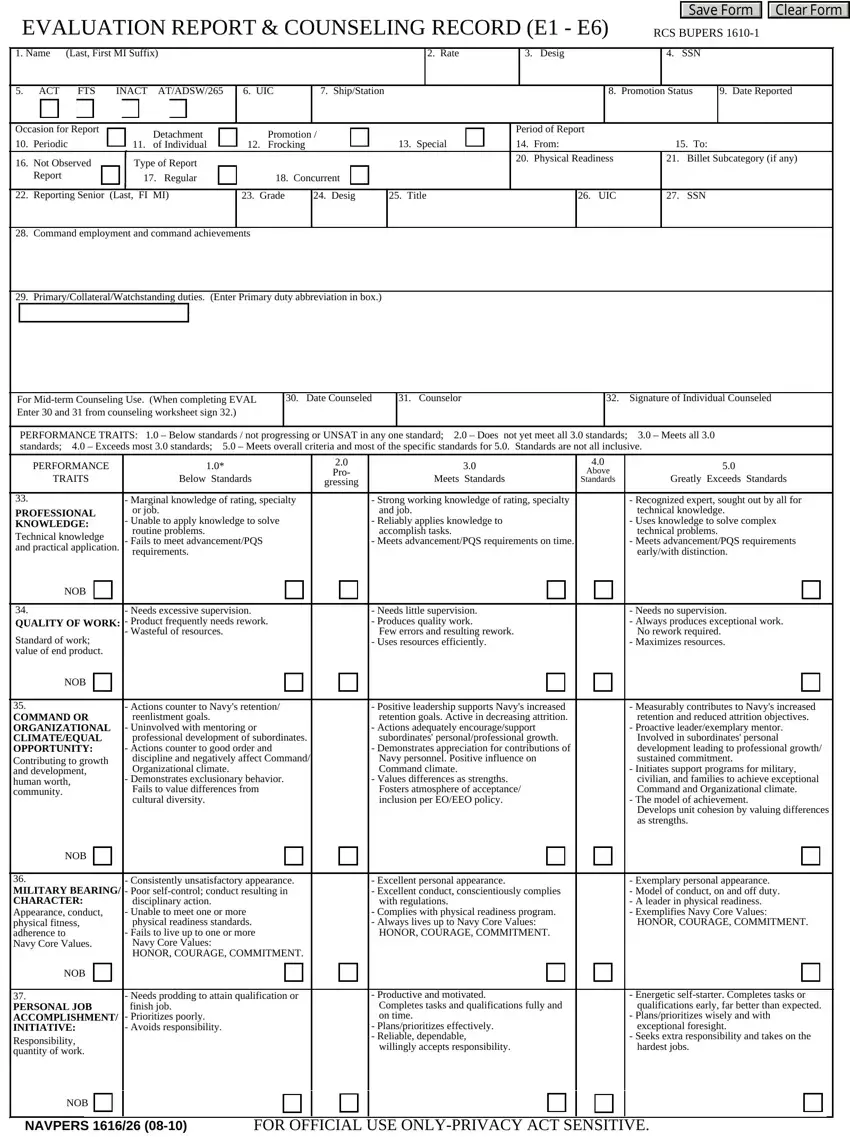
PERFORMANCE TRAITS: 1.0 – Below standards / not progressing or UNSAT in any one standard; 2.0 – Does not yet meet all 3.0 standards; |
3.0 – Meets all 3.0 |
|
standards; 4.0 – Exceeds most 3.0 standards; 5.0 – Meets overall criteria and most of the specific standards for 5.0. Standards are not all inclusive. |
|
PERFORMANCE |
1.0* |
|
|
2.0 |
|
3.0 |
|
|
4.0 |
|
5.0 |
|
|
|
|
|
Pro- |
|
|
Above |
|
|
|
TRAITS |
Below Standards |
Meets Standards |
Greatly Exceeds Standards |
|
gressing |
Standards |
|
|
|
|
|
|
|
|
|
|
|
|
|
|
|
|
|
|
|
|
|
|
|
|
|
|
|
|
|
|
|
|
|
33. |
|
|
|
|
- Marginal knowledge of rating, specialty |
|
|
|
- Strong working knowledge of rating, specialty |
|
|
|
- Recognized expert, sought out by all for |
|
PROFESSIONAL |
or job. |
|
|
|
and job. |
|
|
|
technical knowledge. |
|
KNOWLEDGE: |
- Unable to apply knowledge to solve |
|
|
|
- Reliably applies knowledge to |
|
|
|
- Uses knowledge to solve complex |
|
Technical knowledge |
routine problems. |
|
|
|
accomplish tasks. |
|
|
|
technical problems. |
|
- Fails to meet advancement/PQS |
|
|
|
- Meets advancement/PQS requirements on time. |
|
|
|
- Meets advancement/PQS requirements |
|
and practical application. |
|
|
|
|
|
|
|
|
|
|
|
|
requirements. |
|
|
|
|
|
|
|
|
|
early/with distinction. |
|
|
|
|
|
|
|
|
|
|
|
|
|
|
|
|
|
|
|
|
|
|
NOB |
|
|
|
|
|
|
|
|
|
|
|
|
|
|
|
|
|
|
|
|
|
|
|
|
|
|
|
|
|
|
|
|
34. |
|
|
|
|
- Needs excessive supervision. |
|
|
|
- Needs little supervision. |
|
|
|
- Needs no supervision. |
|
QUALITY OF WORK: |
- Product frequently needs rework. |
|
|
|
- Produces quality work. |
|
|
|
- Always produces exceptional work. |
|
Standard of work; |
- Wasteful of resources. |
|
|
|
Few errors and resulting rework. |
|
|
|
No rework required. |
|
|
|
|
|
|
|
- Uses resources efficiently. |
|
|
|
- Maximizes resources. |
|
value of end product. |
|
|
|
|
|
|
|
|
|
|
|
|
|
|
|
|
|
|
|
|
|
|
|
|
|
|
|
|
|
|
|
|
|
|
|
|
NOB |
|
|
|
|
|
|
|
|
|
|
|
|
|
|
|
|
|
|
|
|
|
|
|
|
|
|
|
|
|
|
|
|
|
35. |
|
|
|
|
- Actions counter to Navy's retention/ |
|
|
|
- Positive leadership supports Navy's increased |
|
|
|
- Measurably contributes to Navy's increased |
|
COMMAND OR |
reenlistment goals. |
|
|
|
retention goals. Active in decreasing attrition. |
|
|
|
retention and reduced attrition objectives. |
|
ORGANIZATIONAL |
- Uninvolved with mentoring or |
|
|
|
- Actions adequately encourage/support |
|
|
|
- Proactive leader/exemplary mentor. |
|
CLIMATE/EQUAL |
professional development of subordinates. |
|
|
|
subordinates' personal/professional growth. |
|
|
|
Involved in subordinates' personal |
|
OPPORTUNITY: |
- Actions counter to good order and |
|
|
|
- Demonstrates appreciation for contributions of |
|
|
|
development leading to professional growth/ |
|
Contributing to growth |
discipline and negatively affect Command/ |
|
|
|
Navy personnel. Positive influence on |
|
|
|
sustained commitment. |
|
and development, |
Organizational climate. |
|
|
|
Command climate. |
|
|
|
- Initiates support programs for military, |
|
human worth, |
- Demonstrates exclusionary behavior. |
|
|
|
- Values differences as strengths. |
|
|
|
civilian, and families to achieve exceptional |
|
community. |
Fails to value differences from |
|
|
|
Fosters atmosphere of acceptance/ |
|
|
|
Command and Organizational climate. |
|
|
|
|
|
|
cultural diversity. |
|
|
|
inclusion per EO/EEO policy. |
|
|
|
- The model of achievement. |
|
|
|
|
|
|
|
|
|
|
|
|
|
|
|
|
|
|
Develops unit cohesion by valuing differences |
|
|
|
|
|
|
|
|
|
|
|
|
|
|
|
|
|
|
as strengths. |
|
|
|
|
|
|
|
|
|
|
|
|
|
|
|
|
|
|
|
|
|
NOB |
|
|
|
|
|
|
|
|
|
|
|
|
|
|
|
|
|
|
|
|
|
|
|
|
|
|
|
|
|
|
|
|
|
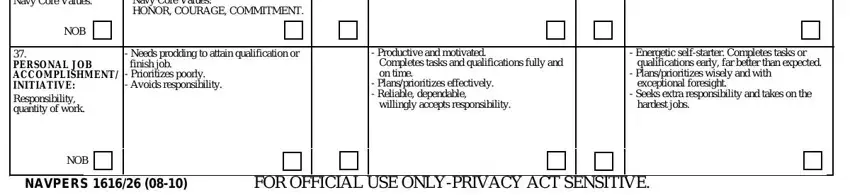
36. |
|
|
|
|
- Consistently unsatisfactory appearance. |
|
|
|
- Excellent personal appearance. |
|
|
|
- Exemplary personal appearance. |
|
MILITARY BEARING/ - Poor self-control; conduct resulting in |
|
|
|
- Excellent conduct, conscientiously complies |
|
|
|
- Model of conduct, on and off duty. |
|
CHARACTER: |
disciplinary action. |
|
|
|
with regulations. |
|
|
|
- A leader in physical readiness. |
|
Appearance, conduct, |
- Unable to meet one or more |
|
|
|
- Complies with physical readiness program. |
|
|
|
- Exemplifies Navy Core Values: |
|
physical fitness, |
physical readiness standards. |
|
|
|
- Always lives up to Navy Core Values: |
|
|
|
HONOR, COURAGE, COMMITMENT. |
|
adherence to |
- Fails to live up to one or more |
|
|
|
HONOR, COURAGE, COMMITMENT. |
|
|
|
|
|
|
|
Navy Core Values. |
Navy Core Values: |
|
|
|
|
|
|
|
|
|
|
|
|
|
|
|
|
|
|
HONOR, COURAGE, COMMITMENT. |
|
|
|
|
|
|
|
|
|
|
|
|
|
NOB |
|
|
|
|
|
|
|
|
|
|
|
|
|
|
|
|
|
|
|
|
|
|
|
|
|
|
|
|
|
|
|
|
|
37. |
|
|
|
|
- Needs prodding to attain qualification or |
|
|
|
- Productive and motivated. |
|
|
|
- Energetic self-starter. Completes tasks or |
|
PERSONAL JOB |
finish job. |
|
|
|
Completes tasks and qualifications fully and |
|
|
|
qualifications early, far better than expected. |
|
ACCOMPLISHMENT/ |
- Prioritizes poorly. |
|
|
|
on time. |
|
|
|
- Plans/prioritizes wisely and with |
|
INITIATIVE: |
- Avoids responsibility. |
|
|
|
- Plans/prioritizes effectively. |
|
|
|
exceptional foresight. |
|
Responsibility, |
|
|
|
|
|
|
- Reliable, dependable, |
|
|
|
- Seeks extra responsibility and takes on the |
|
|
|
|
|
|
|
willingly accepts responsibility. |
|
|
|
hardest jobs. |
|
quantity of work. |
|
|
|
|
|
|
|
|
|
|
|
|
|
|
|
|
|
|
|
|
|
|
|
|
|

 Clear Form