Yardi Voyager 6.0 Procedures Guide
Version 3: 2012.
Yardi Developments
Procedures Guide
Version 3: 2013.0424
1
Contents |
|
PAYABLES |
3 |
Vendor Overview |
3 |
Vendor Lookup |
3 |
Adding a New Vendor |
5 |
Vendor Ledger |
8 |
Payables Batch Processing |
10 |
Create Payable Batch |
10 |
Invoice Entry |
10 |
Distribute Payable Function |
12 |
Recording Manual Checks, Wires, Electronic Payments from Invoice |
13 |
Edit / Review / Post Payable Batch |
14 |
Batch Errors |
16 |
Review Payable |
16 |
Reversing Payables |
17 |
Pay Retention |
19 |
Check Writing |
20 |
Setup |
20 |
Approve Payables |
20 |
Process Checks |
21 |
Rewrite Checks |
23 |
Review Check |
24 |
Void Check |
25 |
2
ItPAYABLESwill be the Property Manager’s responsibility to perform the accounts payable function of vendor set up, entering invoices for payment, and cutting/signing checks. This section provides a tutorial of the accounts payable function.
Vendor Overview
The Vendor screen in Voyager is used to store all vendor related data such as name and address, 1099 information, discount and payment terms. A vendor must be created for any company or individual who will receive a payment out of the system. Each Vendor will maintain their own detailed ledger of payments, credits and adjustments. Vendors may be shared across properties or limited to a single property.
TIP: Prior to setting up a new vendor, make sure that the vendor does not already
exist by performing a vendor lookup, searching by company name or other information provided on theAnW-9additionalform. IIT vendor needs to be set up to be used as the remittance
IIT Tip:
address on Tenant Billing Statements.
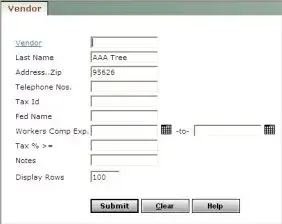
Vendor Lookup
Use the review vendor filter to access a single vendor record, a group of vendors, or all vendors. To review the vendor listing or to search for a specific vendor by name, address or other criteria, select:
Payables>Vendor>Review Vendor
EXAMPLE OF REVIEW VENDOR FILTER
3
Lookup Options:
Todepotview all vendors, click the CLEAR button on the filter, and then click SUBMIT.
To view vendors by name, enter all or part of the name in the Last Name field. For example, will locate Office Depot; Home Depot, etc.
Vendors can be filtered by City, Zip Code, Telephone Number, etc. by entering all or part of the information in the filter field.
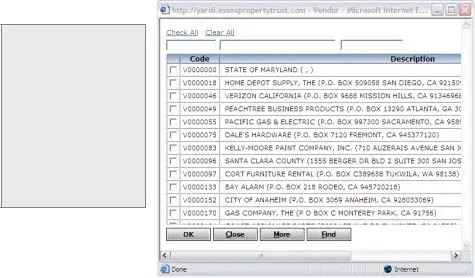
To search for a specific vendor before submitting the request, click the Vendor link to view the lookup list.
SEARCH FIELDS 1 Vendor Code -OR 2 Vendor Name -OR 3 City, State or Zip
Enter search text in the desired field, and then click the
FIND button.
EXAMPLE OF VENDOR LOOKUP LIST
To select a vendor or vendors, click the checkbox next to the vendor code. Click OK. To view more records (in a long list of results) in the alphabetical listing, scroll to the
bottom of the list, then click the MORE button.
To close the list and return to the filter, click the CLOSE button. |
|
BEGINNING with the ext entered. For example, Smith will automatically return |
vendors such as Smith Brothers and Smith & Sons , but will NOT return results for |
TIP: The search text en ered in fields 1, 2 or 3 will search for any vendors |
|
Cohen, Smith and Turner Associates . To locate a vendor CONTAINING Smith |
|
*Smith . |
anywhere |
in the name, use the asterisk (WILDCARD SEARCH) before the search text, for example: |
To search by othderalcriteria,ID, entersuchtheasVendor’si suranceTaxexpirationID numberdate,inthennotes,TaxfederalID fieldtax. id number,
enter the data into the appropriate search field on the filter, click submit. For example to search on Fe
Click SUBMIT.
4
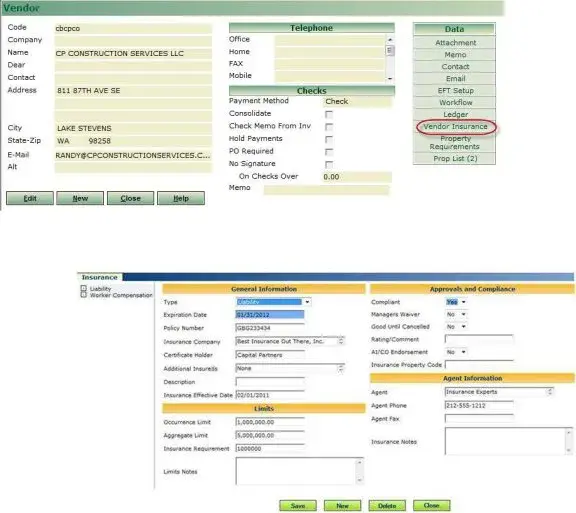
Adding a New Vendor
Payables>Vendor>Add Vendor
 EXAMPLE OF VENDOR SCREEN
DATA ENTRY STEPS:
Enter the Vendor Code using coding convention policy at left.
Enter the Vendor Name. In the case of an indivdual, enter the last name; otherwise enter the business name.
Enter the Vendor Address, including City, State, and ZIP Code. Enter at minimum one Telephone Number for the vendor
Enter additional telephone numbers and Email Address if available
Check the Consolidate flag to write a single check for multiple open invoices
Enter expiration dates for Workers Compensation and Liability Insurance certificates.
For vendors receiving 1099 forms, fill out the Tax Information section from the current W- 9 form
Gets 1099
Tax Identification Number Federal Tax Name
CheckEnter anyContractorapplicablecheckNotesboxfortothewithholdvendorretentions(optional)
Click SAVE
5
Enter Vendor’s Insurance Requirements
TIP: If insurance is expired, an invoice can be entered, but a check will not process until the insurance information is updated.
DATA ENTRY STEPS:
To enter or update the insurance certificate expiration, click on the Vendor Insurance link from the Vendor screen.
EXAMPLE OF VENDOR SCREEN
The Insurance screen will open:
EXAMPLE OF INSURANCE SCREEN
Type: Select from drop down
Expiration Date: Enter the expiration date
Compliant: Select Yes or No
Complete all additional fields as appropriate
Click SAVE
Click New to create additional records and repeat steps as needed, or click Close when complete.
Vendor Screen Navigation
Vendor List |
Vendor Screen |
Vendor Data Links |
EXAMPLE OF VENDOR SCREEN WITH VENDOR LIST AT LEFT
Vendor Navigation Tips:
Click a vendor code/name on the vendor list on the left to load it to the screen
To edit information on the vendor screen, click directly in the field and enter the information.
Click SAVE to save any changes made to the vendor information screen
Click NEW to add a new vendor.
TIP: Not all users will have the ability to add or edit vendor information.
Vendor Data Links: |
|
|
|
Attachment |
To add attachments to the selected vendor |
|
Memo |
To add memos to the selected vendor. |
|
Ledger |
To print vendor ledger to the selected vendor. |
|
|
Prop List |
View / Add properties codes to the selected vendor for |
vendor/property security
To quickly return to the Vendor Filter from the Vendor screen and change your search, click the BACK button in Internet Explorer.
EXAMPLE OF INTERNET EXPLORER BACK BUTTON
To exit the Vendor screen completely, click the Home link.
7
To switch between the menu and the lookup list, click the Menu/Search Results tab found on the bottom of the vendor list.
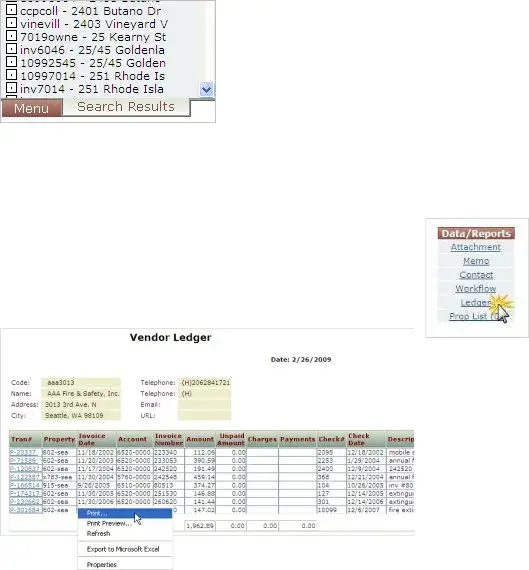
Vendor Ledger |
|
To view a list of payables for the vendor, click the Ledger link |
found under |
the Data/Reports heading on the right side of the Vendor screen. |
|
EXAMPLE OF VENDOR LEDGER REPORT
Printing the Ledger:
Right click on the ledger, and then click PRINT.
Choose the desired printer from the pick list and click Print
8
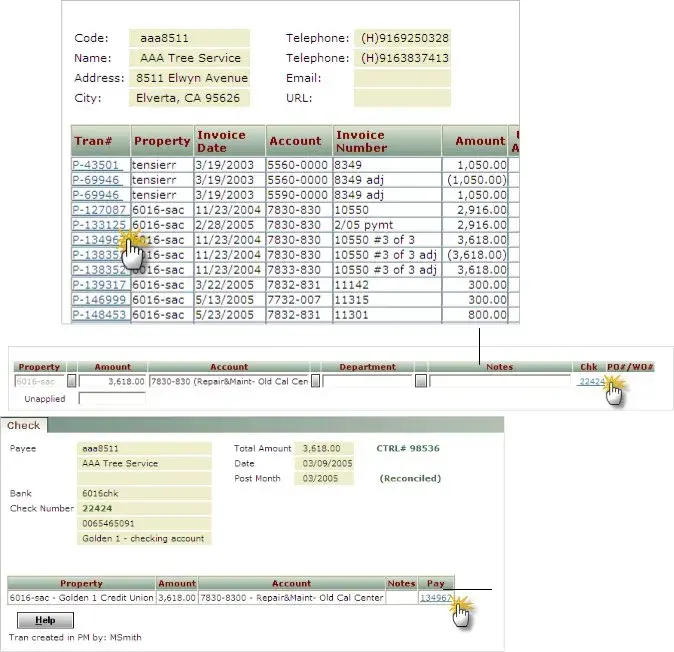
Viewing transactions from the ledger:
To drill down to payable transaction detail, click the Tran# link on the ledger report. Drill down to the check record from the payable screen by clicking the Chk link. Click the Pay link to return to the invoice screen.
|
Drill down from |
|
|
the Vendor |
|
|
Ledger to the |
|
|
invoice by |
|
Drill down from |
|
clicking the |
|
the invoice to |
|
|
|
|
Tran# link |
the check by |
|
|
|
clicking the Chk |
|
|
|
link |
Return to the invoice by clicking the Pay link
9
DATA ENTRY STEPS:
Payables Batch Processing
Create Payable Batch
In the Yardi Voyager program, invoices are entered into batches which can be saved, reviewed, and edited before they are posted to the General Ledger. A batch may contain one or more invoices. Before a batch is created, invoices or invoice backup should be gathered, a count of the invoices, and a calculation of the total amount of the invoices to be entered should be noted. To begin a new batch, select:
SIDE MENU: Payables>Create Batch
TIP: To
navigate backward between the fields, click
SHIFT-TAB.
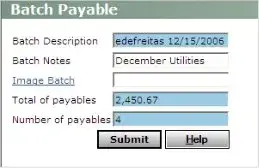
EXAMPLE OF PAYABLE BATCH HEADER SCREEN
The Batch Description automatically fills with the user’s ID and a date/time stamp – do not modify.
In the Batch Notes field, enter notes to identify the batch contents.
In the Total of Payables field, enter the total dollar value of the items to be input.
In the Number of Payables field, enter a count of the items to be input.
Click SUBMIT to proceed.
TIP: If an error is made on the batch total or count, this information can be corrected at any time before the batch is posted
Invoice Entry
Begin entering payables as shown below. Use the TAB key to navigate between fields, or use the mouse to click into the desired field.
10